

Paint isn’t always the best way to refresh a wood fence in Northern New Jersey. Stain lets the wood’s grain show, while paint creates a more opaque finish; sealing adds a protective layer. A fence can be stained when its wood moisture level is below 13%, so a fence staining and sealing company should account for that before work begins.
It makes sense to want a finish that looks right and helps protect your fence, whether it borders a home, business, or shared property. The best approach depends on the wood’s condition, the look you want, and the fence’s exposure to the elements. This guide explains how staining differs from painting, what preparation involves, and how stain and sealer can protect new and existing fences. You’ll also learn what affects the project and how to plan each step, from surface preparation to the finished coat.
Key Takeaways
- Choose a finish based on the wood’s condition and the look you want, from visible grain to a more opaque surface.
- Clean away dirt and organic buildup before staining, then let the fence dry thoroughly so the finish can adhere properly.
- New and weathered fences may need different preparation and stain approaches; the wood’s age and existing finish help guide the choice.
- Plan maintenance around the fence’s exposure and the surfaces being treated, since horizontal and vertical areas can wear differently.
- Residential and commercial projects both benefit from a clear process that considers the fence’s use, condition, and surrounding property.
What's the difference between staining and painting a fence?
Stain colors wood while leaving more of its grain visible; paint creates a more opaque surface coating. Sealer focuses on protecting the wood, so the right combination depends on the fence’s condition, desired appearance, and exposure to rain and sun.
Moisture and Surface Preparation
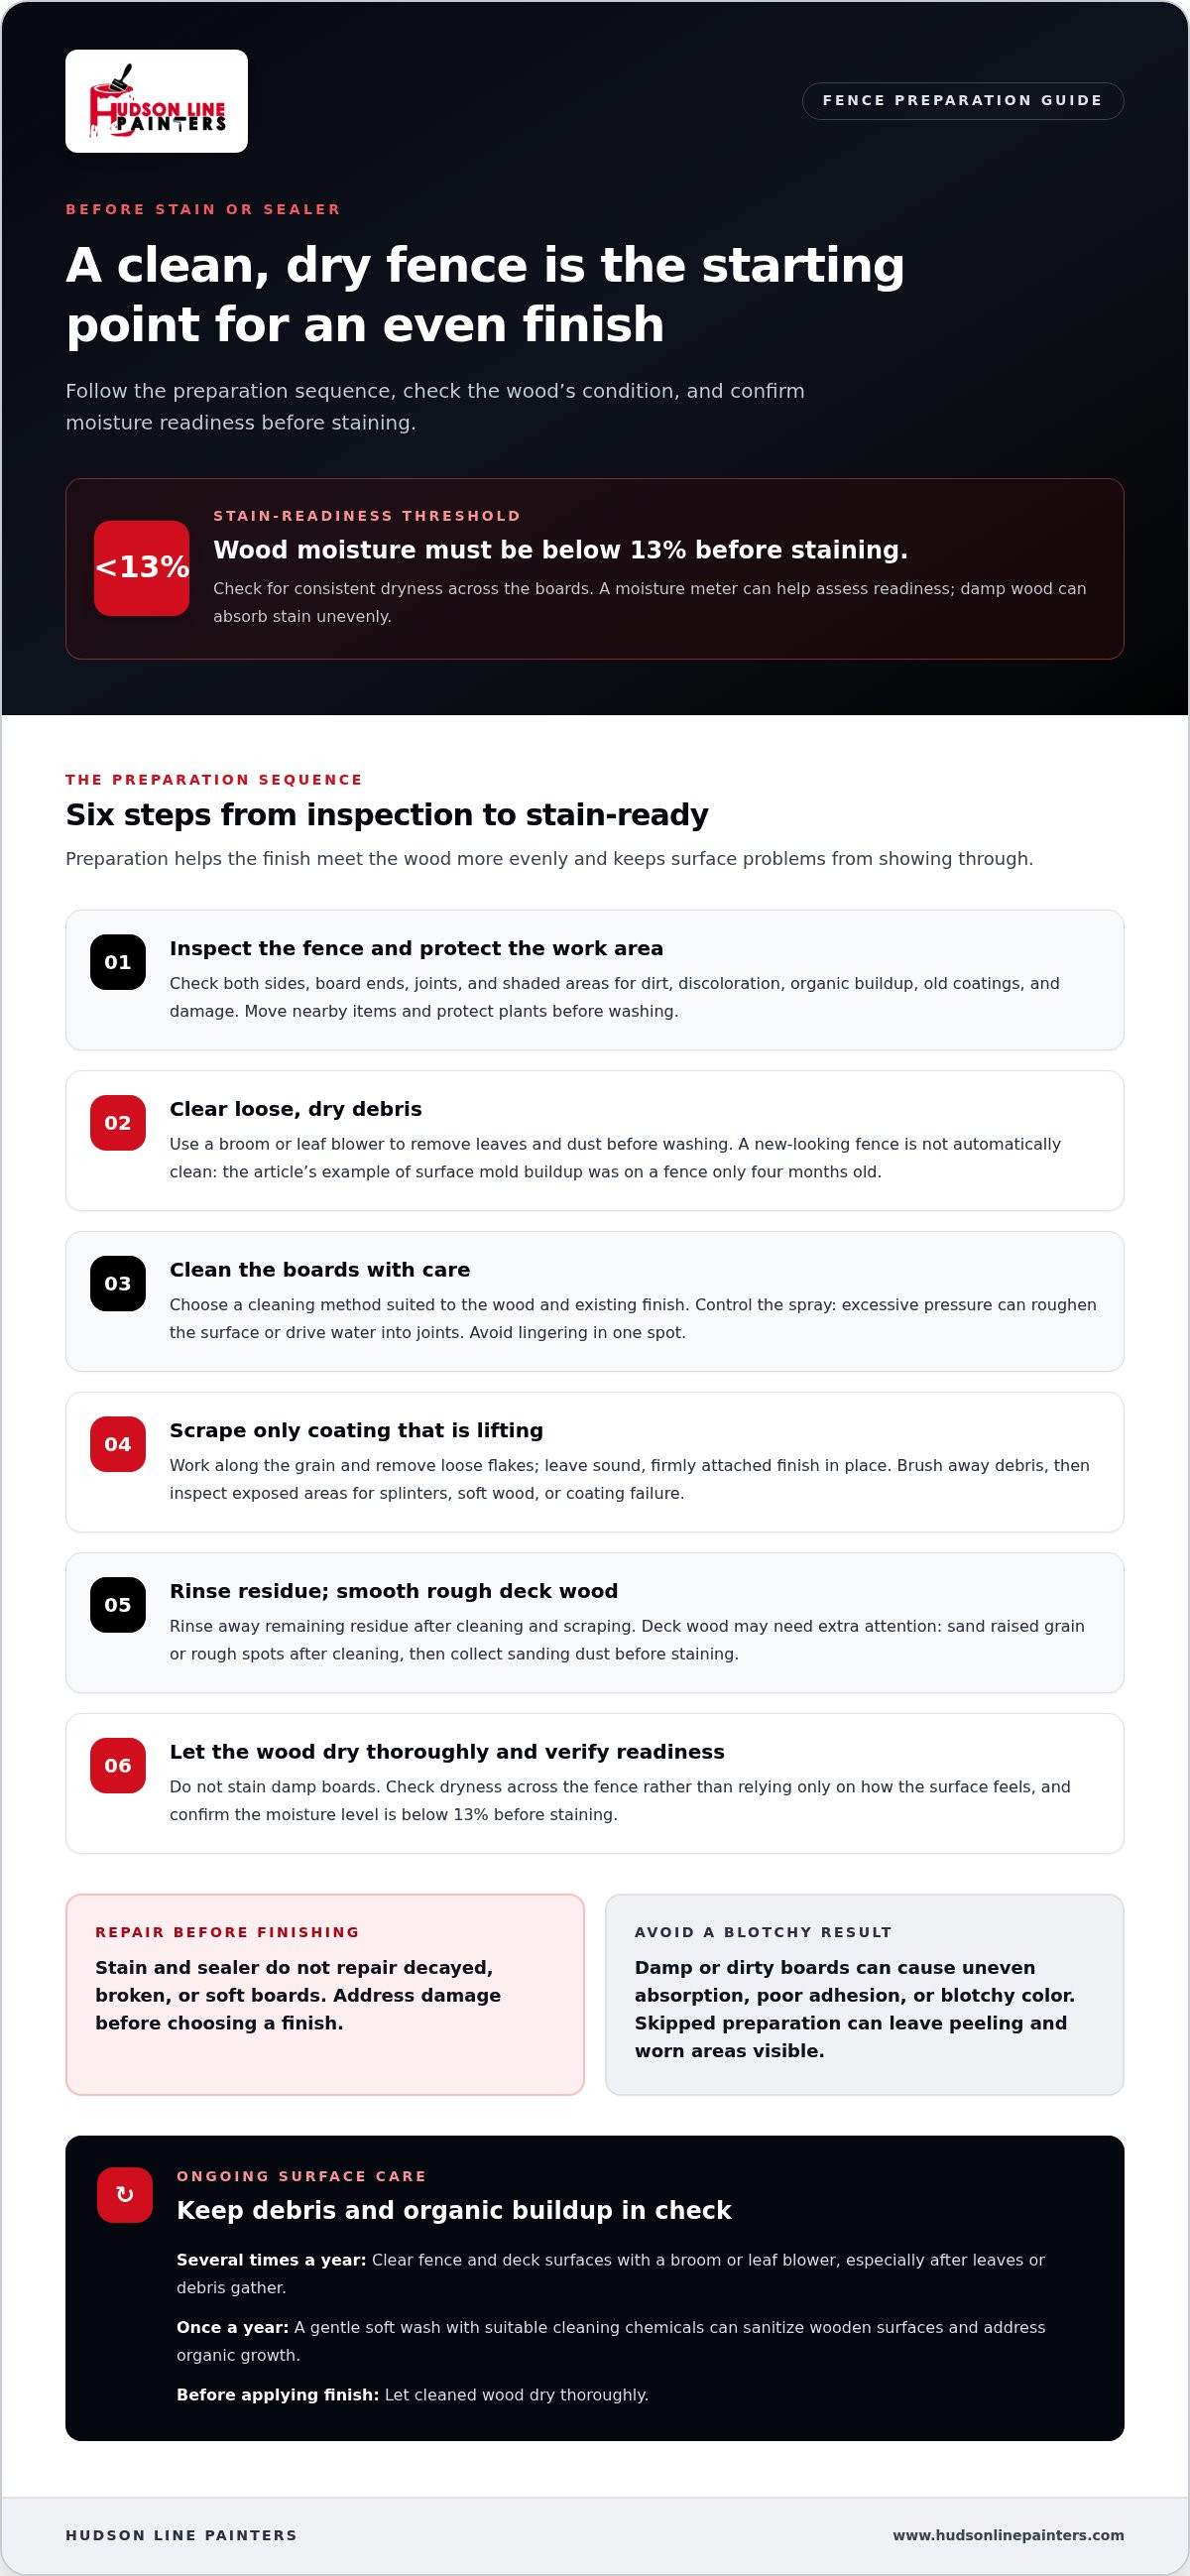
Moisture content affects whether wood is ready to accept stain. The wood moisture level must be below 13% before staining. A careful preparation sequence starts with checking for dirt, old coatings, peeling areas, and damage, then cleaning the fence and allowing it to dry. Staining damp wood can interfere with absorption and produce an uneven finish.
Look for consistent dryness across the boards rather than relying only on how the surface feels. A moisture meter can help assess readiness. Loose paint or a failing previous coating also needs attention; otherwise, a new finish may highlight rough patches instead of creating an even appearance.
Color and Wood Preservation
Stain options range from transparent finishes that show the grain to more opaque colors that conceal more of it. On cedar, a transparent or semi-transparent tone can preserve the wood’s distinctive appearance, while a darker, more opaque stain creates a different effect. Test a sample in an inconspicuous area because the wood’s existing tone affects the finished color.
Stain adds color and helps protect wood, while a compatible sealer adds another protective layer. Neither finish repairs decayed or broken boards. Inspect the fence before choosing a color, and address damaged sections first. A fence staining and sealing company should consider the wood’s condition when recommending a finish and preparation plan.
Outdoor and Weather Protection
Outdoor wood faces moisture, sunlight, and changing weather. A suitable stain helps limit weather-related wear while preserving the chosen appearance; sealing adds another layer of surface protection. The right combination depends on wood type, existing finish, and exposure. A fence in direct sun faces different conditions from one sheltered by a building.
Protection also depends on proper application. Follow product instructions for surface preparation, drying, and recoating rather than applying finish over damp or dirty boards. These steps support a lasting result, though no coating removes the need to inspect for wear.
How do fence staining and sealing compare? Staining adds color and can preserve visible grain, while sealing focuses on protecting the surface. Compatible products can be used together.
How can I compare fence staining companies and verify their credentials? Compare written scopes for cleaning, preparation, stain type, sealing, and cleanup. Ask for a clear explanation of the process and review relevant credentials and insurance documentation.
Are permits or HOA approval needed to stain or seal a fence? Requirements depend on local rules and the property’s HOA documents. Review them before changing the fence’s color or appearance.
What factors affect the cost of staining or sealing a fence? Fence length and height, wood condition, access, existing coatings, preparation, and finish coats affect the project scope. Additional cleaning or repairs can change the work involved.
What risks or problems can result from improper fence staining or sealing? Applying finish to damp or dirty boards can cause uneven absorption, poor adhesion, or blotchy color. Skipped preparation can leave peeling coatings and worn areas visible beneath the new finish.
Cleaning before stain and sealant application
Stain and sealer need a clean surface to meet the wood evenly. Dust, soil, mildew, and loose finish can block absorption or show through the new coat. Inspect both sides of the fence, including board ends, joints, and shaded areas where organic buildup may collect. Remove nearby items and protect plants before washing to keep the work area orderly.
Don’t assume a new fence is clean just because it looks fresh. A fence used as an example of surface mold buildup was only four months old. Check for discoloration, green or dark patches, and residue near the ground. Cleaning addresses surface growth, but soft or damaged boards need separate repair before a finish is applied.
Use a steady preparation sequence: remove loose debris, clean the boards, scrape areas where old coating is lifting, then rinse away remaining residue. A broom or leaf blower can clear dry leaves and dust. For built-up grime, use a cleaning method suited to the wood and existing finish. Excessive pressure can roughen the surface or drive water into joints, so control the spray and avoid lingering in one spot.
Scrape loose material rather than sound, firmly attached finish. Work along the grain, then brush away flakes so they don’t remain on the boards. Inspect the exposed area afterward. If scraping reveals splinters, soft wood, or a failed coating, address the issue before staining; otherwise, the new finish may highlight uneven patches instead of creating a consistent appearance.
Deck wood often needs additional attention after cleaning. Sand it smooth before staining, especially where cleaning raised the grain or left rough spots. Sanding removes small surface irregularities and helps create a more uniform appearance. Collect the sanding dust before applying stain, since leftover particles can interfere with an even finish.
Keep routine maintenance simple. Clear fence and deck surfaces with a broom or leaf blower several times a year, particularly after leaves or debris gather. A gentle soft wash with suitable cleaning chemicals once a year can sanitize wooden surfaces and address organic growth. Let cleaned wood dry before applying any stain or sealant.
Record areas needing repair and the existing finish before requesting an estimate. Note peeling sections, mold-prone shade, and any boards that need replacement. Those details help define preparation needs and protect the original wood where it remains sound. A premium result starts with appropriate cleaning, not simply a premium-looking stain. For help planning fence preparation and staining, discuss your fence project.
Do you stain new and existing fences in Northern New Jersey?
Yes. New and existing wood fences can be stained after their condition and preparation needs are assessed. New boards need a readiness check before finishing, while older boards may need cleaning, removal of failing coatings, or repairs. The work plan should reflect the actual fence rather than assume every surface needs the same treatment.
For a new fence, inspect for construction residue, dirt, rough spots, and moisture. New wood can appear ready while still needing to dry before stain absorbs evenly. Choose a finish based on how much grain you want visible, then follow the product’s directions. A transparent stain and a more opaque color create different appearances.
An existing fence needs a closer review. Look for peeling stain, weathered boards, discoloration, and shaded areas that remain damp. Cleaning can remove surface contaminants, while scraping or sanding addresses loose coating and rough patches. Repair damaged boards before staining, because a coating won’t restore unsound wood. If matching an existing color matters, test a small, inconspicuous area first.
Homeowners and property managers in Hudson County, Union County, and Bergen County can prepare useful project details before requesting an estimate:
- Note the fence’s approximate length, height, material, and access points.
- Describe whether boards are new, previously stained, painted, or bare.
- Photograph peeling, cracked, or discolored sections that may need extra preparation.
- Share the desired appearance, such as visible grain or a more uniform color.
These details help define the scope of staining work. A clean, sound fence may need less preparation than one with peeling paint or damaged boards. A written plan can clarify which areas need cleaning, surface preparation, and stain application. Sealing is a separate finishing consideration; the suitable product and sequence depend on the selected stain and its directions.
Property layouts also shape preparation. A backyard privacy fence in Hoboken may have different access constraints from a commercial boundary in Hackensack. Identify gates, landscaping, paths, and nearby surfaces before work begins. Planning these details helps protect the work area and maintain a consistent appearance across treated sections.
Protection against seasonal and extreme weather
Weather protection depends on the fence’s exposure and the conditions during application. In Northern New Jersey, assess sun, rain, and shade before choosing a work window or finish.
Weather and Application Timing
Check the forecast and the stain manufacturer’s application instructions before work begins. Rain during application or drying can interfere with the finish, while damp boards may not absorb it evenly. Don’t choose a day based only on convenience. For example, postpone work if rain is expected during the product’s stated drying period.
Plan the sequence around the fence itself: clean it, allow it to dry, then apply stain and sealer under suitable conditions. Follow the label’s temperature and drying guidance, since products differ. Hudson Line Painters recommends keeping gates and nearby paths clear until the coating has dried as directed.
Sun and Weather Exposure
A wooden fence facing direct afternoon sun may weather differently from boards shaded by a building. Inspect both sides, plus exposed tops and end grain, where water can collect or sunlight can reach uncovered surfaces. Select a finish suited to the wood and desired appearance, then apply it evenly across the boards.
Stain and sealer add protection, but they don’t stop weathering permanently. Look for fading, a rough surface, or areas where water no longer beads after rain. These signs can indicate that a fence needs maintenance. Address worn sections before they develop into a larger finish problem.
Seasonal changes also affect how a fence looks and feels. After a dry stretch, boards may show checking or small surface cracks; after wet weather, shaded areas may stay damp longer. Inspect the fence after these conditions rather than assuming every section wears at the same rate. A sunny corner and a sheltered gate can need different attention.
- Note which sections receive direct sunlight and which remain shaded.
- Check board tops, joints, and posts for water exposure or worn finish.
- Compare the color and surface texture of exposed boards with protected ones.
- Use the product label to guide application conditions and drying time.
These details help match the maintenance plan to actual exposure. Fading on a sun-facing run, for example, may need attention before a sheltered stretch shows similar wear. Regular inspections also help identify peeling, roughness, or uneven color early. Record the affected locations and finish condition, then plan the appropriate preparation and coating steps. This keeps seasonal care focused on the fence’s needs, not just the calendar.
Residential and commercial fence staining and sealing
Residential and commercial fences both need sound preparation, but their layouts and daily use can differ. A backyard privacy fence, for example, may prioritize color and screening, while a business perimeter may need a consistent finish across visible boundary sections.
Start with the structure. Inspect posts, rails, gates, board edges, and areas where wood meets soil or masonry. Note loose boards, rough surfaces, and failed coatings before planning stain and sealer work. This review separates finishing from repairs and helps define which sections need additional preparation.
For a home, map the fence by area: yard-facing boards, street-facing boards, gates, and shaded corners. This makes it easier to identify color differences and access constraints. For a commercial property, consider the full perimeter, entry points, loading areas, and pedestrian routes. A consistent plan can align the finished appearance across sections without overlooking high-traffic access points.
Work sequence matters on both property types. Clear the work area, protect nearby surfaces, prepare the wood, and apply the selected finish in a consistent direction. Keep gates and walkways usable only when the work sequence and product drying instructions allow it. A commercial site may need sections completed in stages to maintain access; a residence may need landscaping and patio furniture protected.
Use a scope checklist to compare what the project includes:
- Which fence runs, gates, and exposed sides will be treated.
- Whether cleaning, scraping, sanding, or board repairs are needed.
- Which stain appearance is desired, from visible grain to more uniform color.
- Whether sealing follows staining and how the finish will be applied.
- How surrounding plants, paths, and building surfaces will be protected.
A smooth, even result depends on treating details consistently. Board ends, gate frames, post caps, and transitions between old and new sections can absorb finish differently. Review these areas before application, then compare them with nearby boards as work progresses. On a business perimeter, this also helps preserve a unified appearance near entrances and customer-facing spaces.
After application, inspect the fence in daylight from both sides. Look for missed edges, uneven color, and finish buildup around joints. Keep a record of treated sections and their condition for future maintenance. A maintenance coat of stain is recommended every three years, with inspections helping identify wear between planned applications.
A residential or commercial fence staining project should suit the property’s use, access, and wood condition. A clear scope and section-by-section inspection help owners understand the work and maintain a consistent finish.
Hudson Line Painters: Interior Painting
Hudson Line Painters provides Deck & Fence Staining for property owners planning to refresh weathered or unfinished wood fencing. The project plan considers the fence’s condition, desired appearance, and preparation needs. A clear scope helps identify which sections need work and what finish best suits the property.
Hudson Line Painters also offers Interior Painting, Exterior Painting, and Kitchen Cabinet Refinishing for other home improvement projects. For fence staining, the team can discuss the work and the steps needed to prepare the wood for a finished appearance.
Contact Hudson Line Painters to discuss your fence staining project: reach out about your fence.
Make your next fence project easier to plan
A clear project brief can turn a broad idea into a practical next step. Before contacting a fence staining and sealing company, note which sections matter most, the appearance you want, and any access concerns around gates, paths, or landscaping. This gives the conversation a useful starting point without committing to a finish before the wood has been assessed.
Consider how the fence fits the property as a whole. A finish can complement nearby surfaces and help create a more cohesive outdoor space. If you’re also considering other home updates, grouping your priorities can help you plan the order of work and keep decisions organized.
Hudson Line Painters can discuss your project and help identify a practical next step for your property. Share the fence areas you want to address and the look you’re aiming for, then plan work that suits your home or business.
With a clear plan in hand, you’re ready to give your fence the attention it deserves.
Frequently Asked Questions
What stain colors do you offer?
Stain color depends on the finish selected and the wood’s natural tone. Transparent stains preserve more visible grain, while more opaque options create a stronger, more uniform color. Compare samples against the fence in its actual setting, including sunlit and shaded sections. This shows how the same color can appear different across the boards.
Can I just stain and seal parts of my fence, or do I need to treat the entire structure?
You can treat selected sections, but adjoining boards may show a noticeable difference in color and sheen. A partial project makes sense for a separate gate or distinct fence run. For a continuous boundary, assess the whole visible side first and decide whether the finish can blend. Keep a record of the stain used and treated areas to guide future touch-ups.
Do you seal wood too?
Yes, sealing can be included with wood finishing. Stain adds color, while a compatible sealer provides an additional protective layer. The right sequence depends on the products selected, so use finishes designed to work together and follow their application directions. For example, a transparent stain and clear sealer can preserve more of the wood’s appearance than an opaque finish.
How quickly can services be scheduled?
A start date is planned after the project scope, preparation needs, site access, and application conditions are established. A fence with clear access and little surface preparation has different scheduling needs from one requiring extensive scraping or repair. Weather also matters because the wood and finish need suitable conditions. Dates are approximations and may change due to unforeseen circumstances or weather.
How soon after my fence is installed can it be treated?
Treat new wood after its moisture level falls below 13%. Check readings across several boards, since exposure and airflow can leave some areas wetter than others. The stain product’s directions also guide application and drying. For a new fence, allow the moisture reading, not the installation date alone, to determine when treatment is appropriate.
Is there a best time of the year to stain?
Choose a period with suitable application and drying conditions rather than relying on a particular season. Check the product label for temperature, moisture, and weather guidance, then plan around rain and direct exposure during application. A dry stretch, for example, can be more useful than a calendar date if recent rain has left boards damp or the forecast threatens the drying window.
How often should a wood fence be stained or sealed?
Inspect the finish regularly and renew it when fading, peeling, roughness, or exposed wood becomes visible. A sunny fence line may show wear sooner than a sheltered section, so evaluate areas separately instead of assuming every board ages alike. Follow the chosen product’s maintenance directions, and note the application date and finish type to make future inspections more useful.
How do professionals prepare and stain or seal a fence?
Professionals assess the wood, existing finish, access, and areas needing repair, then select a preparation and coating plan. They protect nearby surfaces, clean and prepare the boards, and apply compatible finishes according to product directions. Before considering the work complete, inspect board edges, gate frames, and transitions for missed spots or uneven coverage. Recording the finish type helps with later maintenance.


