

Trim does more than make a room look finished: baseboards help protect the wall-floor joint, while door casings conceal the seams between a wall and door jamb. For baseboard and casing installation and painting, this difference affects how each piece meets the floor, where it is fastened, and how its edges are finished. Flooring sequence matters too: baseboards usually follow hardwood or cement flooring, but are typically installed over the subfloor before carpet.
It is easy to see trim as purely decorative, yet a good fit also helps cover gaps and create a clean transition between surfaces. This guide explains what baseboards and casings do, how to coordinate their installation and finish with flooring, and how to choose a brad nailer and nail length. You will also learn why coping can create a closer fit at an inside corner, helping the finished trim look considered from the floor up.
Key Takeaways
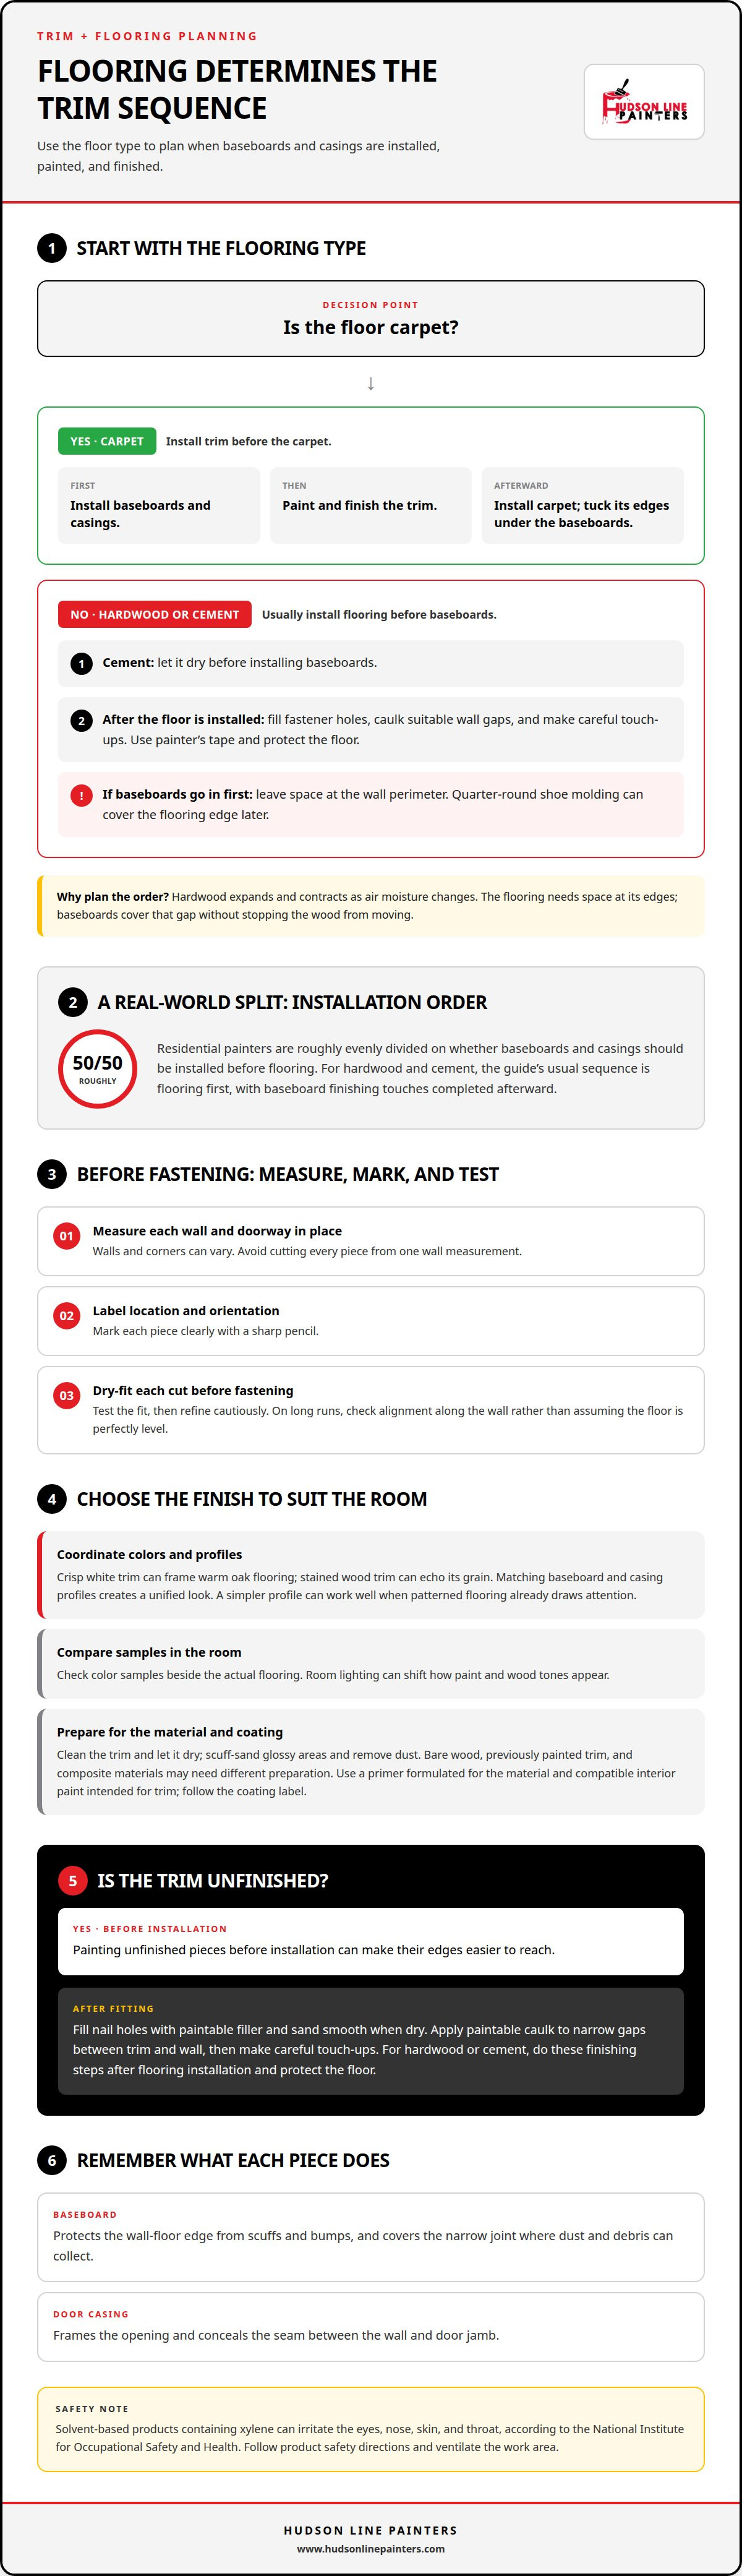
- Plan trim installation around the flooring: baseboards usually follow hardwood or cement flooring, while carpet is typically installed after the baseboards and casings are painted.
- Understand each piece’s role: baseboards protect the wall-floor edge, and door casings cover the joint between the wall and door jamb.
- Choose an 18-gauge brad nailer for trim work, then select nail length to suit the trim and the surface behind it.
- For a neat inside corner, start with a 45-degree cut and cope the profile to fit the adjoining piece.
- When estimating a trim project, consider the amount of installation, surface preparation, and painting involved.
1. Coordinating trim styles and colors with flooring
Plan baseboards, door casings, and flooring as one coordinated finish. For example, crisp white trim can frame warm oak flooring, while stained wood trim can echo its grain. Match casing and baseboard profiles for a unified look, or choose a simpler profile when patterned flooring already draws attention. Compare color samples beside the actual flooring, because room lighting can shift how paint and wood tones appear.
Flooring type determines the installation sequence. With hardwood or cement flooring, baseboards usually go on after the floor; cement must dry first. Carpet is typically installed after baseboards and casings, which are painted and finished beforehand. If baseboards go in before hardwood or cement, leave space at the wall perimeter rather than fitting flooring tightly against the trim. Quarter-round shoe molding can cover the edge after flooring is installed.
Paint trim before installation when pieces arrive unfinished and you want easier access to the edges. After fitting the trim, fill fastener holes, caulk suitable wall gaps, and apply careful touch-ups. For hardwood or cement, complete those finishing steps after flooring installation, using painter’s tape and care to protect the floor. This sequence helps prevent installation from damaging the final coat and avoids extensive brushwork beside finished flooring.
Measure each wall and doorway where the trim will sit, then mark each piece with its location and orientation. Dry-fit each cut before fastening it; walls and corners can vary, so measuring in place helps reveal small differences. Mark clearly with a sharp pencil, cut cautiously, then test the fit and refine it. For long runs, check alignment along the wall instead of assuming the floor is perfectly level.
Choose a primer formulated for the trim material and a compatible interior paint intended for trim. Bare wood, previously painted trim, and composite materials can need different preparation, so follow the coating label. Clean the surface, let it dry, scuff-sand glossy areas, and remove dust. Fill nail holes with paintable filler and sand smooth when dry. Before painting, apply paintable caulk to narrow gaps between the trim and wall.
Common mistakes include cutting every piece from one wall measurement, painting carpet-adjacent trim after carpet installation, and pressing flooring tightly against the wall. Protect hardwood with tape and careful tool placement. Solvent-based products containing xylene can irritate the eyes, nose, skin, and throat, according to the National Institute for Occupational Safety and Health; follow product safety directions and ventilate the work area.
Residential painters are roughly evenly divided on whether baseboards and casings should be installed before flooring: 50/50. The homeowner’s husband, a commercial general contractor, was accustomed to installing flooring before baseboards, reflecting one common sequence. For hardwood and cement flooring, address holes and finishing touches on baseboards and casings after the floors are installed, using painter’s tape and caution.
Baseboards also serve a practical purpose: they help protect walls from furniture scuffs and dents and keep dirt, debris, and excess water from accumulating at the wall-floor joint. Hardwood expands and contracts as air moisture changes, so installers leave space at the edges for baseboards and casings to cover. After carpet installation, the carpet edges can be tucked under the baseboards for a clean, finished appearance.
2. Baseboard and door casing functions
A baseboard forms a protective transition where the wall meets the floor. It helps guard painted drywall from furniture scuffs, vacuum bumps, and shoe marks. It also covers the narrow joint at the wall-floor edge, where dust and debris can collect. For example, a taller profile behind a sofa can shield more wall from occasional contact. The board’s lower edge should follow the floor closely without forcing flooring tightly against the wall.
Door casing serves a different purpose: it frames the opening and conceals the seam between the wall and door jamb. It can hide small installation gaps, exposed edges, and the joint around the frame. A consistent casing profile on nearby doors gives a hallway a considered look, while a distinctive casing can draw attention to an entry. The casing should sit evenly around the jamb, with clean joints at its top corners.
Hardwood changes size as air moisture changes, so installers leave space at its edges. Baseboards cover that expansion gap after the flooring is laid, while helping block dirt and moisture from entering the space. Trim does not stop the wood from moving; it conceals the open edge while allowing room behind it. A properly positioned baseboard is both a finish detail and a practical part of the floor-wall transition.
What types and sizes of baseboard and casing are best for different rooms and budgets? Choose profiles in proportion to the room and door scale: a simple, narrow profile suits an understated space, while a taller or more detailed profile creates a stronger frame. For a tighter budget, a straightforward stock profile can keep decorative complexity down. Prioritize a consistent finish and clean joints over elaborate shapes.
Do building codes or local rules apply to baseboard and casing installation? Requirements vary by jurisdiction and project, so no single trim size applies everywhere. Preserve door operation and any required opening clearances; trim must not interfere with how a door opens or closes.
Match the trim’s material and profile to its location. A busy family room may benefit from a durable, easy-to-clean painted baseboard, while stained casing can echo a wood door. Before fastening, position a short offcut against the wall and door jamb to see whether the profile covers the joint without crowding nearby details. Then inspect the full run for consistent height, secure contact, and aligned casing corners. These checks help each piece serve its protective or concealing role, not just decorate the room.
Door casings also conceal seams and joints between a wall and a door jamb, helping hide cracks, openings, and hardware. This makes those irregularities less visible around the finished opening.
3. Choosing a brad nailer and nail length
An 18-gauge brad nailer is a practical minimum for fastening baseboards and door casings. Its narrow brads leave smaller holes than heavier nails, which simplifies filling before paint. A typical 18-gauge nailer accepts brads from 5/8 inch to 2 inches long. That range covers many trim profiles, but the correct length depends on trim thickness and the material behind it.
Choose a brad long enough to pass through the trim and hold securely in the wall framing or other solid backing. A short brad may hold only the trim’s surface layer; an unnecessarily long one can extend beyond the backing or cause damage. For example, thin casing against a solid jamb needs a different length than thick baseboard installed over a gap. Test in a discreet spot and inspect the result before continuing.
Use an 18-gauge brad nailer for the main run, then place fasteners where they draw the trim snugly against the wall. Keep the tool aligned with the board, and avoid firing near an unsupported edge, where a brad could split the wood. The nailer is a common first choice for trim; one reported practice is to reach for it at least 95% of the time. Match the fastener to the material and fit, not habit alone.
For glued outside miters, 1.25-inch brads can provide additional reinforcement while the joint is assembled. They support the glued connection rather than replacing accurate cuts or adhesive. Position each brad so it helps pull the adjoining pieces together without breaking through the finished face. A test joint made from offcuts shows whether the fastener holds cleanly before the visible corner is assembled.
The basic installation and painting kit includes a tape measure, pencil, saw, 18-gauge brad nailer, compatible brads, adhesive for joints, filler, caulk, sandpaper, primer, and trim paint. A level helps assess the board’s line, while a hammer and nail set can address small adjustments. Keep a scrap piece nearby for testing nail depth before fastening finished trim.
Before loading the nailer, confirm that its magazine accepts the selected brad length and gauge. Set the depth on scrap, then fasten a short test piece. The brad should sit just below the surface, without crushing the wood around its entry. If the head stands proud, adjust the depth; if it sinks deeply, reduce the setting. Fill the small hole before applying the finish coat.
For routine baseboard fastening, choose brad length according to trim thickness and backing. Reserve 1.25-inch brads for reinforced glued outside miters when that length suits the pieces. An 18-gauge nailer’s 5/8-inch to 2-inch capacity offers flexibility, but careful test-firing and secure backing determine a neat, lasting fit.
4. Coping inside corners
A coped joint lets one baseboard profile fit over the face of another at an inside corner. Unlike two straight mitered ends, the visible edge follows the adjoining board’s shape. This can help disguise small variations where walls meet. Start by identifying which board will run continuously into the corner and which will meet it.
Cut the end of the meeting board at 45 degrees, as a starting cut for coping. That angled cut exposes the trim’s profile, giving you a clear line to follow. Use a coping saw to remove the waste behind the profile, keeping the blade near the cut edge. The goal is a shaped front edge, not a full-depth miter that leaves a visible gap.
- Fit the first board. Set one baseboard firmly into the corner, then fasten it in place. Its square-cut end gives the second piece a surface to meet.
- Mark the mating piece. Cut the second board’s end at 45 degrees. The cut reveals the profile line, including curves and small decorative ridges.
- Follow the profile. Saw along the visible edge, removing waste from behind the shaped face. Keep the cut controlled around tight curves so the front edge stays intact.
- Refine the edge. Use a file or sandpaper to remove rough fibers and adjust spots that prevent the joint from closing. Take off small amounts, then test the fit again.
- Dry-fit before fastening. Press the coped edge against the first board. Check the top, bottom, and detailed contours for gaps before securing the second piece.
A test fit is especially useful when the corner is not square. Place the coped piece against the installed board, then note where the edge rocks or stands away. Trim only those contact points with a coping saw or file. For example, if the upper profile touches but the lower edge gaps, remove a little material from the lower back edge and test again.
Keep the coping saw aligned with the profile rather than cutting straight through the board’s full thickness. A slight back bevel can help the front edge meet cleanly, because the rear edge clears the neighboring trim. Avoid removing too much material at once; an oversized cut can leave a gap that filler will not conceal neatly. Once the joint fits, fasten the board and fill its nail holes during finishing.
At a painted inside corner, the coped edge usually presents a neat face-to-profile connection. At a stained corner, careful sawing and sanding matter even more because filler may not blend with the wood grain. Use an offcut from the same trim to practice the 45-degree starting cut and coping motion before shaping the visible piece.
5. What factors affect baseboard and casing installation and painting prices?
The project price depends on its scope and is provided after a quote request. Key cost factors include trim quantity, profile complexity, material, existing surface condition, and the amount of preparation and painting required. A room with simple, continuous walls differs from one with several doorways, tight corners, and damaged trim.
Trim quantity affects materials and labor. Measurements follow the walls and openings receiving new baseboards or casings, while each doorway adds separate pieces and joints. For example, a hallway with several framed doorways requires more casing cuts than a plain wall of similar length. Long, uninterrupted runs require fewer corner transitions than rooms with alcoves or multiple wall returns.
Profile and material also shape the work. A flat, simple board is generally easier to cut and join than an ornate profile with several contours. Hardwood, paint-grade wood, and composite trim can require different handling and finishing. Matching existing trim may involve extra fitting if its profile or dimensions differ from current stock. A custom look can add careful cutting and alignment steps.
Existing conditions can affect preparation. Removing old trim, dealing with adhesive residue, or repairing damaged wall edges adds work before installation begins. Uneven walls may require more fitting to keep the trim visually aligned. For instance, a board that rocks against a bowed wall needs adjustment before fastening, while a clean, even surface needs less correction.
Painting scope matters too. Unfinished trim needs priming and finish coats; previously coated pieces may need cleaning, sanding, and touch-ups. Painting before installation can improve access to edges, while work after installation includes filling fastener holes and finishing joints. Floor protection and careful brushwork matter when hardwood is already installed. The trim’s condition determines how much surface preparation comes first.
Room access and project sequencing affect labor. Furniture, narrow work areas, and occupied rooms can make moving and positioning trim more involved. Carpet, hardwood, and cement flooring each call for a different installation sequence, affecting when finishing work happens. A project coordinated with new flooring may require separate installation and touch-up stages to protect finished surfaces.
To define the project scope, measure the walls and count door openings, then note trim removal, repairs, profile changes, and painting needs. These details help clarify the work rather than relying on room size alone. Include whether the trim is already purchased and whether existing surfaces need preparation.
Request a quote for interior painting
Hudson Line Painters
Hudson Line Painters can help with the painting and finishing that bring fitted baseboards and casings together with the room. Interior painting gives the trim a cohesive color and finish alongside the surrounding walls. Note whether the trim is new or previously painted and what preparation it needs, so the work can be planned around its condition.
If your project includes other interior surfaces, coordinating their finishes can create a consistent look throughout the space. Hudson Line Painters provides interior painting for residential and commercial clients, with careful attention to preparation and the finished appearance.
Plan the finish around the room
Before trim work begins, decide how you want the finished room to feel and how its details should work together. A clear plan for baseboard and casing installation and painting helps align trim choices with the broader interior, rather than treating each surface as a separate task. If the project extends beyond trim, Hudson Line Painters also offers interior and exterior painting and kitchen cabinet refinishing.
Bring together the details that shape the work, including the room’s flooring, existing trim, and desired finish. This gives the project a practical starting point and helps make the final look intentional. When you are ready to discuss next steps, contact Hudson Line Painters.
A thoughtful plan can turn small finishing details into a room that feels complete and cohesive.
Frequently Asked Questions
What are Baseboards and Door Casings?
Baseboards run along the bottom of walls, while door casings frame door openings. For example, a baseboard meets the floor around a bedroom, and casing outlines the sides and top of its doorway. These pieces also create visual transitions between surfaces. Their profiles can match for a consistent look or stay simple so another feature, such as a paneled door, stands out.
What are the steps to measure, cut, and install baseboards and door casing?
Measure each wall and doorway separately, label measurements by location, then cut and test-fit each piece before fastening it. For a doorway, account for both side casings and the top piece; test their joints together before fixing them in place. Keep a marked offcut nearby to check saw settings. After installation, inspect the joints from standing height, since small gaps can show more clearly along a finished hallway.
Is it better to paint trim before or after installation?
Painting before installation makes edges easier to reach, while painting afterward helps blend filled fastener holes and joints. The flooring schedule helps determine the sequence. For example, trim beside carpet is typically finished before carpet goes in, reducing the risk of paint reaching the pile. With a finished hard floor, install protection before touch-ups, and keep a small brush handy for marks revealed after fastening.


