

A clean-looking patch starts with the right repair, not just a fresh coat of paint. A drywall crack repair service should assess the damage, prepare and repair the affected area, and finish it to blend with the surrounding wall. If water is involved, address the moisture source and dry the cavity before repairing damaged drywall.
Choosing a repair professional can feel like a small decision until a crack reappears, a patch stands out, or a water stain returns. Look for a clear process that addresses the underlying damage as well as the visible surface. This guide explains what drywall repair can cover, including cracks, holes, uneven seams, water damage, and texture mismatches, and what to expect from patching and finishing. It also explains when a surface repair may be suitable and when signs of a larger issue call for closer attention, so you can make an informed choice for your home.
Key Takeaways
- Address the moisture source and let the affected area dry before repairing water-damaged drywall.
- Cracks, holes, dents, and ceiling damage call for repairs tailored to the affected area and existing finish.
- A seamless patch depends on careful preparation, taping, compound application, sanding, and texture matching.
- Bulging or poorly taped seams can need more than a surface touch-up; the repair process depends on what is causing the unevenness.
- Understand how the repair will be prepared and finished so the repaired area blends more naturally with the surrounding wall.
Do you handle water-damaged drywall?
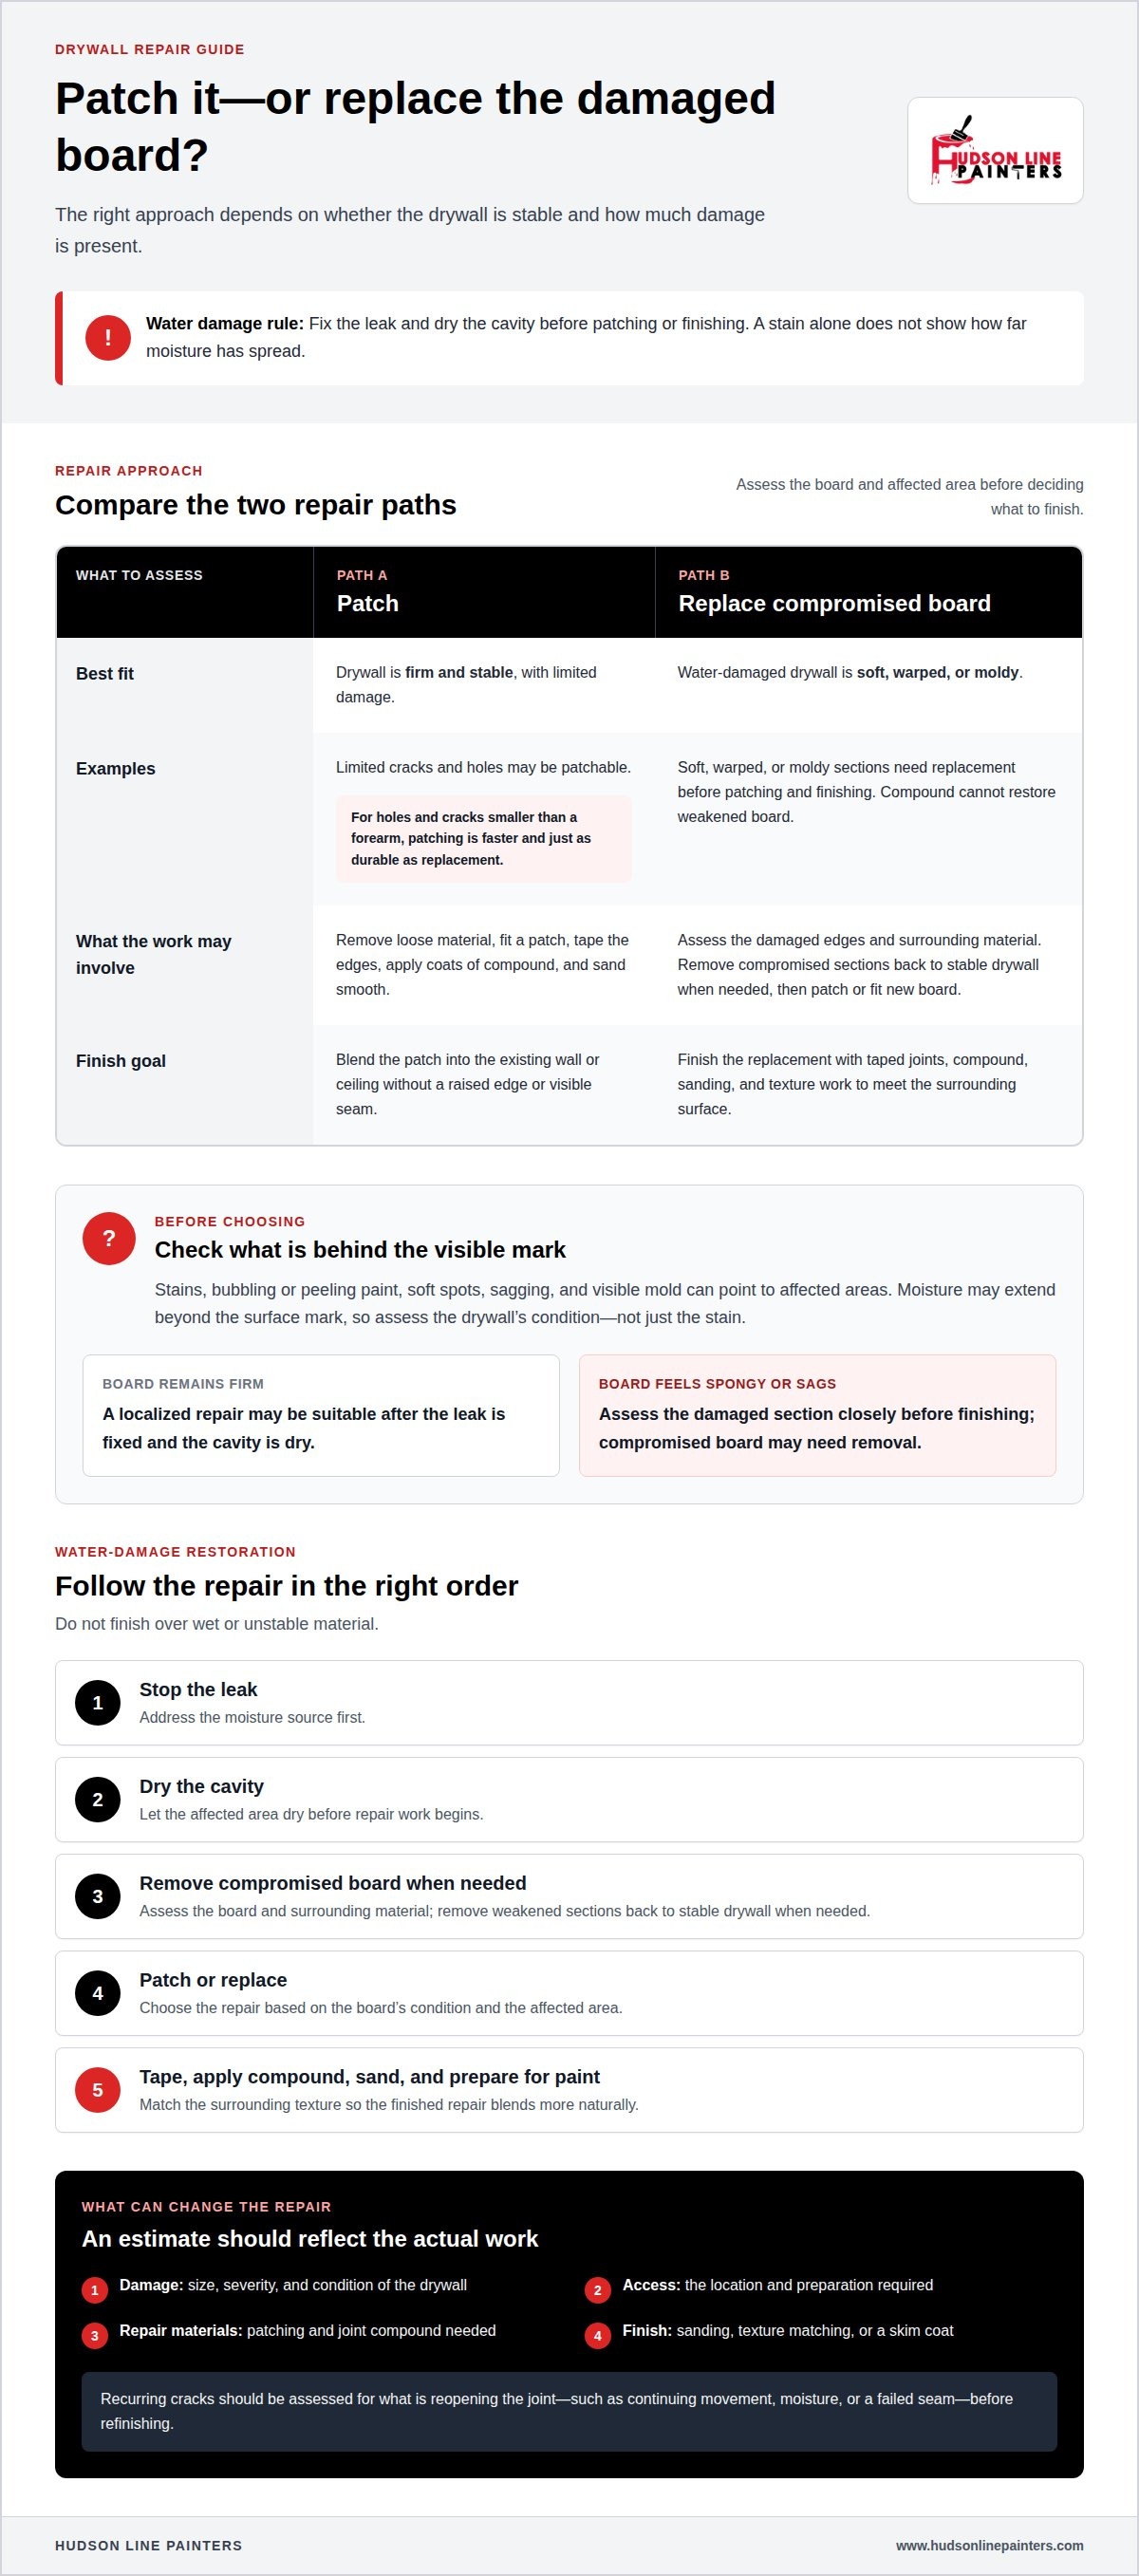
Yes. Repair water-damaged drywall only after the leak is fixed and the cavity is dry. The repair depends on whether the board remains firm or has softened, warped, or developed mold. A stain alone doesn’t show how far moisture has spread, so assess the affected area before patching or replacing the board.
Damage from Water Leaks
A roof leak, plumbing leak, or overflow can leave stains, bubbling or peeling paint, soft spots, sagging, or visible mold. These signs help identify affected walls and ceilings, but moisture can extend beyond the surface mark. First, address the leak. Then let the cavity dry before beginning repairs, so new finishing work does not cover damp material.
For example, a ceiling stain below a bathroom may not reveal the full extent of the damage. An estimate should consider the drywall’s condition and the affected area, not just the visible stain. If the board remains firm, a localized repair may be suitable. If it feels spongy or sags, assess the damaged section closely before finishing.
Patching or Replacing Damaged Drywall
Patching suits stable drywall with limited damage. For holes and cracks smaller than a forearm, patching is faster and just as durable as replacement. The process may include removing loose material, fitting a patch, taping its edges, and applying coats of compound before sanding smooth.
After water damage, replace soft, warped, or moldy drywall before patching and finishing. Compound cannot restore weakened board. Assess the damaged edges and surrounding material, then remove compromised sections back to stable drywall when needed. Settling can also reopen cracks, so consider whether movement is continuing when choosing the repair approach.
Impact damage needs its own assessment. A small dent may need filling and feathered compound, while a punched hole may need a fitted patch or new board section. The finished repair should meet the existing wall or ceiling without a raised edge or visible seam. Matching the texture and preparing the surface for paint help the repair blend with the room.
Water-damaged drywall restoration follows a clear sequence: stop the leak, dry the cavity, remove compromised board when needed, patch or replace it, then tape, apply compound, sand, and prepare the surface for paint. This order avoids finishing over wet or unstable material. It also helps homeowners understand which steps an estimate covers and why.
Recurring cracks call for identifying what is reopening the joint, such as continuing movement, moisture, or a failed seam, before refinishing. Warranty coverage depends on the written terms, including which repair work it covers and how it addresses later movement or new water damage.
Can you match existing wall texture?
Yes. A drywall repair can be finished to blend with an existing wall or ceiling texture. The result depends on preparing the damaged area, applying joint compound carefully, and recreating the surrounding pattern before painting.
For a crack, hole, or dent, start by assessing its edges and the nearby surface. Remove loose material, then fill the damage with a patch or compound. Taping helps reinforce repaired seams, while additional coats of compound smooth the transition. Match the final texture to the wall’s pattern, whether subtle or pronounced. A seamless appearance also depends on how the repair meets the undamaged surface.
Cracks require attention to their shape and location. A narrow line along a taped joint calls for a different repair than an opening around a corner or ceiling seam. The repair addresses the surface, but cracks accompanied by visible structural movement need assessment beyond cosmetic finishing. For dents, feather compound beyond the damaged spot to help prevent a noticeable raised outline after painting.
Ceiling repairs require careful access and control of gravity. A small hole may need a fitted patch, taped edges, and compound applied in controlled coats. Larger damaged sections may require cutting out compromised board and fitting a new piece. If the ceiling needs installation rather than a localized repair, secure the board and finish its joints before painting.
A skim coat can help restore a broad, uneven surface by applying a thin layer of compound across it. It can also reduce the contrast between an older texture and a repaired area. Covering an entire ceiling, however, is different from patching one crack. The affected surface area and desired finish determine the work involved.
Professional drywall crack repair pricing can vary with the work required, so request an estimate for the specific damage. The damaged area’s size and severity are key factors.
Other cost factors include access to the repair, the amount of joint compound and patching required, and whether matching texture or a skim coat is needed. A ceiling repair may require different preparation than a wall patch.
A repair estimate should assess the damaged area, its severity, and the work needed for a finished surface. It should account for preparation, patching or taping, compound, sanding, and texture work.
Homeowners insurance coverage depends on the policy’s terms and the cause of the crack. The policy language determines whether a particular repair is covered.
Nearby drywall repair services can address cracks, holes, dents, ceiling damage, uneven seams, and texture matching. For example, a small wall dent needs a different repair sequence than a ceiling section requiring board replacement.
Drywall patching and texture matching
A finished patch should follow the surrounding surface from preparation through texture and paint. The repair sequence determines whether a small patch blends in or remains visible.
Matching Existing Wall Texture
Texture matching starts by identifying the pattern around the repair, not by applying compound at random. A smooth wall, lightly stippled surface, and pronounced texture reflect light differently. Prepare and patch the repair area, then work the compound to echo the surrounding pattern. The transition matters: a patch that stops abruptly can leave a visible edge across the existing surface.
Sheetrock repairs may also involve nail pops, where a fastener creates a small raised spot. Secure and finish the fastener area before restoring the texture. Matching the wall means considering both the patch and nearby imperfections, so the repaired section doesn’t stand out beside them.
Blending Texture After Patching
After removing damaged material, fit a patch or new board section to close the opening. Tape reinforces the seams, and joint compound goes on in multiple coats. Let each coat dry before the next finishing step. Sanding smooths the repair, while feathering compound beyond the patch softens its boundary.
Apply texture to match the pattern around the repair. A small patch beside a broad textured wall needs a controlled transition, not a thick mound of compound. Check the surface from different viewing angles, since light can reveal ridges that disappear when viewed straight on.
Matching Texture and Paint
Texture and paint both affect how a repaired wall looks. A consistent pattern can still appear different if the paint has a contrasting sheen or shade. Once the compound is smooth and the texture matched, prepare the repair for paint. Painting then brings the finish together across the surface.
Drywall finish levels help describe smoothness. Level 4 is the standard finish for most homes. Level 5 adds a thin skim-coat over the entire wall, and is recommended for raking light, glossy paints, or large unbroken walls. Those conditions expose small surface variations, so broad skim-coating may suit them better than a localized patch.
Ceiling repairs follow the same sequence, but texture and lighting need close attention. A ceiling near a window may show uneven compound under raking light. Matching the existing texture before painting helps restore continuity across the repaired area.
Before finishing, address loose material, taped joints, compound ridges, and texture transitions. Nail pops, patched holes, and uneven seams each need different preparation, even though they share the same final goal: a consistent surface ready for paint.
Can a handyman repair holes in drywall?
Yes. A handyman can handle a simple drywall patch, while complex installations are better suited to a drywall specialist. The right repair depends on the damage, the surrounding board, and the finish required.
Inspection and Patching
Begin by assessing the hole’s edges and the surrounding drywall. A clean, stable opening may take a fitted patch; trim loose or damaged sections back to sound material. For example, a small hole from a door handle needs a different patch than a torn opening with crumbling edges. The inspection should also identify cracks, nearby nail pops, and seams that may need attention.
After preparing the area, fit the patch flush with the surrounding surface. It must sit securely before taping and applying compound. A raised or shifting piece can leave an uneven finish that remains visible after painting. Let the size and condition of the damaged sections guide the method, rather than considering the opening alone.
Taping and Finishing
Tape covers patch edges and seams, helping create a continuous surface. Joint compound is applied, then allowed to dry before further coats. A typical finishing process uses one coat followed by two additional coats, then sands the area smooth. Drying time matters: repairs may require visits on 2-3 consecutive days because the first mud layer needs a day to dry.
Finishing goes beyond filling the hole. Feather compound outward, sand ridges, and check the surface before preparing it for paint. Light across a wall can reveal a raised edge that looked smooth from another angle. A proper finish also considers how patched sections meet existing texture, so the repair doesn’t appear as a flat square.
Drywall Crack and Hole Patching
Cracks and holes need related but distinct preparation. A crack along a seam may require removing loose material and reinforcing the joint with tape. A hole needs a patch that bridges the opening before compound covers its edges. If a crack reopens, assess whether movement or a weak joint is contributing rather than simply covering the line again.
For a simple patch, a handyman may be a cost-effective choice; complex full installations are better suited to a drywall specialist. Match the task to its scope: a localized hole, a short crack, and a full board replacement are not equivalent jobs, even when each needs a smooth, paint-ready finish.
A clear estimate describes the affected sections and the work involved, including patching, taping, compound, sanding, and preparation for painting. It should distinguish a localized repair from work involving larger drywall sections. Understanding the sequence helps homeowners assess the proposed finish and how the repaired area will blend with nearby walls.
Bulging or poorly taped drywall seams
A raised seam can make a wall look uneven, even beneath fresh paint. Start by identifying what caused the bulge and whether the tape or drywall has failed.
Look for a ridge running along a joint, a cracked line over the tape, or edges lifting away from the wall. On ceilings, a sagging seam may be easier to spot under light from a nearby window. These signs point to damage beyond a simple surface mark. Patching over the high spot without checking the seam can leave the original problem visible.
A seam may bulge because tape was poorly embedded, compound was applied unevenly, or the joint has shifted. Moisture can also weaken drywall and loosen tape. A long raised line along a ceiling joint differs from a small, isolated bump; examine the surrounding surface before choosing a repair.
During assessment, a repair professional can:
- Trace the raised area and identify loose or cracked tape.
- Check whether compound has separated from the drywall.
- Look for nearby cracks, stains, or soft material.
- Determine whether the seam needs new tape or broader drywall replacement.
Once the cause and extent are clear, remove loose tape and compound. Retape the joint where needed, then finish it with compound in controlled coats. Let each layer dry before applying the next or sanding. This sequence builds a smooth transition rather than hiding a ridge beneath more material.
Ceiling repairs need careful preparation because dust and compound can fall during removal and sanding. Move or protect furniture beneath the work area before repairs begin. A crack beside a seam may also need to be addressed as part of the joint, rather than filled separately, to create a consistent finish across the damaged area.
Recurring bulges need attention to the reason they return. If a seam keeps opening after patching, another coat alone won’t correct movement, moisture, or a loose joint. The repair plan should address the observed cause and extent, then restore the surface for finishing. That distinguishes proper seam repair from a quick cosmetic cover-up.
A clear repair estimate describes the damaged sections and proposed preparation, taping, compound, and finishing work. It should explain whether the repair covers one localized seam or includes wider drywall damage. Understanding those steps helps homeowners see how the repaired area will meet the surrounding wall or ceiling.
Hudson Line Painters: Drywall & Plaster Repair
Hudson Line Painters provides drywall and plaster repair for homeowners dealing with cracks, holes, damaged seams, or uneven surfaces. Choose this service when a wall or ceiling needs repair before it can be finished and painted. The right approach depends on the damage: a small patch differs from a weakened or water-damaged section that needs replacement. Repairing the damaged area before interior painting helps create a sound surface for the final finish.
For recurring cracks or damage beyond a simple cosmetic touch-up, describe what you’re seeing and where it appears. This context helps clarify the repair needed for your walls or ceilings. Contact Hudson Line Painters to discuss your drywall or plaster repair.
Plan the repair around the finished room
Before work begins, decide how the repaired surface should fit into your plans for the room. A drywall crack repair service can be part of a broader refresh, especially when a wall needs attention before painting. Hudson Line Painters also offers interior painting, exterior painting, and kitchen cabinet refinishing for other home improvement projects.
Think about the result you want, from a wall ready for a new color to a repair that blends quietly into the existing finish. Sharing that goal helps shape a practical next step for your home.
A carefully planned repair can help you enjoy the room again and move forward with confidence.
Frequently Asked Questions
What should I look for when hiring a drywall repair service?
Look for a clear description of the repair, from preparation through the finished result. A useful estimate identifies damaged areas and explains whether the work involves patching, taping, compound, sanding, or texture matching. For example, a cracked joint and a hole near a doorway need different preparation. A defined scope helps you understand what the repair covers and how the surface will be finished.
How long does a drywall job take?
The schedule depends on the repair’s size, the steps involved, and drying time between compound coats. A small patch needs less work than replacing a damaged board section or finishing an entire room. Ceiling access and texture matching can also affect the sequence. Since compound must dry before sanding or another coat, a repair with several finishing stages may require work across multiple days.
Why should I hire a pro instead of fixing my drywall myself?
A professional can assess whether damage is limited to the surface or extends into a seam or board section. That distinction affects how the repair is prepared and finished. Filling a crack without addressing loose tape, for example, can leave a visible line. A professional also handles feathering and texture transitions, helping reduce ridges that stand out after painting or under angled light.
Can a professional repair drywall without replacing it?
Yes. A professional can repair drywall without replacing the board when the surrounding material is stable and the damage can be patched. For instance, a localized dent or small hole may be repaired while retaining the existing sheet. The decision depends on the board’s condition and the extent of the damage. The repair should leave the surface sound and ready for its final finish.
Do you repair drywall ceilings as well as walls?
Yes, drywall repair can address both ceilings and walls. A ceiling crack, damaged joint, or small opening needs preparation suited to its overhead position, while a wall patch may require different access and finishing. For example, a ceiling seam may show more clearly under light from a window. Repairing the affected area and preparing it for paint helps restore a consistent surface.
How do I know if I have settlement cracks in my drywall?
Settlement cracks may appear as hairline or vertical lines, including cracks about 1/8 inch wide. Many are cosmetic, but a crack can sometimes indicate a foundation problem. Pay attention to whether it changes, reappears, or appears alongside other signs of movement. A surface repair addresses the drywall itself, while suspected foundation movement calls for assessment by a structural professional.
What does a drywall crack repair service include?
A drywall crack repair service generally addresses the damaged surface and prepares it for finishing. Depending on the crack, the work may include removing loose material, reinforcing a seam with tape, applying compound, sanding, and matching nearby texture. A crack over a joint, for example, may need different preparation than a mark on an otherwise smooth wall. Preparing the surface for paint completes the repair.
How to choose a licensed and insured drywall repair contractor?
Choose a contractor whose credentials and repair work suit your home’s location and needs. Hudson Line Painters is fully licensed and insured in New Jersey; EPA Lead-Safe Certified. Its local service area includes Hudson County, Union County, Bergen County, Hoboken, Edgewater, Fort Lee, Teaneck, Hackensack, Englewood, Cliffside Park, Leonia, Palisades Park, and Ridgefield. A clearly described scope helps connect the project with the right repair.


