

Spending $100 on a gallon of premium acrylic paint doesn't guarantee a high-end finish; in fact, without the right technique, expensive modern formulas often make lap marks even more visible. It's incredibly frustrating to invest your weekend only to see "railroad tracks" and inconsistent sheen once the surface dries. You wanted a crisp transformation for your home in Jersey City or Westfield, but instead, you're left wondering how to avoid paint streaks on walls that were supposed to look flawless. We understand that property maintenance is stressful, and you deserve a result that reflects the care you put into your living space.
This guide will show you how to master the professional "wet edge" technique and select the specific tools that seasoned NJ contractors use for a glass-like result. You'll gain the technical precision needed to handle the fast-drying, low-VOC paints required by current NJDEP regulations. We'll walk through the impact of local humidity on your drying times, the necessity of dedicated primers, and the systematic rolling method that ensures your interior looks like a meticulous professional crew just finished the job.
Key Takeaways
- Master the essential "wet edge" technique to blend paint layers seamlessly and eliminate the visible lap marks that ruin a professional finish.
- Select the proper 3/8-inch or 1/2-inch microfiber roller nap and transition from a standard tray to a pro-grade bucket for more consistent loading.
- Learn how to avoid paint streaks on walls by managing New Jersey's unique humidity levels, which can either help or hinder your paint's "open time."
- Avoid the common mistake of using high-speed fans, which causes surface "skinning" and leads to permanent texture inconsistencies across your walls.
- Identify why large, open-concept living spaces are the most challenging to paint and when a professional transformation is the most reliable choice for your home.
Why Do Paint Streaks Happen? Identifying the Culprits
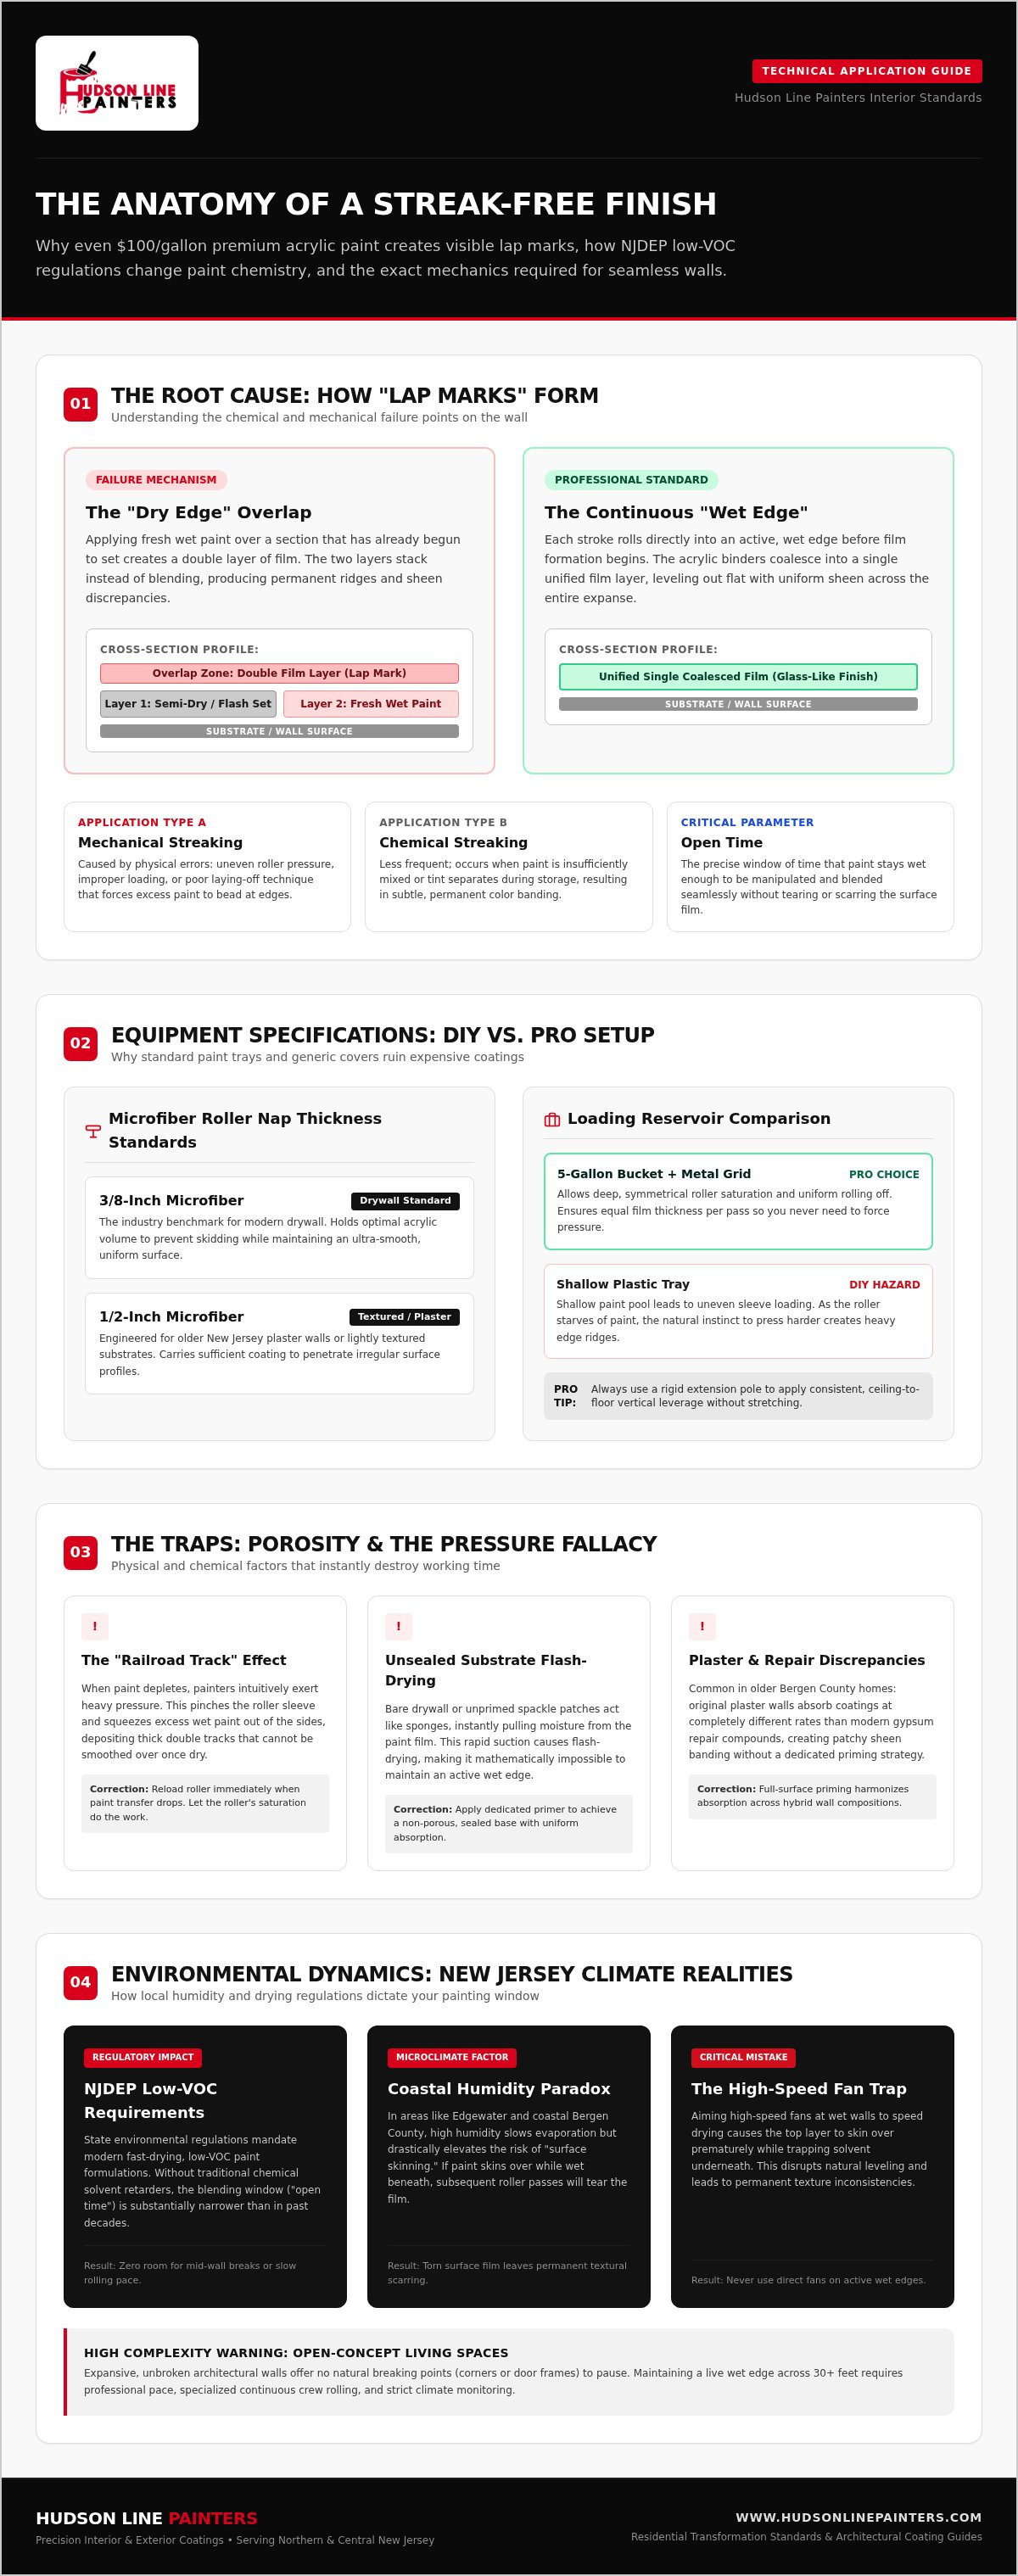
Paint streaks, technically known as "lap marks," are the most common frustration for homeowners attempting a DIY refresh. These visible lines occur when you apply wet paint over a section that has already begun to dry, creating a double layer of film that changes the sheen and texture of the finish. Understanding how to avoid paint streaks on walls requires a shift from viewing painting as a simple chore to seeing it as a time-sensitive chemical process. When you overlap a drying edge, the two layers don't meld; they stack, leaving a permanent record of every roller stroke.
The "dry edge" is your primary adversary. Modern, low-VOC paints used in New Jersey homes dry much faster than older formulas, which means your window for blending sections is narrow. If you stop for a break or move too slowly across a large wall, the edge of your previous stroke sets. When you finally overlap it with a fresh roller, the transition becomes visible. This creates a ridge that no amount of additional coats will fully hide, often forcing you to sand the wall back down and start over.
Mechanical errors often involve inconsistent pressure and poor tool choices. Many DIYers push harder on the roller as it runs out of paint, but this actually forces paint out of the sides of the sleeve, leaving thick "railroad tracks" along the edges. Your paint roller nap selection is critical here; choosing a nap that is too thick for your specific wall texture can trap excess material and make these ridges even harder to manage during application.
Local climate also plays a significant role in how your paint behaves. In coastal Bergen County areas like Edgewater, high humidity can actually extend your working time by slowing evaporation, but it also increases the risk of the paint "skinning over." If the surface dries while the layer underneath remains wet, rolling back over that section will tear the film and create permanent texture streaks. Success depends on balancing your pace with the environmental conditions inside your home.
Mechanical vs. Chemical Streaking
Mechanical streaks stem from physical application errors, such as poor roller loading, uneven pressure, or improper "laying off" techniques. Chemical streaks are less common but occur when the paint isn't mixed thoroughly or the tint separates, leading to subtle color banding. Open time refers to the specific duration that the paint remains wet enough to be manipulated and blended without leaving a visible mark. Mastering this window is the secret to a professional result.
The Role of Porosity in Streak Formation
Porosity is the silent killer of a smooth finish. Bare drywall or patched areas act like a sponge, pulling the moisture out of your paint instantly. This flash-drying makes it impossible to maintain a wet edge, even with the best technique. Investing in expert drywall and plaster repair ensures a uniform, sealed surface that allows the paint to level out naturally. This is especially vital in older NJ homes where original plaster walls have different absorption rates than modern repairs, requiring a meticulous priming strategy and high-quality interior painting products to achieve a consistent, streak-free sheen.
Essential Tools and Prep: The Foundation of a Streak-Free Finish
Quality tools are the primary differentiator between a DIY project and a professional result. If you want to know how to avoid paint streaks on walls, your first decision should be your roller nap selection. We typically recommend:
- 3/8-inch microfiber: The industry standard for achieving a smooth finish on modern drywall.
- 1/2-inch microfiber: Ideal for walls with a slight texture or older Bergen County plaster surfaces.
Professionals rarely use the shallow plastic trays found in big-box stores. Instead, we use a five-gallon bucket with a metal grid. This setup allows you to load the roller more deeply and consistently, which is the secret to maintaining a uniform film thickness. When your roller is evenly saturated, you don't have to press harder to get paint onto the wall. This prevents those frustrating edge ridges often called "railroad tracks."
Selecting the Right Paint and Primer
While "Paint and Primer in One" products are popular, they often contain higher solids that cause the paint to set up too quickly. This reduced "open time" makes it much harder to blend your strokes. If you are struggling with how to avoid paint streaks on walls while using high-gloss products, the answer usually lies in the primer. A dedicated high-hide primer ensures the wall absorbs the topcoat at a uniform rate. We always aim for PCA industry standards for properly painted surfaces, which require a finish free from visible defects and sheen inconsistencies. Keep in mind that higher sheens, like eggshell or satin, are significantly less forgiving than flat finishes because their reflective properties highlight every minor application error.
Preparation Steps You Can't Skip
You cannot achieve a smooth finish on a dirty surface. Oils from hands or dust from previous repairs will cause the paint to bead or "crawl," leading to permanent streaks. Clean your walls with a mild detergent and let them dry completely. Between your first and second coat, a light sanding with fine-grit paper removes any small bumps or "nibs" in the paint. Finally, manage your environment. We find that keeping the room between 65 and 75 degrees Fahrenheit provides the ideal balance of drying time and leveling. If you find the preparation process overwhelming, our team at Hudson Line Painters can handle these meticulous details for you.
Master the Technique: How to Paint Without Lap Marks
The Golden Rule of professional painting is to always work toward a wet edge. This means you must apply fresh paint over paint that is still wet, allowing the layers to fuse into a single, uniform film. If you allow the edge to dry even slightly, you create a seam that becomes visible once the room is fully lit. Learning how to avoid paint streaks on walls is largely a matter of disciplined movement; you must complete an entire wall from top to bottom before taking a break. Speed is your friend, but consistency is your foundation.
Proper lighting is an often overlooked tool in the professional's kit. Use a dedicated work light angled across the wall. This raking light reveals "holidays," which are small missed spots, and ridges in real-time. This allows you to fix them while the paint is still wet enough to level out. Environmental control plays a major role here as well. Maintaining EPA recommended indoor humidity levels between 30% and 50% helps the paint level out without drying too quickly or staying tacky for too long, which is especially important in the variable climate of Bergen County.
The Step-by-Step Roller Motion
Achieving a glass-like finish requires a systematic approach to how you move the roller across the drywall. Follow these steps for every section:
- Step 1: Load the roller until the sleeve is fully saturated in your bucket grid. It should be heavy with paint but not dripping.
- Step 2: Apply the paint in a large "W" or "N" pattern across a 3x3 foot section to unload the bulk of the material.
- Step 3: Without reloading the roller, use vertical strokes to fill in the gaps and spread the paint evenly across that grid.
- Step 4: Finish by "laying off" the paint. While the section is still wet, use a light, continuous stroke from the ceiling to the floor without stopping. This aligns the texture and hides the start-and-stop marks.
Cutting-In Like a Professional
Many homeowners make the mistake of cutting in the entire room at once. By the time they start rolling, the brushed edges have already dried, creating a "picture frame" effect where the edges are a different texture than the main wall. Instead, cut in one wall at a time. Immediately roll that wall while the brushed paint is still wet to blend the textures seamlessly. If the precision required for cutting in around trim and ceilings feels too tedious, our interior painting services provide a stress-free alternative for a perfectly seamless finish.
Environmental Factors: Managing NJ Humidity and Drying Times
Your home's environment is just as influential as your roller technique. In riverfront areas like Hoboken or Jersey City, summer humidity frequently climbs above 65% to 70% indoors. This moisture slows the evaporation process, increasing drying times by 25% to 50% or more. While a slower dry time can theoretically help you maintain a wet edge, excessive humidity often leads to "surfactant leaching" or a finish that remains tacky for days. Mastering the local climate is a critical part of learning how to avoid paint streaks on walls, as it dictates how long you have to blend your sections before the film sets.
Many homeowners try to speed up the process by pointing high-powered fans directly at the wet wall. This is a mistake that almost guarantees a streaky finish. Moving air too quickly causes the surface of the paint to "skin over" while the layer underneath remains liquid. When you roll back over this skinned surface to blend a lap mark, the roller tears the delicate film, creating permanent texture inconsistencies. Instead of fans, use a dehumidifier to maintain a controlled environment. Aim for the industry standard of 40% to 50% relative humidity to ensure the paint levels out perfectly.
Winter painting in New Jersey presents the opposite challenge. Forced-air heating often drives indoor humidity below 30%, causing modern low-VOC paints to flash-dry. When the air is this dry, your "open time" might drop to less than 60 seconds. This makes it nearly impossible to finish a floor-to-ceiling stroke before the previous pass begins to set. If you are painting during a cold snap, consider using a humidifier to bring the room back into the ideal range of 65 to 75 degrees Fahrenheit.
Using Paint Extenders Safely
Paint conditioners, such as Floetrol, are specialized additives that increase the "open time" of waterborne acrylic paints. They are particularly useful when you are working with dark colors or high-gloss sheens that show every minor defect. However, you must follow the manufacturer's ratios exactly. Never attempt to thin your paint with water to avoid streaks; this dilutes the binders and resins, which can ruin the paint's durability and cause the color to appear washed out or blotchy.
How to Fix Dried Streaks and Roller Marks
If you discover heavy lap marks after the paint has dried, you cannot simply paint over them. The ridge is a physical texture that must be removed. Use fine-grit sandpaper to level the high spots, wipe away the dust with a damp cloth, and apply a fresh coat of primer to ensure uniform absorption. When performing touch-ups, "feather out" the edges by applying less pressure as you move away from the center of the repair. If you are dealing with similar issues on overhead surfaces, our guide on fixing water stains on ceilings offers specific advice for managing gravity and drying times on horizontal planes.
Request a Professional Interior Painting Quote
Achieving a Flawless Transformation: Why Professional Painting Wins
While mastering the "wet edge" technique is possible for a dedicated homeowner, the scale of many New Jersey properties makes manual application exceptionally difficult. Large, open-concept homes in Bergen and Hudson Counties often feature expansive wall surfaces that catch raking light from floor-to-ceiling windows. In these environments, even a minor lapse in timing creates a visible shadow. This is why many residents find that learning how to avoid paint streaks on walls is only half the battle; the real challenge is executing that technique flawlessly across thousands of square feet without a single error.
The true cost of a DIY project often includes the price of trial and error. When a room requires sanding and repainting due to heavy lap marks, you've doubled your material costs and lost another weekend. Choosing a professional service eliminates this risk. We bring a level of operational discipline that ensures your home's transformation is seamless from the start. This expertise is even more critical on high-stakes surfaces like built-ins or kitchen cabinets, where a streak-free finish isn't just an aesthetic preference; it's a requirement for long-term durability and value.
The Hudson Line Painters Process
Our reputation for excellence is built on a proprietary 5-step preparation and application framework. This systematic approach mirrors the meticulous care we use in our cabinet refinishing projects. We don't just roll paint; we manage the entire environment. Our process includes precision drywall repair to ensure uniform porosity, digital humidity monitoring, and the use of high-output specialized equipment that maintains a consistent film thickness far beyond what standard DIY rollers can achieve. If you are ready for a result that meets the highest craftsman standards, you can request a quote for our residential painting services today.
Serving Our NJ Community
We take immense pride in serving homeowners throughout Bergen, Hudson, and Union Counties. As a local business, we understand that we aren't just working on a job site; we are working in your private sanctuary. Our team adheres to strict site etiquette and protection protocols, ensuring that your furniture, flooring, and belongings are treated with the utmost respect. We maintain a clean, organized workspace from the initial consultation to the final walkthrough. This commitment to transparency and reliability is why your neighbors trust us to deliver a guaranteed transformation without the stress of typical home improvement projects.
Contact us today for a streak-free interior transformation
Elevate Your Home with a Flawless Interior Finish
Achieving a smooth, professional result requires more than just high-quality paint. It demands a disciplined approach to the "wet edge" technique and a deep understanding of how local NJ humidity affects your drying times. By mastering your roller movement and preparing your surfaces with a meticulous 5-step prep process, you can eliminate the frustration of lap marks and inconsistent sheens. Understanding how to avoid paint streaks on walls is the first step toward a transformation you can be proud of.
If the technical precision required for large, open-concept spaces or tricky lighting feels overwhelming, our team is here to help. Serving NJ homeowners since 2018, our fully insured local craftsmen specialize in delivering high-end results that last. We take the stress out of property maintenance so you can simply enjoy the beauty of your refreshed environment. You deserve a space that feels as good as it looks.
Take the next step toward your home's transformation with confidence. We look forward to partnering with you to create a beautiful, streak-free interior.
Frequently Asked Questions
Can I fix paint streaks with a second coat?
A second coat won't fix physical ridges. You must sand the high spots down with fine-grit paper first. If you just paint over a lap mark, you're essentially highlighting the texture difference. Once the wall is smooth, apply a fresh coat of primer to ensure uniform absorption. This is a standard part of our meticulous 5-step prep process used for every residential project in Bergen County.
Why does my paint look streaky after it dries?
Streaks often appear because the "wet edge" was lost during application. This happens when the paint sets up before you can blend the next stroke. In places like Hoboken or Edgewater, high riverfront humidity can actually slow drying, but inconsistent pressure on the roller creates "railroad tracks." Learning how to avoid paint streaks on walls requires maintaining a steady pace and even pressure from ceiling to floor.
Is it better to use a roller or a brush to avoid streaks?
A high-quality roller is the best tool for large wall surfaces. Brushes are essential for cutting in around trim in your Teaneck home, but they leave visible "drag" marks if used on broad areas. We recommend a 3/8-inch microfiber roller nap for most modern drywall. It holds enough paint to prevent the "dry-rolling" that leads to the most common application streaks and texture inconsistencies.
Does the quality of paint really affect how many streaks I get?
Premium paint significantly reduces streaking because it contains better leveling agents. Higher-end formulas stay "open" longer, giving you more time to blend your strokes before the film sets. This is especially important given New Jersey's strict VOC regulations, which cause cheaper, fast-drying paints to tack up almost instantly. Investing in quality materials is a smart financial choice that prevents expensive DIY rework and frustration.
What is the best temperature for painting walls in New Jersey?
The ideal temperature for painting interior walls in New Jersey is between 65 and 75 degrees Fahrenheit. You should also aim for relative humidity levels between 40% and 50%. During a cold winter in Hackensack, forced-air heating can make the air too dry, causing paint to flash-dry. Conversely, summer humidity in Cliffside Park can prevent proper curing. Using a dehumidifier or humidifier helps create a controlled, "lab-like" environment.
How do I avoid streaks when using a dark paint color?
Dark colors have higher pigment loads, making sheen inconsistencies very obvious. To succeed, always use a tinted primer to build color depth and reduce the number of topcoats needed. Work in smaller vertical sections and never stop in the middle of a wall. Maintaining a wet edge is critical for these deep tones, as any overlap on a drying section will create a permanent, shiny "flash" mark.
Should I sand between coats of paint to prevent roller marks?
Lightly sanding between coats is a secret to achieving a professional, "glass-like" finish. It removes small dust particles, known as "nibs," and levels out any minor ridges left by the roller. Use a fine-grit sanding sponge and wipe the wall with a damp cloth afterward. This extra step ensures the final coat bonds perfectly and looks uniform across the entire surface of your Englewood or Leonia home.
What should I do if my paint is drying too fast while I'm working?
If your paint is drying too fast, you need to increase the "open time." Start by turning off any fans or direct air vents in the room. You can also add a specialized paint conditioner like Floetrol, which slows evaporation without ruining the paint's chemistry. If you're still struggling with how to avoid paint streaks on walls during a dry NJ winter, try working in narrower 2-foot vertical strips.


