

A ceiling crack is rarely just a cosmetic blemish; it's a symptom of your home's natural movement. If you've ever tried to patch a gap only to see it return a few months later, you know how discouraging it feels to watch your hard work vanish. Many homeowners across Hudson, Union, and Bergen Counties struggle with these recurring issues because they rely on quick fillers rather than structural reinforcement. Mastering how to repair ceiling cracks before painting is the only way to ensure your new aesthetic lasts for years instead of weeks.
In this guide, we'll provide the peace of mind you need by helping you distinguish between simple settling and structural concerns. You'll learn the professional methods for taping and mudding that create an invisible, durable bond. We've designed this process to be clean and systematic, focusing on the right materials to keep dust to a minimum throughout your house. By the time you reach the final step, you'll have the technical precision required to move into the painting phase with total confidence in your flawless results.
Key Takeaways
- Learn to distinguish between cosmetic hairline cracks and structural shifts caused by New Jersey's seasonal humidity and soil settling patterns.
- Discover why professional-grade materials like setting-type joint compound and paper tape are essential for a repair that won't reopen.
- Follow our step-by-step guide on how to repair ceiling cracks before painting, including the critical "V" shape preparation technique for lasting results.
- Implement meticulous dust management and sanding strategies to keep your interior clean while achieving a perfectly smooth, invisible finish.
- Recognize the warning signs of extensive plaster failure or sagging that require professional intervention to protect your property's value.
Understanding Ceiling Cracks: Settling vs. Structural Issues
Seeing a thin, jagged line across your ceiling can be unsettling for any homeowner. In New Jersey, our properties endure intense seasonal humidity shifts and specific soil expansion patterns that naturally lead to house settling. Heavy foot traffic in the rooms above can also create enough vibration to stress the ceiling materials. Before you pick up a brush, you must identify the source of the damage. Learning how to repair ceiling cracks before painting starts with a careful diagnostic of the crack's shape and size.
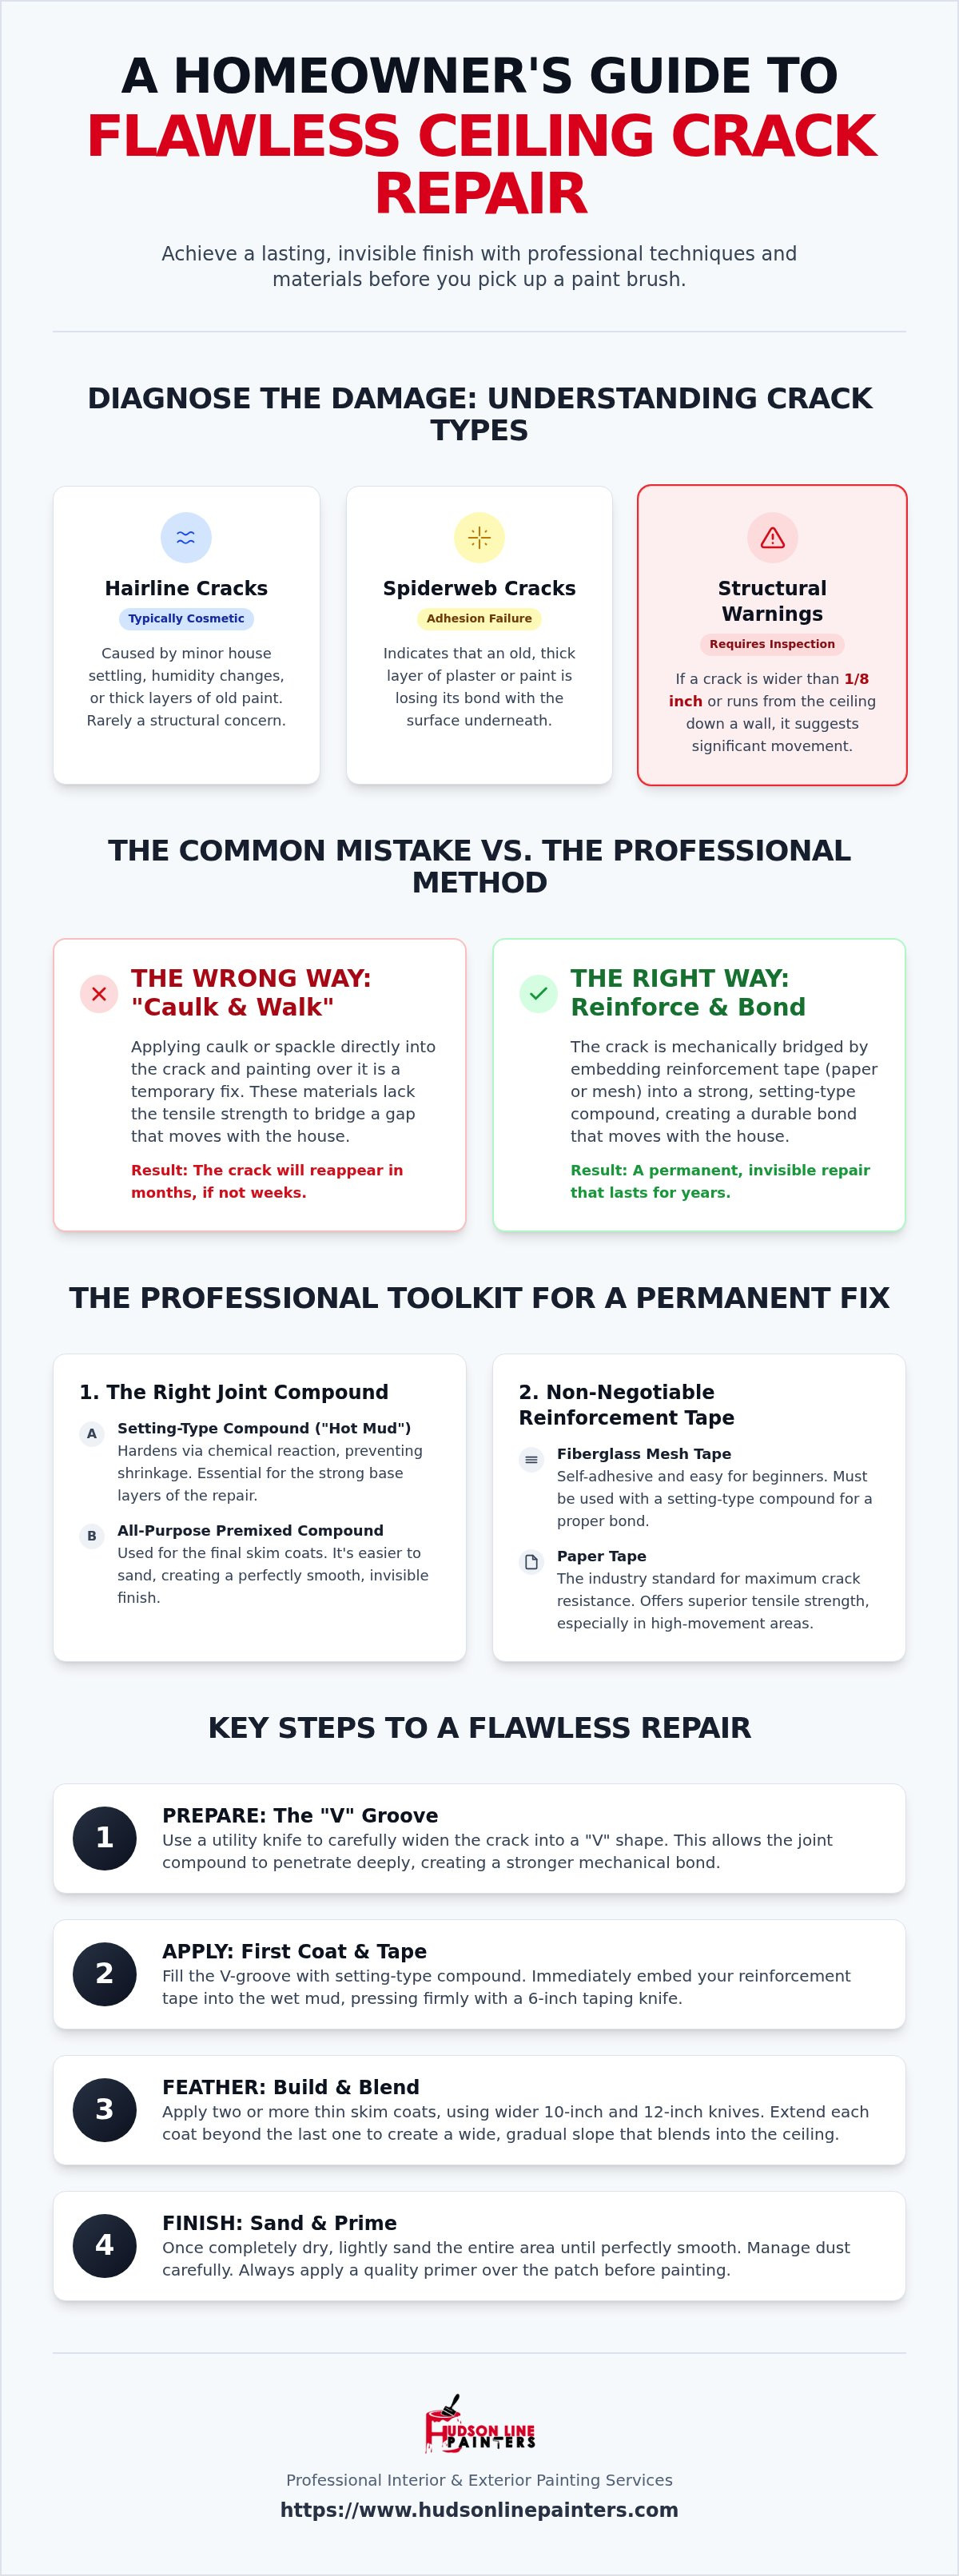
Most cracks fall into three distinct categories. Hairline cracks are typically cosmetic, often caused by minor expansion or a thick buildup of old paint layers. Spiderweb cracks, which look like a shattered windshield, usually indicate that a thick layer of old plaster or paint is losing its adhesion to the substrate. However, structural warnings require immediate attention. If a crack is wider than 1/8 inch or runs from the ceiling down a wall, it suggests movement that requires a professional inspection before any cosmetic work begins.
Plaster vs. Drywall: Why Material Matters
Older New Jersey homes, particularly in historic areas like Hoboken and Jersey City, often feature lath and plaster ceilings rather than modern gypsum board. These materials behave differently under stress. Plaster is rigid and prone to cracking as the wood lath behind it expands with the Jersey Shore humidity. Modern homes utilize a different system, and Understanding Drywall Composition helps explain why these panels are more flexible but still susceptible to joint failure. You can tell which material you have by gently pressing near the crack; plaster feels cold and rock-hard, while drywall has a slight give and sounds hollow when tapped.
The Problem with Just Painting Over Cracks
Many homeowners attempt a "caulk and walk" approach, filling the gap with a bead of caulk and immediately applying paint. This is the most common mistake we see in local renovations. Paint and caulk lack the tensile strength to bridge a gap that is actively moving. Without a proper mechanical bond, the crack will simply reappear as soon as the temperature changes. A permanent fix requires embedding reinforcement tape into a setting-type compound to create a bridge that moves with the house. This meticulous preparation is a core part of our interior painting process, ensuring the final aesthetic remains flawless for years. We view repair as a craft that adds genuine value to your space rather than just a manual task.
Professional Toolkit: Materials You Need for a Permanent Fix
Achieving a smooth, invisible finish starts with chemistry, not just technique. When you look at how to repair ceiling cracks before painting, the most common pitfall is using a material that lacks structural integrity. Typical lightweight spackle might work for a small nail hole, but it will inevitably fail on a ceiling crack because it cannot withstand the subtle shifts of a building. You need a toolkit that prioritizes mechanical bonding and durability.
Choosing the Right Joint Compound
Professionals rely on setting-type compounds, often called "hot mud," for the foundational layers of a repair. Products like Easy Sand 45 or 90 harden through a chemical reaction rather than simple evaporation. This process prevents the shrinkage that causes most DIY repairs to fail within a few months. Once the base is set, an all-purpose premixed compound works best for the final skim coat. This dual-material approach follows Ceiling Repair Best Practices, ensuring the patch is both strong and easy to sand for a premium aesthetic.
Mesh vs. Paper Tape: The Pro Perspective
Reinforcement is non-negotiable for a permanent fix. Self-adhesive fiberglass mesh tape is an excellent choice for beginners because it stays in place while you apply the first coat of compound. However, it must be paired with a setting-type compound to achieve a proper bond. For maximum crack resistance, especially in corners or high-movement areas, traditional paper tape remains the industry standard. It provides superior tensile strength that prevents hairline fractures from returning during the next New Jersey winter. Understanding how to repair ceiling cracks before painting requires a focus on these professional-grade materials rather than quick-fix alternatives.
You will also need a progression of taping knives to achieve a seamless result. A 6-inch knife is perfect for embedding the tape, while 10-inch and 12-inch knives allow you to feather the edges out. This creates a wide, gradual slope that makes the repair disappear into the surrounding ceiling. For dust management, we recommend using a pole sander with a vacuum attachment. This setup allows you to smooth the surface without coating your furniture and floors in a fine white powder. If you prefer to leave the meticulous prep work to the experts, our team at Hudson Line Painters provides comprehensive interior painting services that include professional-grade drywall restoration.
Step-by-Step: How to Repair Ceiling Cracks for Good
Repairing a ceiling crack requires a systematic approach that addresses the root of the movement. Simply filling the surface leads to failure. A professional repair involves creating a structural bridge that can handle the expansion and contraction common in New Jersey homes. Following this disciplined framework ensures your interior painting project starts on a stable, flawless foundation.
The V-Groove Technique
Before you apply any compound, you must widen the existing crack with a utility knife. This might feel counterintuitive; however, creating a "V" shape is essential for a permanent bond. This groove removes loose edges and creates a physical "key" that allows the new mud to lock into the ceiling substrate. Once the groove is carved, use a vacuum with a brush attachment to remove all fine dust. A clean surface is the only way to ensure the setting-type compound adheres properly to the old plaster or drywall. This step is often skipped in DIY guides, but it's the difference between a one-month fix and a multi-year solution.
Applying the Foundation
Once the area is prepped, fill the "V" groove with your setting-type compound using a 6-inch knife. While the mud is still wet, center your reinforcement tape over the crack and press it firmly into the mixture. Run your knife over the tape to remove excess compound and eliminate air bubbles. This first layer is the most critical for strength. It provides the mechanical bridge that prevents the crack from reappearing when the Jersey humidity shifts during the summer months. We take pride in this meticulous preparation, as it adds genuine value and comfort to your space.
Feathering: The Secret to Invisible Repairs
The key to an invisible patch is the 6-10-12 rule. This progression of knife sizes allows you to "feather" the edges so the repair blends into the rest of the ceiling. Each subsequent coat should be wider than the last to trick the eye. When you apply the second and third coats, focus on applying pressure to the outer edge of your knife. This thins the mud at the perimeter to a nearly transparent layer. Use a 12-inch knife for the final skim coat to create the widest possible transition.
To verify your work, hold a bright work light at an angle against the ceiling. This raking light will highlight any small ridges or dips that need further attention before you begin sanding. Mastering how to repair ceiling cracks before painting is a logical, sequential process. It requires operational discipline to achieve the premium results your home deserves.
Finishing and Priming: Preparing for the Paint
The transition from structural repair to aesthetic finishing is where a project truly comes together. Even the most durable patch will look like an eyesore if the texture doesn't match the surrounding ceiling. Mastering how to repair ceiling cracks before painting requires a disciplined approach to sanding and sealing. This stage is often the messiest part of any home improvement task, so we prioritize site protection to keep your New Jersey home clean and comfortable throughout the process.
Professional Sanding Tips
Sanding should be a two-stage process. We begin with 120-grit sandpaper to remove the bulk of the excess compound and level the ridges left by the taping knife. Use a circular motion and light pressure to avoid gouging the soft material. Once the patch is level, switch to 220-grit sandpaper for the final finish. This finer grit polishes the compound to a smooth, feather-light edge that is impossible to detect by touch.
For sensitive areas like kitchens or nurseries, you can utilize a "wet sanding" technique. A damp, specialized drywall sponge allows you to smooth the edges without creating airborne dust. It's a slower method, but it eliminates the need for extensive cleanup. Before you move to the priming phase, always wipe the ceiling with a clean tack cloth. Any leftover dust will prevent your primer from bonding, leading to paint failure down the road.
Why Priming is Non-Negotiable
Skipping primer is the most common reason for a visible repair. Joint compound is highly porous; it absorbs the moisture from paint much faster than the surrounding drywall. This leads to "flashing" or "ghosting," where the patch appears as a dull, flat spot in the middle of your otherwise consistent ceiling sheen. A high-quality ceiling primer seals the compound, creating a uniform surface that allows the final paint coat to sit evenly across the entire room.
If your ceiling damage was caused by a leak, a standard primer won't be enough. You will need a stain-blocking primer to prevent tannins or water marks from bleeding through the new finish. For more details on handling these specific issues, see our guide on Fixing Water Stains on Ceilings. Proper priming ensures that your hard work in learning how to repair ceiling cracks before painting results in a professional, long-lasting transformation.
Book a professional interior painting consultation today
When to Hire a Professional for Ceiling Repair
Mastering how to repair ceiling cracks before painting provides a great sense of accomplishment, but certain scenarios demand the intervention of a seasoned craftsman. Safety is the primary consideration for homes with high vaulted ceilings or complex stairwells. These areas often require specialized scaffolding that goes beyond the reach of a standard household ladder. Attempting to balance on a ladder while applying pressure with a taping knife is a risk that most homeowners should avoid. Knowing how to repair ceiling cracks before painting also involves recognizing when the job exceeds your current toolkit.
Structural red flags also signal a need for professional help. If you notice a ceiling that appears to be sagging or pulling away from the wood lath, this indicates extensive plaster failure. In these cases, a simple patch won't suffice; the entire substrate may need stabilization to prevent a collapse. Additionally, matching complex textures like popcorn, knockdown, or skip-trowel finishes is notoriously difficult for beginners. A mismatched texture often draws more attention to the repair than the original crack. This undermines the aesthetic value of your home.
The Value of Professional Drywall and Plaster Repair
Professional drywall and plaster repair offers a level of precision that is difficult to replicate with a DIY approach. In historic Bergen County homes, we focus on maintaining the architectural integrity of the space through meticulous color and texture matching. Our team at Hudson Line Painters has refined our process since 2018 to handle the unique settling patterns found in New Jersey homes. We understand that a ceiling is a large, flat canvas where even minor imperfections are magnified by overhead lighting. By choosing a professional, you bypass the steep learning curve of mudding and sanding. You move directly to the flawless result you desire. We use commercial-grade drop cloths and advanced dust management systems to ensure your environment remains pristine. This level of site etiquette is a hallmark of our service, providing you with a safe and guaranteed transformation.
Your Next Steps for a Flawless Ceiling
Before you begin, assess the total scope of the project. If you're dealing with a single hairline fracture, the techniques outlined in this guide will serve you well. However, if you're preparing for a comprehensive interior painting project involving multiple rooms, hiring a professional ensures the work is completed efficiently and correctly the first time. You can choose to gather the specialized tools we've discussed or opt for the peace of mind that comes with a craftsman's touch. Our systematic approach ensures your property is respected and your vision is realized.
Ready for a professional finish? Contact Hudson Line Painters for an estimate.
Achieve a Flawless Finish for Your New Jersey Home
Mastering the V-groove technique and selecting the right setting-type compounds are the foundations of a permanent repair. By following a disciplined sanding and priming sequence, you ensure your aesthetic transformation remains invisible for years. Understanding how to repair ceiling cracks before painting is the first step toward a home that feels renewed and meticulously maintained.
As fully insured local NJ contractors, we bring specialized expertise to historic home plaster repair and modern drywall restoration. We prioritize meticulous dust containment and a thorough clean-up to protect your living space while we work. Whether you're tackling a single hairline fracture or a full-room renovation, we are here to provide the peace of mind that comes with professional craftsmanship.
Get a Professional Quote for Your Ceiling Repair and Painting Project
Your home is your most significant investment. It deserves the precision and care that keeps it beautiful for the long term.
Frequently Asked Questions
Why do the cracks in my ceiling keep coming back after I fix them?
Cracks typically reappear because the repair lacks structural reinforcement. If you only use a surface filler, the natural movement of your New Jersey home will eventually pull the patch apart. Seasonal temperature swings and humidity changes in Hudson or Bergen Counties cause wood framing to expand and contract. To prevent this, you must use reinforcement tape to bridge the gap and create a mechanical bond that moves with the structure.
Can I use caulk to fill ceiling cracks before painting?
You should avoid using caulk for this specific task. While caulk is flexible, it cannot be sanded flat and will always leave a visible ridge under your paint. Additionally, most caulks shrink as they cure, which causes the crack to reappear as a dip in the ceiling. For a professional, invisible result, always use joint compound and tape when learning how to repair ceiling cracks before painting.
What is the best joint compound for repairing ceiling cracks?
A combination of setting-type and all-purpose compounds works best. We recommend using a setting-type "hot mud" for your initial coats because it hardens chemically and doesn't shrink. This provides the structural strength needed to hold the tape in place. For the final skim coat, an all-purpose premixed compound is ideal because it's easier to sand to a perfectly smooth finish that blends with the rest of your ceiling.
Do I need to sand between every coat of joint compound?
You don't need to sand between every layer. In fact, professionals prefer to use a taping knife to scrape off any high spots or ridges once a coat has dried. This approach significantly reduces the amount of dust in your home and prevents you from accidentally over-sanding the soft compound. Save the actual sanding for the final coat to achieve that seamless, premium aesthetic before you apply your primer.
Is a ceiling crack a sign of a structural problem in my house?
Most small ceiling cracks are cosmetic results of house settling, but size and location are key indicators. Hairline fractures are common in older NJ homes, but cracks wider than 1/8 inch or those that run diagonally down a wall may suggest structural movement. If the ceiling is sagging or if multiple cracks appear in a specific pattern, we recommend a professional inspection to ensure your property's safety before proceeding with cosmetic repairs.
How do I match the texture of my ceiling after a repair?
Matching texture requires a methodical approach using specialized sponges or texture sprays. For knockdown or skip-trowel finishes, you can apply a slightly thinned joint compound and use a sea sponge or a trowel to mimic the existing pattern. We always suggest practicing your technique on a piece of scrap cardboard before touching the ceiling. This ensures you can replicate the exact depth and frequency of the texture for an invisible match.
Should I use mesh tape or paper tape for ceiling crack repair?
Both have their place, but paper tape offers the highest resistance to recurring cracks. Paper tape is the industry standard for corners and high-stress areas because it has superior tensile strength. Self-adhesive mesh tape is often easier for DIY projects on flat surfaces, but it must be used with a setting-type compound to prevent failure. When determining how to repair ceiling cracks before painting, choose paper tape if you want the most durable reinforcement.
How long does it take for joint compound to dry before I can paint?
Drying times depend on the material used and the humidity in your home. Setting-type compounds can be recoated in as little as 45 to 90 minutes, while all-purpose premixed mud typically requires 24 hours to dry completely. It's essential to wait until the patch is bright white and bone-dry before sanding or priming. Applying paint to damp compound will cause the finish to bubble or peel, ruining your hard work.


