

What if the smoothest paint finish has less to do with a steady hand and more to do with what happens before the first stroke? If you’re wondering how to get professional painting results, the answer starts with careful surface preparation, suitable tools, and a consistent application process. Skipping a step can leave you with visible brush marks, roller texture, drips, uneven coverage, or paint that doesn’t last.
You’re right to want a clear plan before opening a paint can. Knowing what to inspect, clean, repair, and protect can make the work feel more manageable and help prevent avoidable problems. This guide walks you through each stage, from checking walls or exterior surfaces to choosing brushes, rollers, and application methods that suit the job.
You’ll also learn how to apply paint evenly, avoid common finish flaws, and handle cleanup without overlooking the final details. When damage calls for more than basic patching, or the project feels beyond your tools or experience, you’ll know when to consider professional help. A disciplined process makes the difference between a quick coat and a cleaner, longer-lasting finish.
Key Takeaways
- Learn how to get professional painting results by assessing the surface before choosing tools or applying paint.
- Follow a practical preparation order to protect the room, clean surfaces, and address defects before painting.
- Match brushes, roller naps, and application methods to the surface texture and coating directions.
- Use visible paint flaws as clues to possible application or surface issues, rather than assuming another coat will fix them.
- Finish with a careful inspection after drying, then make touch-ups and clean tools without disturbing fresh paint.
How to Get Professional Painting Results Starts with the Surface
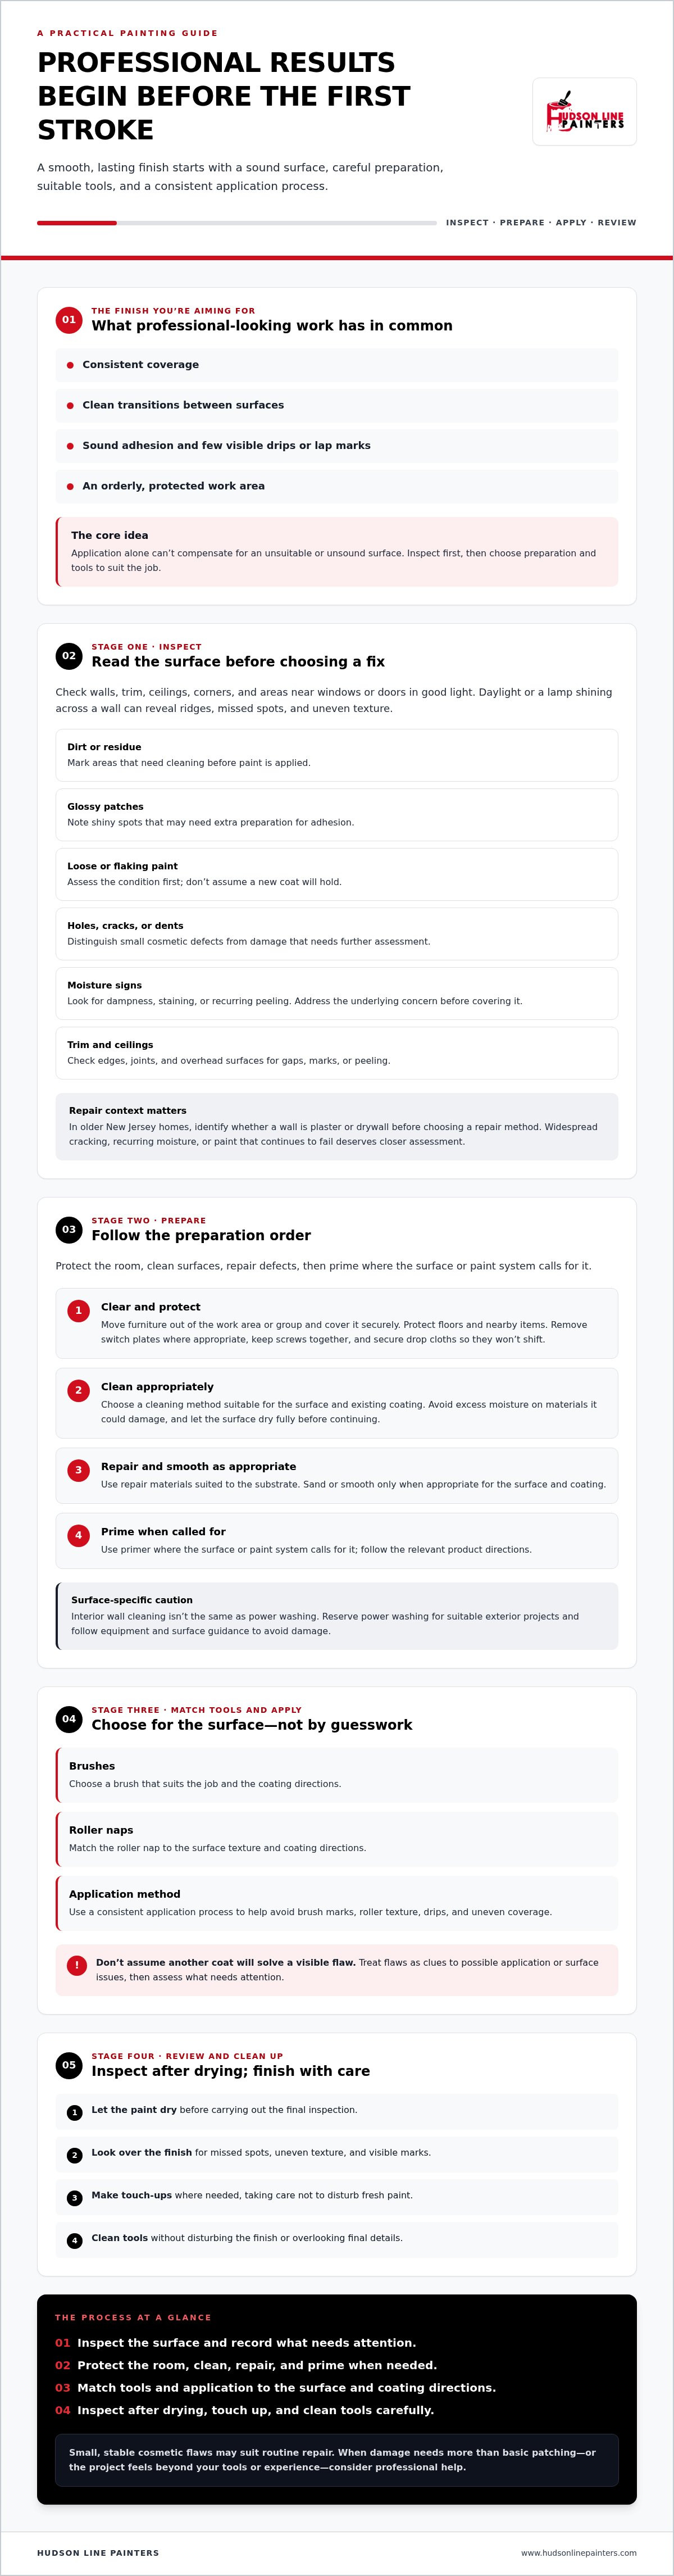
An even finish starts before the first coat, not with a premium brush or roller. If you want to know how to get professional painting results, begin by checking what the paint will stick to. Professional-looking work means consistent coverage, crisp edges, sound adhesion, and an orderly work area. Careful inspection helps you choose suitable preparation instead of painting over a problem that may show through later.
Dirt can interfere with adhesion, glossy areas may need extra preparation, and flaking paint or damaged plaster calls for a different response than a small nail hole. Sheen matters, too: a smooth, shiny surface can reveal flaws that a low-sheen finish might disguise. The work of a professional painter includes surface preparation because application alone can’t compensate for an unsuitable or unsound surface.
What makes a paint job look professional?
Look for smooth-looking coverage, clean transitions between surfaces, and few visible drips or lap marks. No finish is flawless from every angle, and lighting can make a difference: daylight or a lamp shining across a wall may reveal ridges, missed spots, or uneven texture that’s hard to notice up close. A good result depends on both a properly assessed surface and controlled application.
How to assess walls, trim, and ceilings before painting
Inspect each surface in good light, then run your eyes along corners, edges, and areas near windows or doors. In older New Jersey homes, identify whether a wall is plaster or drywall before choosing a repair method. Hudson Line Painters provides interior painting, with surface repair considered when the condition calls for it.
Use this room-by-room checklist to note what needs attention:
- Dirt or residue: Mark areas that need cleaning before painting.
- Glossy patches: Note shiny spots that may need preparation for adhesion.
- Loose or flaking paint: Don’t assume a new coat will hold; assess the condition first.
- Holes, cracks, or dents: Separate small cosmetic defects from damage that needs further assessment.
- Moisture signs: Look for dampness, staining, or recurring peeling. Address the underlying concern before covering it with paint.
- Trim and ceilings: Check edges, joints, and overhead surfaces for gaps, marks, or peeling.
Small, stable cosmetic flaws may be suitable for routine repair. Widespread cracking, recurring moisture, or paint that continues to fail deserves closer assessment before work begins. Record your findings first; the next steps can then match the surface instead of relying on guesswork.
How to Prepare Walls and Rooms for Professional Painting Results
Once you’ve identified what each surface needs, follow a steady preparation order: clear and protect the room, clean, repair, then prime where the surface or paint system calls for it. This sequence helps prevent dust, debris, and unfinished repairs from interfering with a fresh coat. Preparation takes time, but it gives paint a cleaner, more reliable surface to adhere to.
What should you do before opening the paint?
Start by moving furniture out of the work area or grouping and covering it securely. Protect floors, cover nearby items, and remove switch plates where appropriate, keeping screws together so they’re easy to replace. Secure drop cloths and protective coverings so they won’t shift while you work. For additional professional painting tips, Bob Vila also discusses practical preparation such as cleaning walls and using painter’s tape.
Next, clean with a method suitable for the surface and its existing coating. Avoid soaking materials that could be damaged by excess moisture, and let the surface dry fully before continuing. Interior wall cleaning isn’t the same as power washing: reserve power washing for suitable exterior projects, and follow equipment and surface guidance to avoid damage. Hudson Line Painters offers exterior power washing as a separate service when an exterior surface needs it.
After cleaning, address small cosmetic defects with repair materials suited to the substrate. Sand or smooth only when appropriate for the surface and coating. Follow the repair material’s manufacturer instructions, including its preparation and drying directions, before applying paint. If cracks, damaged plaster, or other repairs go beyond minor filling, consult this drywall and plaster repair guide to understand what may need attention.
When do primer and extra surface checks matter?
Primer isn’t an automatic step for every wall. The appropriate choice depends on the surface, repair, existing coating, and paint-system directions. Check the product label and instructions, and if compatibility is uncertain, test the proposed preparation and coating in an inconspicuous area before covering the room. Let the test area dry as directed, then assess adhesion and appearance before proceeding.
For suspected lead-based paint, don’t scrape, sand, or otherwise disturb it. Stop and contact a qualified specialist for guidance; lead paint abatement is not a do-it-yourself preparation task. Taking that pause protects occupants and helps ensure the next step is based on a proper assessment, not guesswork.
Choose Painting Tools and Techniques for an Even, Clean Finish
The right tool helps you control paint, but there’s no single brush or roller that suits every surface. For how to get professional painting results, match the tool to the task, surface texture, and coating directions. A small test area can show whether your setup gives the finish you want before you continue across a whole wall.
When should you use a brush or roller?
Brushes offer control around corners, trim, edges, and detailed areas. Rollers cover broad surfaces efficiently, but the cover’s nap should suit the wall texture and paint instructions. If you’re new to either tool, practice on a sample board or inconspicuous section first. Use the coating label as your guide, rather than assuming the same tool works well on every surface.
- Brush: Cut in along edges, reach corners, and paint trim or narrow details.
- Roller and cover: Apply paint to broad wall or ceiling areas; choose nap and material based on texture and coating guidance.
- Tray: Hold a manageable amount of paint and distribute it evenly across the roller cover.
- Protective equipment: Use suitable eye, skin, and clothing protection for the task, and follow any safety directions on the coating label.
How can you avoid lap marks, drips, and uneven coverage?
Load a brush or roller evenly, then remove excess paint before applying it. Too much paint can create drips, ridges, or heavy edges; too little may leave thin, patchy coverage. Work in manageable sections and keep a steady pace. On broad areas, overlap each pass while the previous edge is still wet where practical. This wet edge helps reduce visible lap marks as the coating begins to dry.
Use consistent, controlled pressure instead of pressing harder to force paint onto the surface. With a roller, spread paint smoothly and avoid repeatedly working an area as it starts to set. With a brush, use deliberate strokes and check corners for buildup. If coverage looks uneven, don’t assume that adding paint immediately will solve it; the cause may relate to application, the surface, or the coating.
There’s no universal roller nap, application method, or correct number of coats. Those choices depend on the surface and the specific paint system. Check the manufacturer’s directions for application, drying, and recoating, and allow the stated drying time before applying another coat. Rushing can disturb the first layer and compromise the finish. A consistent technique and the right tool for each area do more for a clean result than speed.
Fix Common Painting Mistakes Before They Ruin the Finish
More paint or a faster pace won’t automatically fix a rough finish. Extra paint can create heavy edges and drips, while rushing may leave uneven coverage or visible lap marks. If a flaw appears, pause before adding another coat. The cause may be the tool, technique, coating, or surface, so the right correction depends on what you’re painting and the product directions. That careful diagnosis is part of how to get professional painting results without turning a small defect into a larger repair.
Why do brush marks, roller texture, or drips appear?
Unevenly loaded tools, excessive pressure, poor pacing, or a brush or roller cover that doesn’t suit the surface can all contribute to visible marks. Drips may form when a tool carries too much paint or excess coating gathers at edges. Roller texture can also vary with the cover and wall surface. These are possible causes, not a one-size-fits-all diagnosis.
Let the paint dry as directed on its label before judging the finish. Then inspect the area in good light and compare it with the surrounding surface. Don’t immediately brush over a tacky patch or pile on more paint. First identify the likely cause, check the coating instructions, and correct the underlying issue using a method suitable for the surface and paint system. If recoating is appropriate, follow the stated preparation and recoat directions.
What should you do when paint peels or will not adhere?
Peeling or poor adhesion can point to contamination, inadequate surface preparation, moisture, or an incompatible existing coating. Avoid covering the defect with another layer. If the surface is damp or the peeling keeps returning, find and address the underlying moisture concern before painting; otherwise, the new finish may fail too.
For limited, clearly understood cosmetic issues, a suitable repair may be manageable. Widespread peeling, recurring failure, or an uncertain surface calls for a more careful assessment rather than guesswork. Don’t scrape or sand suspected lead-based paint; leave it undisturbed and contact a qualified specialist. If the problem involves interior paint failure or you’re unsure how to proceed, an experienced painter can assess the surface and recommend next steps. Hudson Line Painters provides interior painting as well as drywall and plaster repair when those services fit the condition.
Explore interior painting services
Finish the Project with a Professional-Style Inspection and Cleanup
The last coat isn’t the last step. Give the paint time to dry according to the manufacturer’s directions before judging its color, sheen, or coverage. Wet paint can look uneven or appear different from its final finish, so inspecting too soon may lead to unnecessary touch-ups or damage.
How do you inspect and touch up a finished paint job?
Once the coating has dried as directed, look at the room in consistent, suitable light. Check the walls from normal viewing distances, then inspect edges and corners more closely. Look for missed areas, drips, heavy buildup, uneven coverage, and paint on surfaces that were meant to stay protected.
- Edges and corners: Check for gaps, rough transitions, or stray paint.
- Coverage: Look for noticeable thin spots or patches that differ from the surrounding finish.
- Drips and ridges: Check along trim, corners, and other areas where paint may collect.
- Protected surfaces: Make sure floors, fixtures, and hardware are clean before removing coverings.
For a small flaw, use the same paint and a compatible application method when practical. Apply a controlled amount, and follow the coating directions for any additional drying or recoating. If a touch-up stands out, pause to consider whether the original cause was uneven application, a surface issue, or a difference in the paint or tool. The professional home painting guide can help you compare a DIY approach with professional service.
After the inspection and any touch-ups, clean tools according to the paint manufacturer’s instructions. Remove masking and protective coverings carefully, and leave the work area orderly. A measured final check is a practical part of how to get professional painting results, not just a finishing formality.
When should you bring in a professional painter?
Consider professional help if a project involves extensive repairs, difficult access, large areas, or uncertainty about the existing coating. A painter can assess the surface and preparation needs before recommending an appropriate scope of work. If you’re weighing DIY against help with an interior project, reviewing interior painting services may help you decide what fits.
Talk with Hudson Line Painters
Put a Careful Painting Process into Practice
Professional-looking paint comes from a sequence of sound decisions, not a single tool or technique. Inspect the surface before you begin, prepare it in the right order, and choose application methods that suit the coating and material. That’s the practical foundation for how to get professional painting results.
As you work, use steady application and follow the manufacturer’s directions for drying and recoating. Then wait until the paint is dry before inspecting edges, coverage, and drips. Small, suitable touch-ups can refine the finish, while extensive repairs, difficult access, or uncertain coating conditions may be a reason to bring in a professional.
Hudson Line Painters is an independent business founded in 2018, providing residential and commercial interior and exterior painting. If you’d rather have experienced help assess the surface and plan the work, explore its painting services.
Whether you tackle the project yourself or seek professional support, a measured approach can help you finish with greater confidence and care.
Frequently Asked Questions
Is professional painting mostly about preparation?
Preparation is a major part of achieving a durable, consistent finish, but it isn’t the whole job. A key part of how to get professional painting results is starting with clean, sound surfaces and making suitable repairs so the coating can adhere properly. Application technique, appropriate tools, and following the paint manufacturer’s drying and recoating directions also matter. Skipping one stage can affect the appearance or performance of the finished surface.
Can I get professional painting results without professional tools?
Yes, suitable, well-maintained basic tools can produce a good finish on many projects. Choose brushes, roller covers, and trays based on the surface texture and the paint manufacturer’s directions, rather than buying specialized equipment by default. Clean tools and controlled technique matter, too. For an unfamiliar tool or coating, practice on a sample area first. Larger, difficult-to-reach, or detailed projects may require equipment and experience beyond a basic setup.
How do you avoid brush marks when painting?
Choose a brush suited to the coating and surface, then load it evenly without carrying excess paint. Apply controlled strokes and avoid repeatedly brushing over an area as it begins to dry, since that can leave visible marks. Work at a steady pace and follow the product’s application directions. Brush marks can also relate to surface condition or paint characteristics, so inspect a fully dried test area before continuing.
How many coats of paint do I need for a professional-looking finish?
There isn’t one coat count that suits every project. Coverage depends on the paint, the color change, the substrate, and how well the surface was prepared. A major color shift or an absorbent or repaired area may affect the result. Follow the selected paint’s label for coverage and recoating guidance, and let each coat dry as directed before assessing it. Don’t apply extra paint simply to compensate for an unresolved surface problem.
What happens if you paint over a dirty or damaged wall?
Paint applied over dirt, residue, loose coating, or unresolved damage may have trouble adhering or may show an uneven appearance. Cracks, holes, and peeling can remain visible beneath a new coat, while moisture problems may cause recurring failure. Identify the issue first, then clean or repair the surface using a method suitable for its material. If damage is extensive or moisture is active, address the underlying cause before painting.
Should I prime walls before painting?
Primer isn’t required for every wall. Whether it’s appropriate depends on the substrate, repairs, existing coating, and directions for the paint system you’re using. A repaired or uncertain surface may need a different approach than a sound, previously painted wall. Check the product label and instructions, and test compatibility in an inconspicuous spot if you’re unsure. Allow the test area to dry as directed before judging its appearance and adhesion.
When should I hire a professional painter instead of doing it myself?
Consider a professional if the project involves extensive repairs, difficult access, a large area, or uncertain surface or coating conditions. A painter can assess preparation needs before recommending the appropriate scope of work. Hudson Line Painters provides residential and commercial painting in Hudson, Union, and Bergen counties, including Hoboken, Edgewater, Fort Lee, Teaneck, Hackensack, Englewood, Cliffside Park, Leonia, Palisades Park, and Ridgefield. Asking about local help can be a practical next step.


