

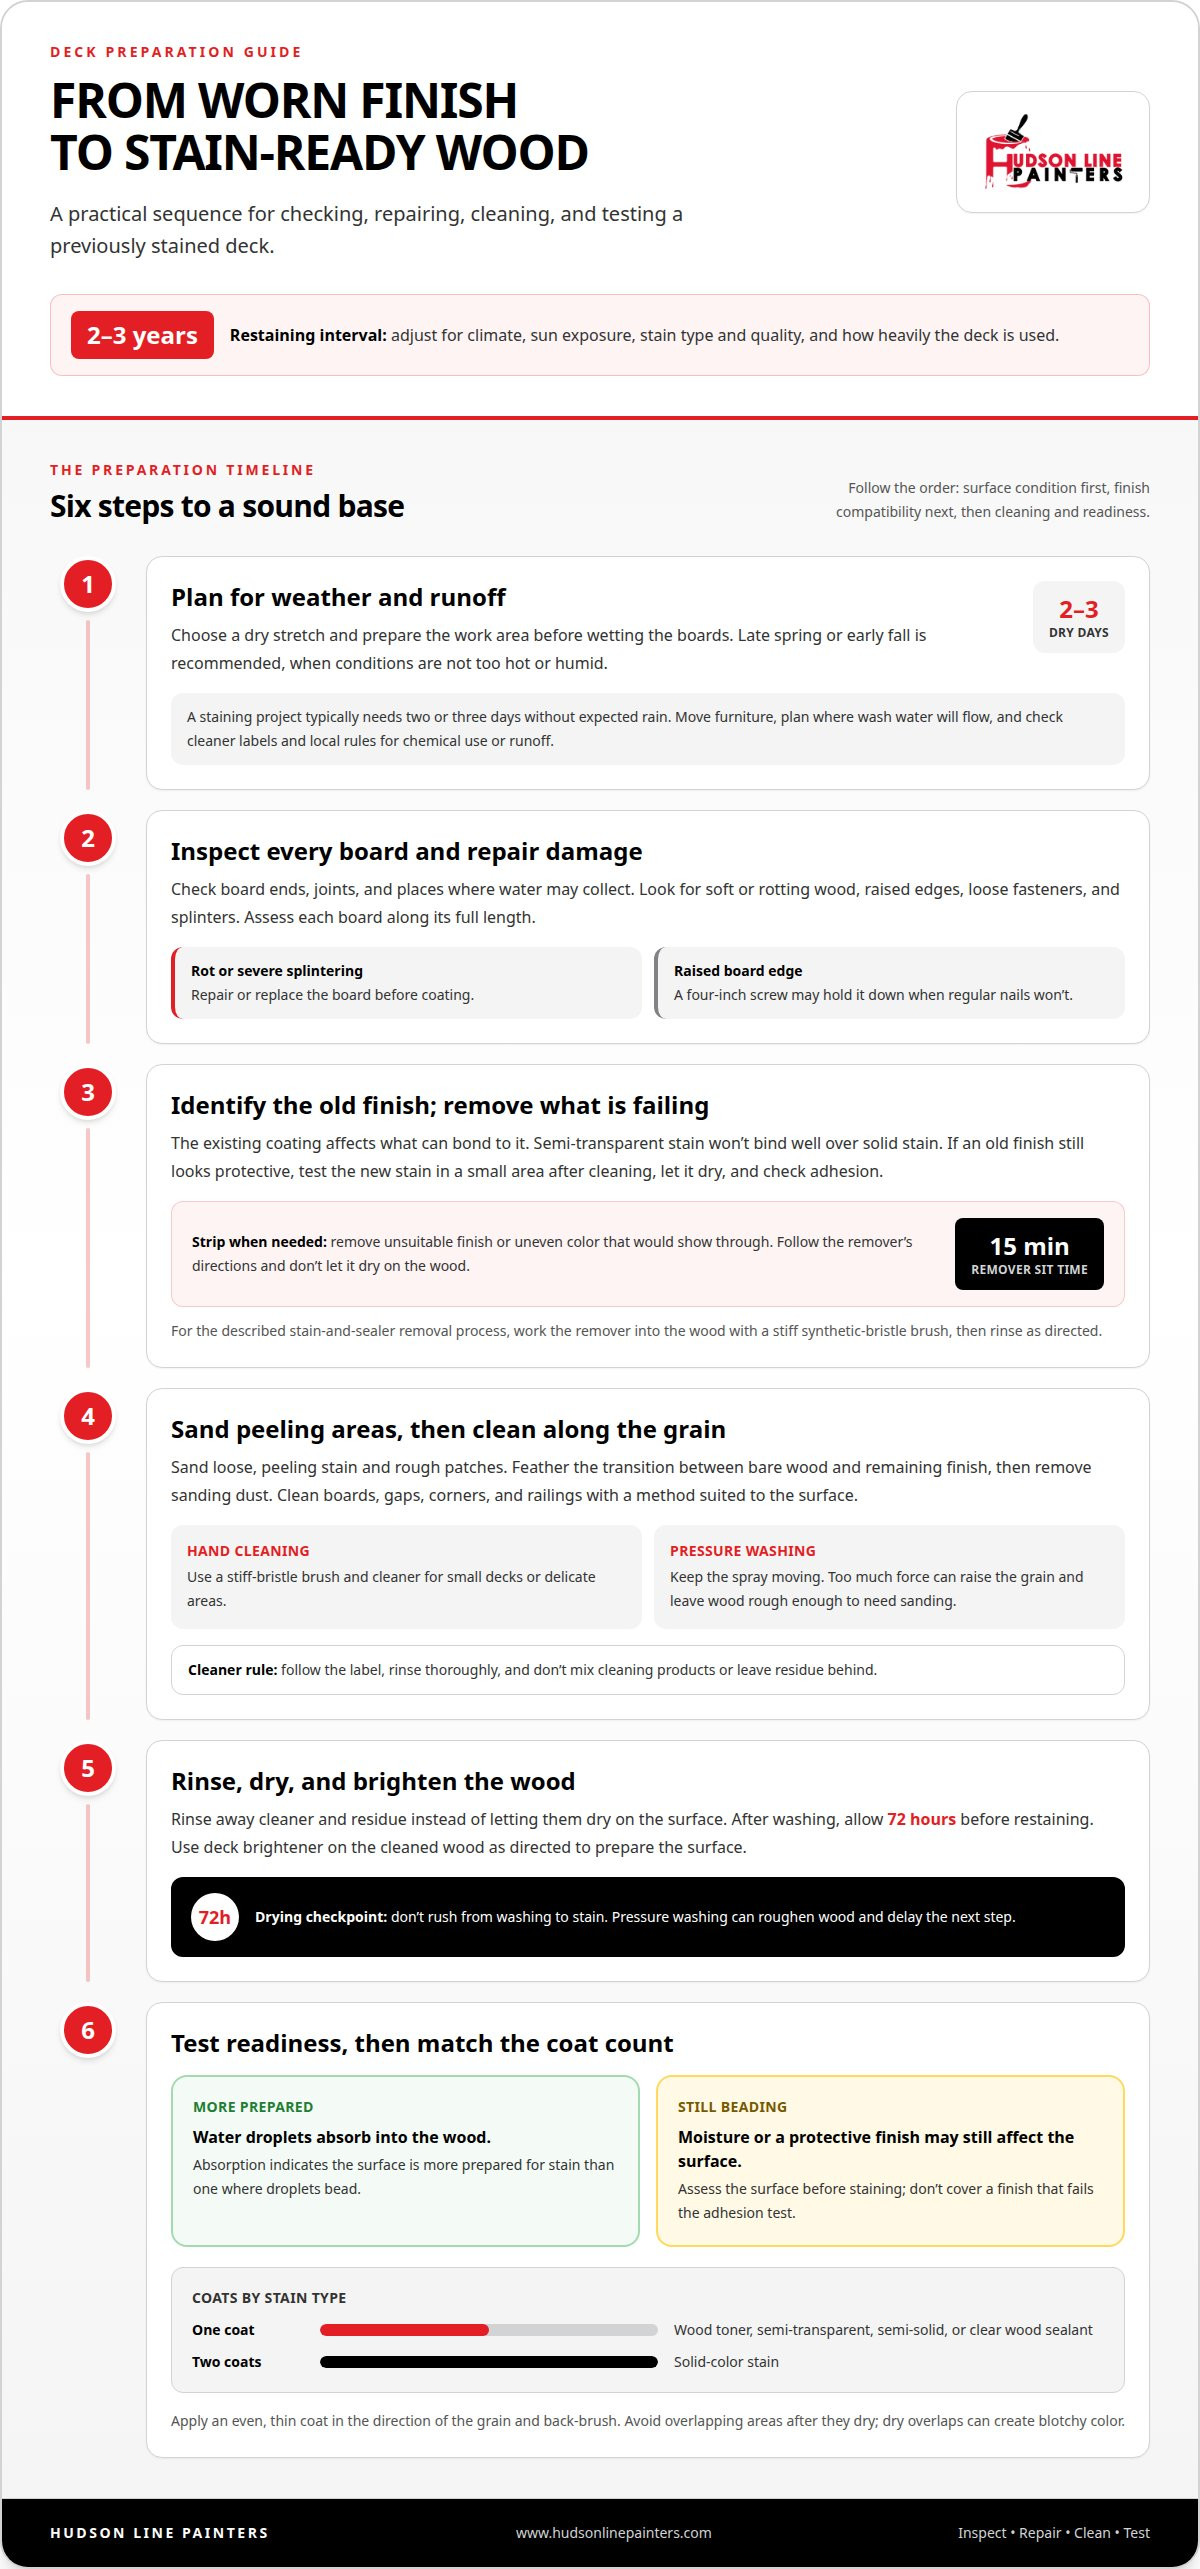
A fresh coat won’t fix a deck that isn’t ready for it. Plan to restain a deck every 2-3 years, adjusting for climate, sun exposure, stain type and quality, and how heavily the deck is used. Preparing a deck for restaining means checking the existing finish and wood first, then repairing and cleaning the surface so the new stain has a sound base.
When preparing a deck for restaining, it’s easy to focus on color and overlook peeling stain, rough boards, or dirt that can interfere with adhesion. Assessing the deck first helps you catch problems before they’re covered and choose preparation steps suited to the wood and its existing finish.
This guide walks through the process in order: inspect and repair the deck, remove failing finish, wash it, brighten the wood, and test whether it’s ready for stain. You’ll also learn why a water-drop test matters and why you shouldn’t rush from cleaning to staining. Careful preparation helps you decide when the deck is ready for a fresh finish.
Key Takeaways
- Identify the existing finish before choosing a new stain, since different stain types may not bond well together.
- Repair damaged boards and remove peeling finish before staining; a new coat won't fix failing wood or old stain.
- Clean the deck carefully and allow enough drying time, especially after pressure washing.
- Use deck brightener to prepare the cleaned wood, then assess whether moisture is still affecting the surface.
- Test readiness with water droplets: wood that absorbs them is more prepared for stain than wood where they bead.
Is staining a deck that is already stained possible?
Yes, but the existing finish matters: semi-transparent stain won’t bind well to a solid-stain surface. Clean the deck and assess adhesion before deciding whether to apply another coat or remove the old finish.
-
Prepare for Cleaning and Weather
Choose a stretch of dry weather and prepare the work area before wetting the boards. Late spring or early fall is recommended, when conditions are not too hot or humid. A staining project typically needs two or three days without expected rain so the finish can dry completely.
Move furniture and plan where wash water will flow. Local rules and cleaner labels can restrict chemical use or runoff, so read the label and follow applicable local requirements. Don’t assume rinse water can flow into a garden or drain.
Gather a stiff-bristle brush, hose, deck cleaner, and protective coverings for nearby plants. Hand cleaning gives you control around edges and railings. Pressure washing can clean broad areas faster, but excessive force may roughen the wood.
-
Clean the Previously Stained Deck
Remove loose dirt and debris first, then clean the boards with a method suited to the existing finish. Work along the grain, including board gaps and corners where grime collects. For a small deck or delicate areas, scrub by hand with a brush and cleaner. Rinse away residue rather than letting it dry on the surface.
Use a pressure washer cautiously if you choose that method. Keep the spray moving, and avoid concentrating force on one board, since pressure washing can raise the grain and leave wood rough enough to require sanding. After washing, allow 72 hours before restaining.
For this stage, gather a brush, hose or pressure washer, deck cleaner, and coverings for nearby surfaces. Follow the cleaner’s label for use and rinsing directions. Don’t mix cleaning products or leave residue behind, as either can compromise the next preparation step.
-
Use Deck Cleaner and Check Restrictions
Apply deck cleaner according to its label, treating the surface evenly rather than flooding one area. Scrub any remaining dirt, then rinse thoroughly. The deck should be free of dirt and mildew so stain can adhere properly. If the old finish still looks protective, test the new stain in a small area after cleaning.
Let the test dry and check whether it adheres. If it doesn’t, remove the protective finish before applying fresh stain. Semi-transparent stain won’t bind well over solid stain, so identify the old coating before choosing a replacement. This is an important step when preparing a deck for restaining.
Common mistakes include rushing the drying period, leaving cleaner residue, and using force that roughens the boards. Avoid uncontrolled runoff, follow the product label, and keep people away from the wet work area. These steps help reduce avoidable exposure and prevent a poor surface from being hidden beneath new stain.
Inspecting and repairing a previously stained deck
Inspect the cleaned boards before choosing repairs or applying fresh stain. Rot, splinters, peeling finish, and uneven color each call for a different preparation step.
-
Inspect the Stained Deck
Walk the deck and examine each board, paying close attention to ends, joints, and places where water may collect. Gently press suspicious areas and look for soft, rotting wood, raised edges, loose fasteners, or splinters. Stain won’t repair damaged wood, so repair or replace boards with rot or severe splintering before coating.
Mark problem spots as you go. A board may look sound in the middle but have a damaged end, so assess its full length before deciding whether sanding is enough.
-
Strip Old Stain for More Even Color
Remove old stain if it’s unsuitable for the new coating or if its uneven color would show through. A stain stripper can help clear residue so fresh stain can penetrate and look more uniform. Follow the remover’s directions, including its working time, and don’t let it dry on the wood.
For removing old deck stain and sealer, let the remover sit for 15 minutes, then work it into the wood with a stiff synthetic-bristle brush. Rinse as directed and assess the surface after it dries. Avoid applying new stain over a protective finish if a test shows poor adhesion.
-
Sand Rough Areas and Peeling Stain
Sand peeling stain off before restaining. A new layer over loose finish can peel away with the old coating, leaving an uneven surface. Focus on lifted edges and rough patches, then feather the transition between bare wood and remaining finish so it’s less abrupt.
Check the entire deck for rough grain after sanding or washing. Power washing can raise the grain, sometimes making it necessary to sand the whole surface. Remove sanding dust before staining because it can hinder adhesion. Don’t use a new coat to conceal peeling or roughness.
-
Repair the Deck and Plan Stain Coverage
Secure raised board edges and replace boards that are rotten or badly splintered. A four-inch screw may hold down a raised deck-board edge when regular nails won’t. Once repairs are complete, apply an even, thin coat in the direction of the grain. Back-brush the surface, then use a paintbrush between boards, in seams, and along edges.
Match the coat count to the stain type: use one coat for wood toner, semi-transparent stain, semi-solid stain, or clear wood sealant. Solid-color stains call for two coats. Keep coverage consistent and avoid overlapping areas after they dry; a dry overlap can receive a second coat and create blotchy color.
Should I pressure wash my deck before staining?
Pressure washing can remove grime, but too much force can roughen the wood and delay staining. Plan washing, drying, and stain application as one sequence.
-
Pressure Wash the Deck
Use a pressure washer only when the deck needs it, and keep the spray moving across the boards. Concentrating pressure in one place can raise the grain and leave the surface rough. If that happens, sanding the entire surface may be necessary before staining.
Work along the boards rather than directing a hard stream into their edges or seams. Rinse away loosened dirt and cleaner residue, then inspect for raised grain or rough patches. Don’t treat a freshly washed deck as ready for stain: water remains in the wood after the surface looks dry.
After pressure washing, allow the deck to dry for 72 hours before restaining. Use that waiting period to check for rough areas and plan any sanding before applying a new finish.
-
Allow the Deck to Dry Before Use
Keep foot traffic and furniture off the wet deck while it dries. Damp boards can hold moisture in seams and beneath objects, so leave the surface clear and exposed to airflow. Wait 24-48 hours after staining before using the deck, with temperature and humidity affecting the drying period.
That post-stain wait is different from the drying time before application. Don’t move chairs back or walk across the finish just because the top feels dry; the full 24-48 hours gives the coating time to dry before regular use.
-
Wait for the Deck to Dry Before Staining
Match the drying window to both the cleaning method and stain type. For water-based deck stains, allow cleaned wood to dry for one or two days before application. For oil-based stains, allow three full days of dry weather. After pressure washing, use the 72-hour drying period before restaining.
Plan for two or three days without expected rain so the stain can dry completely. Before starting, make sure the deck is clean, dry, and free from mildew. If the boards still feel damp or hold water in their seams, wait rather than trapping moisture under the stain.
Keep the sequence clear: wash, let the wood dry, apply stain, then leave the finish undisturbed. The stain’s base, recent weather, humidity, and exposure all affect drying. Treat each waiting period as a separate checkpoint, not time you can skip because the surface appears dry.
Brightening and neutralizing the deck
Apply deck brightener after cleaning or stripping when its product directions call for it. Follow a clear sequence, observing the label’s dwell time and rinsing instructions before moving on to staining.
- Prepare the cleaned surface for brightener. Remove leftover debris and arrange your work so you can treat boards evenly without letting the product dry in isolated patches. Check the cleaner or stripper label for any required next step. If it directs you to neutralize the surface, use the specified brightener or neutralizer rather than guessing at a substitute.
Protect nearby plants and surfaces as directed on the product label. Set out the brush and rinsing equipment before application so you can complete each stage without leaving treated areas unattended.
- Apply deck brightener evenly across the wood, following its label for application and coverage. Work on a few boards at a time, including edges and spaces between boards where wash residue can remain. Avoid puddles and don’t let one section dry while you’re still treating another.
Let the brightener sit for 10-15 minutes. Use that window to watch the surface and follow any label direction about agitation. Don’t extend the dwell time based on guesswork; the product’s instructions set the working procedure.
- Rinse the deck as directed after the brightener has completed its stated dwell time. Move methodically from one end to the other, clearing product from board faces, seams, and corners. Residue can interfere with the next preparation stage, so inspect the whole surface rather than rinsing only the most visible boards.
If the label calls for a particular rinsing method, follow it. Don’t combine brightener with other cleaners unless their instructions explicitly allow that sequence. A controlled rinse also helps reveal remaining stains or patches that need attention before the wood dries.
- Let the deck dry fully, then inspect its color and texture in daylight. Look for cleaner residue, unevenly treated areas, and rough grain that may need sanding. Brightener is a preparation step, not a substitute for removing loose stain or repairing damaged boards.
Keep stain off the deck until the wood is dry and ready. Recheck the brightener’s label for post-treatment directions, then test the intended stain color in a small, hidden area after it dries. This final review helps distinguish natural color variation from a missed cleaning or brightening patch.
Checking wood readiness with a water-drop test
After cleaning, brightening, and drying, use a water-drop test to gauge whether the wood can absorb stain. Droplets should soak into the wood; beads sitting on the surface mean the deck needs further assessment before coating. This simple check makes preparing a deck for restaining more deliberate because it tests absorption rather than relying on appearance alone.
- Choose several representative spots for the test, including a central board and an area near an edge. Don’t test only one unusually exposed patch, since old finish or uneven cleaning can affect boards differently. Use clean water and apply a few drops to each spot.
Watch how the surface responds. If the drops soak into the wood, that area is ready to absorb stain. If water remains beaded, don’t assume the spot is ready based on appearance alone.
- Compare test spots across the deck rather than relying on the first result. Water may soak into a bare-looking board but bead where old protective finish remains. Different results indicate an uneven surface, so note each location before deciding what preparation it needs.
A water-drop test indicates absorption, not the condition of every board or the strength of a previous coating. Pair the result with a visual inspection for peeling stain, residue, rough grain, and damaged wood. Address each issue separately.
- If drops bead, assess the area for remaining finish, cleaner residue, or moisture. A coating that still protects the wood can block new stain from adhering. Dust can also hinder adhesion, so remove visible particles before retesting. Don’t apply fresh stain to an area that hasn’t passed the absorption check.
Return to the relevant preparation step for that surface. Remove failing or incompatible finish as needed, rinse away residue, and let the wood dry. Then repeat the water test on the corrected area. Aim for consistent absorption across the boards, not a passing result from one isolated patch.
- Once droplets soak into the tested wood, consider the result alongside the stain label and the deck’s overall condition. A passing test supports readiness, but doesn’t replace checking for mildew, dust, peeling finish, or repairs still needed. Inspect seams and board edges, too, since they can hold residue or moisture.
Note which spots absorbed water and which repelled it. That record helps target remaining preparation instead of reworking the entire deck without cause. As you continue preparing a deck for restaining, use the results to guide final checks and give the new stain a cleaner, more consistent surface to bond with.
Hudson Line Painters: Interior Painting
Hudson Line Painters provides Deck & Fence Staining for homeowners who want professional support after inspecting, repairing, and preparing the wood. Turn to the service when peeling finish, rough areas, or uneven color make preparation more involved, or when you want careful application after the deck is ready.
Clear preparation still matters: boards need repairs, loose stain needs attention, and the surface must be clean and dry before fresh stain goes on. Sharing what you’ve found during your inspection helps frame the project and its needs. For a straightforward next step, contact Hudson Line Painters to discuss your deck staining project.
Move from deck preparation to a finished project
Once the surface is ready, decide whether to apply the stain yourself or have Hudson Line Painters handle the project with its Deck & Fence Staining service. The same attention to finish can support other home updates, including Interior Painting, Exterior Painting, and Kitchen Cabinet Refinishing.
Keep your inspection notes and stain preferences close as you plan the work. Those details provide a clear starting point, whether you’re coordinating the final application or planning related improvements. Careful preparation gives your deck a sound beginning, and a considered next step carries that care through to the finished space.
Frequently Asked Questions
How often should I restain my deck?
Plan to restain a deck every 2-3 years, adjusting for climate, sun exposure, stain type and quality, and deck use. Inspect high-traffic steps and sunny railings first because their finish may wear differently from sheltered boards. If those areas look faded or water no longer absorbs into the wood, assess the finish and surface condition before setting your next maintenance date.
How do you tell if a deck needs stripping or just cleaning before restaining?
Clean the deck first, then inspect how the old finish behaves and test stain adhesion in a hidden spot. If dirt or mildew disappears but the finish remains sound, cleaning may be enough. Sand peeling stain, and remove a protective coating that rejects the test stain. Beading water can also indicate remaining finish, so compare several boards rather than relying on one patch.
How do you clean a deck before applying stain?
Start by sweeping away leaves and loose debris, then use a deck cleaner according to its label. Scrub with a stiff brush, especially around board gaps, railings, and corners where grime collects. Rinse thoroughly to remove cleaner residue. Hand scrubbing gives more control on small or delicate areas; pressure washing can help with broader surfaces, but excessive force can roughen the wood.
How do you strip old deck stain safely and effectively?
Choose a stain remover labeled for the existing deck finish, then follow its directions for application, working time, brushing, and rinsing. Work in manageable sections so the remover doesn’t dry before you scrub. Use a stiff synthetic-bristle brush to work the softened finish into the wood, then rinse as directed. Protect nearby surfaces and control runoff according to the product label and local requirements.
How long should a deck dry after cleaning before staining?
After pressure washing, allow 72 hours before restaining. For cleaned wood and water-based stain, allow one or two days; oil-based stain calls for three full days of dry weather. Use the water-drop test as an additional readiness check: droplets should soak into the wood rather than sit on top. Damp seams or boards that still repel water call for more preparation time.
What temperature and weather conditions are best for preparing and staining a deck?
Choose late spring or early fall, when conditions aren’t too hot or humid. Plan for two or three days without expected rain so the stain can dry completely. Avoid starting if rain is forecast during that period, and consider the deck’s sun exposure: direct heat can dry one section while you’re still applying stain elsewhere. Follow the stain label for specific application conditions.
How do you sand a deck before restaining, and what grit should you use?
Sand peeling edges and rough patches until the loose finish is removed and transitions feel smooth. Work with the wood grain, use controlled pressure, and check progress by touch before sanding further. No single grit suits every deck; the wood’s condition and sanding tool affect the choice. Test a small area first, then clear away sanding dust before staining.
How do you protect plants, siding, and nearby surfaces when preparing a deck?
Before washing or applying cleaner, move furniture and plan where rinse water will go. Cover nearby siding and fixed surfaces with protective sheeting, and shield plants from direct cleaner spray. Don’t let coverings trap water against wood or foliage, and remove them after rinsing. Read the cleaner label for handling and runoff directions, then rinse accidental splashes promptly as instructed.


