

A smooth finish is only part of the job: wrought iron needs a coating made for metal, with primer to help the paint adhere and protect the surface. When painting a wrought iron fence, apply a compatible primer, then at least two thin coats of exterior metal paint. The right coating system helps the finish withstand weather and everyday wear.
Choosing paint may seem like a small decision, but the wrong product or rushed preparation can lead to peeling, uneven coverage, and extra work later. Start with a metal-compatible primer and paint, then prepare the surface carefully so each coat can do its job.
This guide explains why wrought iron calls for suitable products, how to clean the fence and address rust before painting, and how to apply and maintain the finish. You’ll learn what to look for on paint labels, how to plan the coating process, and when professional exterior painting or fence staining can help restore a well-kept look.
Key Takeaways
- Choose a metal-compatible primer and paint with your fence’s weather exposure and desired upkeep in mind.
- Compare coating systems by how they work together, not just by the topcoat alone.
- Clean the surface and remove loose rust before painting so the new finish can adhere properly.
- Choose between spraying and brushing based on the fence’s details, access, and the level of control the job needs.
- Inspect the finish regularly and address small chips or rust spots before they spread.
Is Primer Necessary for a Wrought Iron Fence?
Gather a wire brush, scraper, sandpaper, cleaning supplies, metal primer, exterior metal paint, and brushes or a sprayer. A drop cloth and painter’s tape can protect nearby surfaces while you work.
Before sanding or painting, wear safety glasses, gloves, and a suitable respirator. Keep children and pets away from the work area, and follow product labels for handling and ventilation.
- Choose a primer made for metal, then apply one solid coat to the prepared iron. Primer gives the topcoat a suitable base and helps protect exposed metal. Pay particular attention to joints, decorative details, and areas where old paint has come away.
- Match the paint to the fence’s exposure and the primer system. Choose exterior paint labeled for metal rather than assuming a general-purpose product will adhere well. Check the label to confirm it can be applied over your primer; compatible layers work together as a system.
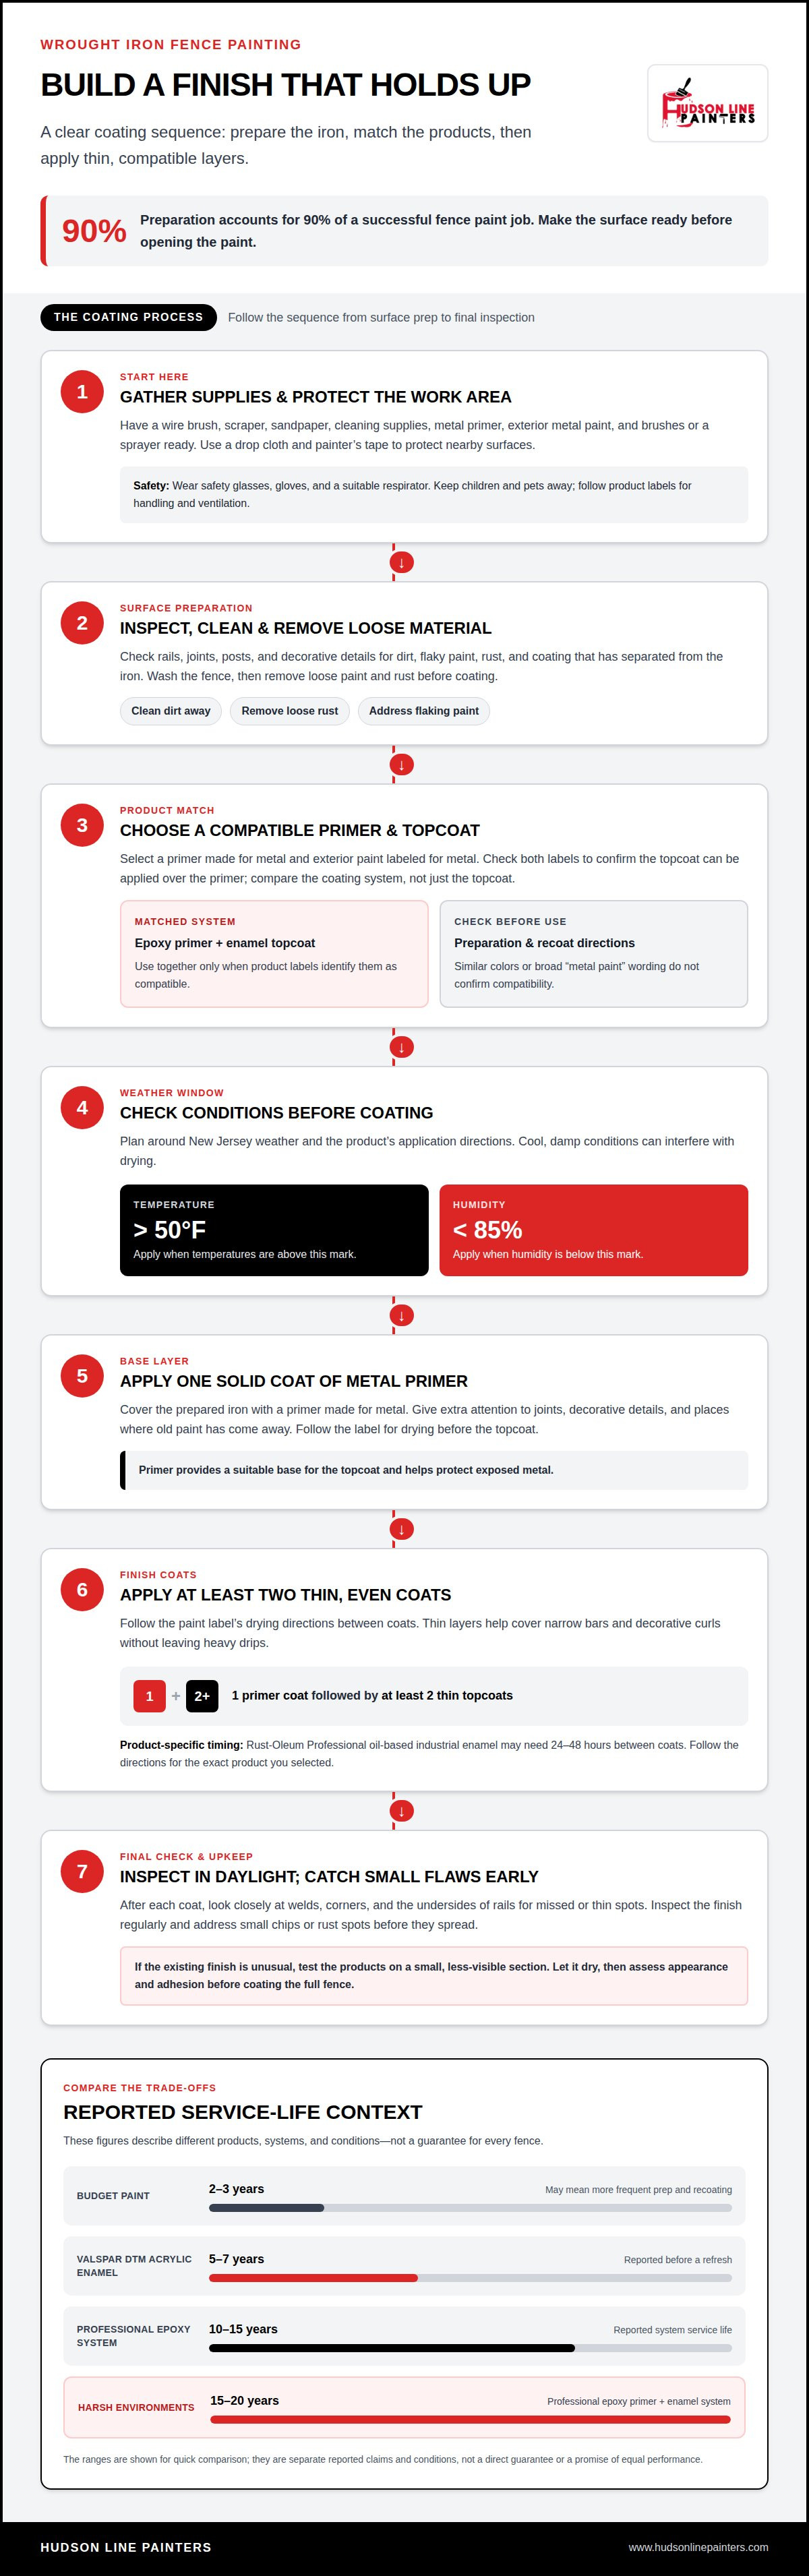
- Plan around New Jersey weather before opening the paint. Apply the coating when temperatures are above 50°F and humidity is below 85%. Cool, damp conditions can interfere with drying, so choose a suitable weather window and follow the product’s application directions.
- Set a realistic budget by weighing initial product cost against the effort of repainting. Budget paints for wrought iron may last 2-3 years, so a lower-cost choice can mean more frequent preparation and recoating. Compare labels and system compatibility, not just the can price.
- Apply thin, even layers instead of trying to cover every rail in one heavy pass. Apply at least two thin coats over the primer, following the label’s drying instructions between coats. Thin layers help cover narrow bars and decorative curls without leaving heavy drips.
- If the existing finish is unusual, test your products on a small, less-visible section. Let the area dry before assessing its appearance and adhesion. This check can reveal a mismatch between the old coating, primer, and topcoat before you paint the entire fence.
- Inspect the finish in daylight after each coat. Look closely at welds, corners, and the undersides of rails, where missed spots are easy to overlook. When painting a wrought iron fence, a careful final check helps catch thin coverage while touch-ups are still straightforward.
Epoxy primer and enamel topcoat systems
Choose an epoxy primer and enamel topcoat as a matched system for a wrought iron fence. Compare enamel types by their labels, drying directions, and intended use.
-
Select an Epoxy Primer and Enamel Topcoat
Pair an epoxy primer with an enamel topcoat only when the product labels identify them as compatible. The primer provides a dedicated base, while the enamel forms the visible finish. Before buying, read both labels for surface preparation, application directions, and suitable topcoat pairings. Don’t combine products based only on similar colors or broad “metal paint” descriptions; compatibility matters more than appearance.
Use the labels to plan the sequence, including how long the primer should dry before applying the enamel. Keep the product instructions at the work area so you can follow the correct preparation and recoating directions for each layer.
-
Compare Enamel Paint Options
Compare oil-based industrial enamel, Valspar DTM Acrylic Enamel, and rust-inhibiting enamel by their stated uses and application directions. Rust-Oleum Professional oil-based industrial enamel may need 24-48 hours between coats. Valspar DTM Acrylic Enamel is reported to last 5-7 years before needing a refresh. Those figures describe different considerations, so compare drying time and reported service life separately.
For rust-inhibiting enamel, check the label to see whether it requires a separate primer or is part of a specified system. “Rust-inhibiting” does not mean the paint can go over loose rust or replace surface preparation. Choose a product suited to the fence’s condition and follow its coating directions.
- Check the application instructions for your chosen enamel before starting. An oil-based product and a DTM acrylic product may have different cleanup and recoating directions. Follow the label for the specific enamel you selected rather than applying instructions from another product. This helps you plan the work around the correct drying requirements.
- Compare reported service-life claims with the project’s maintenance priorities. Valspar DTM Acrylic Enamel is reported at 5-7 years before a refresh, while professional epoxy systems may last 10-15 years. In harsh environments, a professional epoxy primer and enamel topcoat system is described as lasting 15-20 years. These figures refer to distinct systems and conditions, not a guarantee for every fence.
- Keep product names and instructions clear throughout application. Mark each container as primer or topcoat, and check the label before pouring or cleaning tools. For example, don’t mistake Rust-Oleum Professional oil-based industrial enamel’s 24-48-hour recoat interval for the directions on Valspar DTM Acrylic Enamel. Matching each instruction to its product keeps the system organized and the coating sequence consistent.
Fence cleaning and rust removal
To paint a wrought iron fence step by step, inspect it, clean away dirt, remove loose paint and rust, then apply compatible coatings. Preparation accounts for 90% of a successful fence paint job, so work carefully before opening the paint.
- Inspect every rail, joint, post, and decorative detail before cleaning. Look for flaky paint, rust, dirt, and areas where the coating has separated from the iron. Mark damaged sections mentally or with removable tape, so you can return to them after washing. This inspection helps distinguish stable old paint from material that needs removal.
- Wash the fence with a suitable cleaning solution, removing grime from crevices. Use a brush around joints, curls, and the undersides of rails, where dirt can collect. Rinse away residue and let the metal dry thoroughly before sanding. Paint applied over dust or dampness may not adhere evenly.
- Scrape and sand loose paint until the remaining edges are firmly attached. A wire brush can reach rough rust patches, while sandpaper smooths chipped paint around them. Remove peeling edges rather than coating over them. Feather the transition between bare iron and sound existing paint to create a smoother surface for the next layer.
- Remove rust that flakes or brushes away before applying new paint. Work around welds and fence connections, where corrosion can hide beneath decorative shapes. Once the surface is prepared, wipe away sanding dust with a clean cloth. Use a rust-treatment product only as its label directs.
- After cleaning, check whether the old paint is still firmly bonded. Sound, well-adhered paint can remain as a base if the new coating is compatible. Remove loose, cracked, or blistered areas instead of covering them; a fresh coat won’t stabilize paint that has detached from the iron.
- Consider POR-15 rust preventive coating only as a labeled coating option for prepared metal. Read its instructions for surface preparation, application, and compatibility with the primer or topcoat you plan to use. Don’t assume it can cover loose rust or replace every preparation step. Follow the product directions for the exact surface condition.
- Finish preparation by checking the fence from several angles in daylight. Look for dust, damp spots, loose paint, and untreated rust around joints, and correct them before coating. Keep the prepared surface clean until application, since handling or nearby sanding can leave residue that interferes with adhesion.
Paint lifespan and maintenance
Keep drying, curing, and wear in mind as you maintain the finish. Inspect exposed rails and joints regularly, where chips can reveal bare metal.
-
Check Paint Drying and Curing
Follow the coating label’s recoat and handling directions, because drying between coats differs from full curing. Most oil-based metal paints need 24 hours between coats. A wrought iron fence’s paint may take anywhere from a few days to a month to cure fully. Avoid treating a dry surface as fully cured; protect it from contact and avoid stressing the finish during that period.
-
Maintain the Paint with Touch-Ups
Inspect the finish for chips, cracks, and rust spots, especially near joints and gates. A properly prepared and professionally painted fence can retain its paint job for 5 to 10 years. Touch up small damaged areas before exposed iron and spreading corrosion require broader preparation. Clean the spot, remove loose coating, and apply compatible primer and paint according to their labels.
- Use the coating system’s expected lifespan as a planning guide, not a fixed repaint date. Valspar DTM Acrylic Enamel is reported to last 5-7 years before needing a refresh. A properly prepared and professionally painted wrought iron fence can retain its finish for 5 to 10 years. Exposure, surface preparation, and upkeep affect how the coating performs on your fence.
- Check vulnerable details during each inspection. Look closely at welds, narrow rails, fasteners, and the bottoms of posts, where water damage or chipped paint can go unnoticed. Address small damaged areas before the problem spreads to nearby sections. Note repaired spots so you can compare their condition during your next inspection.
- Clean dirt from the finish with a soft cloth and a suitable cleaning method. Avoid scraping sound paint as you remove surface grime. Afterwards, look for dull patches, lifted edges, or rust-colored marks. These signs can help distinguish routine dirt from coating damage that needs a targeted repair.
- Consider the maintenance trade-off before choosing a finish. Professional powder coating for wrought iron is described as lasting 20-30 years, while painted finishes need inspection and occasional touch-ups. Powder coating is a different finishing process, so it isn’t a simple paint repair. For an existing painted fence, maintain the current compatible coating system instead.
- Review the fence after repairs and again once the coating has cured. Check that touch-ups cover the prepared area without leaving bare edges or drips. For example, inspect a gate’s moving joints after use, since contact can wear paint sooner than it does on stationary rails. This routine helps you spot localized damage early.
Spray versus brush application
Choose an application method based on the fence’s shape, nearby surfaces, and how well you can control the work area. A sprayer can cover open rails quickly, while a brush helps work paint into joints and detailed ironwork.
- Assess the fence’s design before selecting a tool. A long run of simple, open rails may suit a sprayer, while scrollwork, tight corners, and ornate finials need careful attention. Note nearby cars, windows, plants, and walkways; overspray can travel beyond the iron and land on those surfaces.
- Choose a brush for detailed control and localized work. It lets you coat the front, back, and edges of a narrow bar without sending paint into the air. Work along each rail in a consistent direction, then inspect welds and decorative joints for missed spots.
- A sprayer may suit a fence with broad, accessible sections if you can protect nearby areas. Move steadily along each rail, keeping the spray directed at the iron. Practise on a less-visible section first, and adjust your motion if you see dry gaps, heavy buildup, or paint drifting onto surrounding surfaces.
- Use both methods when the fence calls for speed and precision. Spray accessible rails, then brush tight curls or thinly covered spots. Check the coating label before changing tools, since its directions govern application and any required thinning.
- Avoid applying paint too heavily with either method. A slow brush pass can leave runs, while holding a sprayer too close can cause drips or uneven buildup. If paint pools around a joint, smooth it before it dries, following the product’s application and recoating directions.
- Keep a wet edge as you move along the fence. With a brush, overlap adjacent strokes before the previous area dries. With a sprayer, maintain a consistent pace across each section. Stopping midway along a rail can leave a visible lap mark, especially as the coating begins to set.
- Inspect both sides of every rail after applying each coat. View the fence from different angles to find thin spots behind bars, around hinges, and beneath horizontal rails. Correct missed areas with the same compatible paint rather than adding a different product that may not adhere properly.
- Clean tools and protect the work area according to the paint label. Remove masking and coverings carefully so they don’t drag against fresh paint. After application, check nearby concrete, siding, or plants for stray droplets, and address spills using the product’s cleanup directions.
Hudson Line Painters: Interior Painting
Hudson Line Painters provides professional interior and exterior painting for homes and businesses, along with kitchen cabinet refinishing. For exterior painting around your property, the team can address surrounding surfaces. Deck and fence staining suits materials that take stain, not the metal coating described here. Interior painting and cabinet refinishing can help with separate indoor projects.
If the fence needs careful preparation and coating, use this guide to plan the work and maintain the finish. For other painting projects or a wood fence that needs staining, contact Hudson Line Painters to discuss your project.
Plan the Right Next Step for Your Fence
Before painting a wrought iron fence, consider whether you can handle the surface preparation, careful application, and follow-up maintenance. A fence with extensive rust, intricate details, or hard-to-reach sections may require more time and control than a simple run of rails. Plan around your property and schedule so you can complete the work without rushing the finish.
For projects beyond the fence, Hudson Line Painters offers interior painting, exterior painting, and kitchen cabinet refinishing. Choose the service that fits your next improvement, whether you’re refreshing a room, updating exterior surfaces, or renewing cabinets.
With a clear plan and careful attention, you can approach the work confidently and keep your home looking well cared for.
Frequently Asked Questions
Why Does Wrought Iron Need a Special Kind of Paint?
Wrought iron needs a coating made to adhere to metal and protect it from moisture and corrosion. Ordinary wall paint is not designed for this surface and may not bond or hold up outdoors. Choose an exterior metal coating and follow its specified primer system. For example, a decorative gate exposed to rain needs a coating for exterior metal, not leftover interior trim paint.
Which Paint Brands Get the Best Results?
No single brand is best for every fence; product type and compatibility matter more than the name. Rust-Oleum and Valspar offer metal-coating options, but compare each product’s intended use and label instructions. Check that the paint suits exterior metal and works with your primer. The application directions are more useful than brand recognition alone.
What is the best primer for wrought iron or metal fences?
A primer labeled for metal is a practical choice, and an epoxy primer suits an epoxy-and-enamel system when the products are compatible. Choose based on the fence’s condition and planned topcoat. Read both labels to confirm compatibility and application directions. Don’t pair an epoxy primer with an unrelated topcoat unless the manufacturers’ instructions allow it.
What type of paint is best for an exterior wrought iron fence?
Choose exterior paint specifically labeled for metal, such as enamel intended for outdoor ironwork. A rust-inhibiting formula may be useful, but it does not remove the need for surface preparation. Check that the coating matches the primer and suits the fence’s exposure. For example, a gate near sprinklers needs a product intended for outdoor moisture and weather exposure.
Is it better to spray or brush paint a wrought iron fence?
Neither method is always better; the fence design and work area determine the choice. A brush provides control around hinges, tight curls, and small touch-ups. A sprayer can cover open, accessible rails efficiently, but nearby surfaces need protection. On an ornate gate, brushing details after spraying broader sections can combine coverage with control. Follow the paint label for approved application methods.
How much does it cost to paint a wrought iron fence?
The cost depends on the fence’s length and height, its condition, access, preparation needed, and the coating system. Extensive rust or peeling paint requires more surface work than a sound, clean fence. The price depends on the specific project and is provided after a quote request. Comparing estimates is most useful when each accounts for the same preparation, primer, paint, and application scope.


