

Most homeowners think a scraper and a fresh coat of white paint are enough to solve a flaky ceiling, but simply covering up the mess is why the repair often fails within a few months. Learning how to fix peeling paint on ceiling surfaces requires more than just aesthetic touch-ups; it demands a forensic look at moisture levels and substrate stability. It is incredibly frustrating to find unsightly flakes on your furniture or to feel that nagging fear of hidden water damage every time a storm rolls through Northern New Jersey. You've likely tried a quick patch before, only to see the same bubbles return, leaving you back at square one.
We understand that your home is your sanctuary, and a failing ceiling disrupts that peace of mind. This 2026 guide reveals the professional secrets to identifying, repairing, and preventing peeling paint for a seamless, long-lasting finish. We will walk you through a systematic repair process, from moisture testing to choosing the right premium finishes. You will also learn how to determine if the height of your ceilings or the delicate nature of a historic Hudson County home warrants the specialized equipment and meticulous care of a professional craftsman.
Key Takeaways
- Identify the hidden root causes of failure, such as Northern NJ humidity or substrate breakdown, before applying any new coatings.
- Master the professional three-coat joint compound method to learn how to fix peeling paint on ceiling surfaces for a perfectly smooth result.
- Protect your living environment by establishing a meticulous dust-proof zone and utilizing mandatory PPE throughout the scraping and sanding phases.
- Lock down vulnerable edges with specialized moisture-blocking primers to ensure your new finish stands up to the demands of kitchens and bathrooms.
- Evaluate when the complexity of high, vaulted, or historic ceilings requires the specialized equipment and disciplined approach of a professional contractor.
Identifying the Root Cause: Why Ceiling Paint Peels
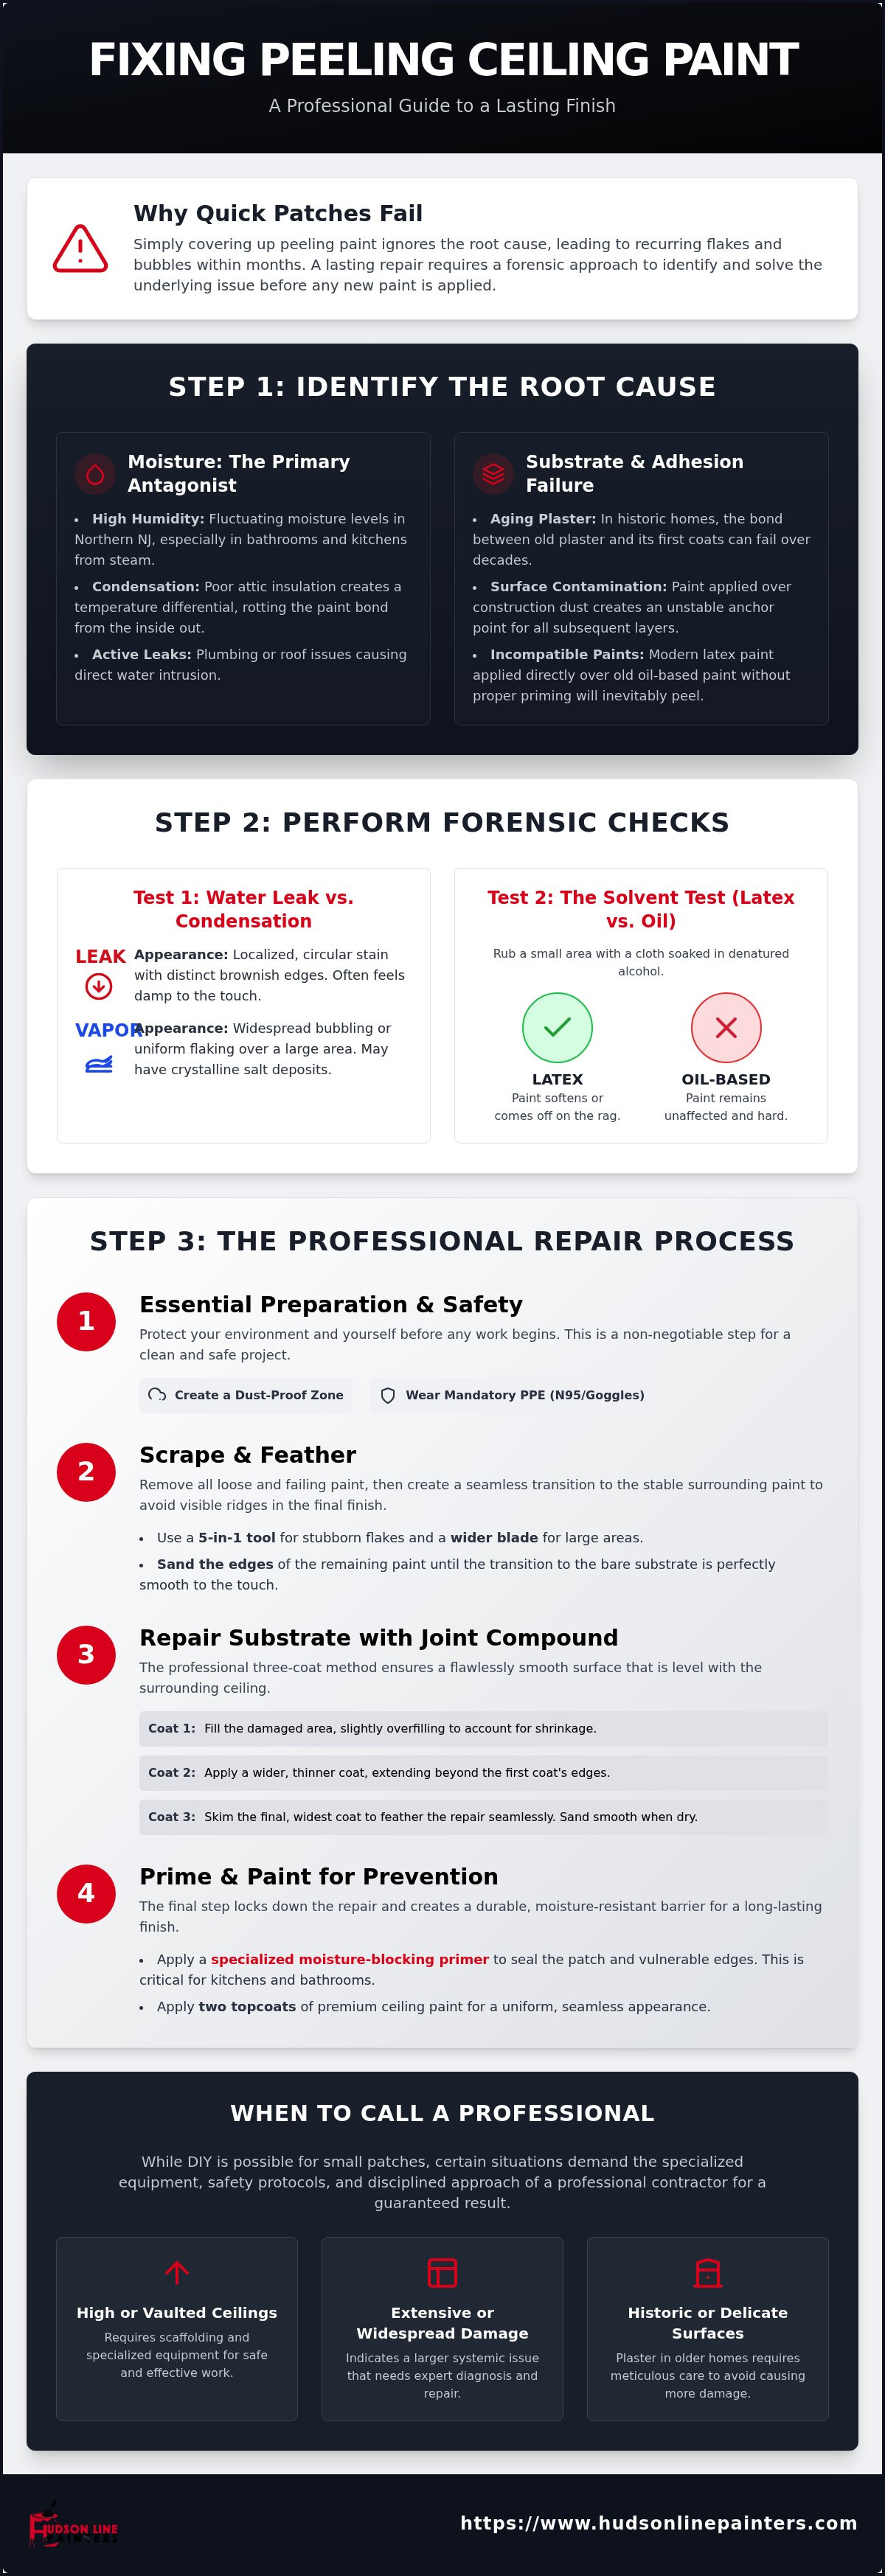
Before you pick up a scraper, you must act as a forensic detective. Most homeowners search for how to fix peeling paint on ceiling surfaces only to find the problem returns because they ignored the environmental friction causing the failure. In Northern New Jersey, where humidity levels fluctuate wildly, moisture is the primary antagonist. In bathrooms and kitchens, steam penetrates the paint film, causing it to expand and lose its grip on the substrate. However, the issue might also be structural. If your attic insulation is insufficient, the temperature differential between the warm ceiling and the cold attic creates localized condensation, effectively rotting the bond from the inside out.
Substrate failure is another common culprit, especially in our region's historic homes. Over decades, the bond between old plaster and its initial lead-free coatings can simply give way due to building settlement or vibration. If the original painter skipped the vacuuming step and applied paint over construction dust, that hidden layer of grit acts like a release agent. No matter how many fresh coats you apply, the entire stack remains unstable because it's anchored to nothing but dust and debris. Identifying these root causes is the only way to ensure your interior painting project lasts for years rather than months.
The Water Leak vs. Condensation Test
Distinguishing between an active plumbing leak and simple condensation is the first step in a professional forensic check. An active leak usually presents as a localized, circular stain with distinct brownish edges, often feeling damp to the touch long after a shower has ended. In contrast, condensation damage appears as widespread bubbling or uniform flaking across a larger area. You should also look for hygroscopic salts, which are mineral crystals that absorb moisture from the air and expand, creating internal pressure that eventually forces the paint film to detach from the substrate. If these salts are present, a simple patch doesn't suffice; the moisture source must be eliminated first.
Incompatible Paint Layers
Historic homes in Hudson and Bergen County often harbor layers of old oil-based paint that modern latex products cannot bond to without specific preparation. This incompatibility leads to "alligatoring," a pattern of deep, jagged cracks that resemble reptile skin. To verify your existing finish, perform a simple solvent test: rub a small area with a cloth soaked in denatured alcohol. If the paint softens or comes off on the rag, it's latex; if it remains unaffected, you're dealing with old-world oil. Applying modern water-based paint directly over this slick, non-porous surface is a guaranteed recipe for failure. Understanding how to fix peeling paint on ceiling areas involves recognizing these chemical barriers before the first drop of primer hits the surface.
Essential Preparation: Safety and Surface Scraping
Meticulous preparation is the hallmark of a high-end restoration. Before addressing how to fix peeling paint on ceiling surfaces, you must protect your living environment. Establish a dust-proof zone by sealing doorways and HVAC vents with heavy-duty plastic sheeting and professional-grade painters tape. In the densely packed neighborhoods of Hudson County, managing airborne debris is essential to prevent dust from migrating into adjacent rooms. Don't underestimate the mess; even a small patch can create a surprising amount of fine particulate that settles on every surface.
If your home was built before 1978, you must assume the presence of lead-based paint. While Hudson Line Painters does not perform lead abatement, we strongly advise homeowners to use lead-safe testing kits before disturbing any surface. Regardless of the paint's age, PPE is non-negotiable. Wear an N95 respirator and wrap-around eye protection to shield yourself from falling flakes and the fine dust generated during the feathering process. This disciplined approach to safety ensures the project remains a home improvement rather than a health hazard.
Professional Scraping Tools and Techniques
Start by using a 5-in-1 tool to pick at the edges of the peeling paint. This rigid tool provides the leverage needed to remove stubborn flakes, while a wider four-inch blade is better for clearing large, loose areas without gouging the delicate drywall or plaster. The goal isn't to remove every inch of paint, but rather to eliminate anything that isn't firmly bonded. Once the loose material is gone, use the "scrape and feather" technique. This involves sanding the edges of the remaining paint until the transition between the bare substrate and the old paint is smooth to the touch, preventing unsightly shadow lines from appearing under your new coat.
Dust Management in NJ Homes
Managing dust in tight Hoboken or Jersey City apartments requires a disciplined approach to site etiquette. Use a HEPA-rated vacuum directly at the source of sanding to capture particles before they settle on floors or furniture. Professional painters utilize 120-grit sandpaper during this phase because it's aggressive enough to level the paint edges without leaving deep scratches in the underlying plaster. Protecting your home's air quality is just as important as the final aesthetic result. If the thought of managing this debris feels overwhelming, our team provides meticulous interior painting services that prioritize a clean, organized workspace from start to finish.
Repairing the Substrate: Drywall and Plaster Restoration
Once the surface is scraped clean, you are often left with a cratered landscape of old paint layers and exposed substrate. Learning how to fix peeling paint on ceiling surfaces requires a disciplined approach to leveling these transitions. If the exposed material is firm drywall, a standard repair is straightforward. However, in many historic Northern NJ homes, you may encounter crumbly, sandy plaster. This indicates that the bond between the plaster and the underlying wooden lath has failed. Applying new paint to a moving substrate is a recipe for immediate cracking, so stabilization must come first.
For a professional-grade repair, we utilize a systematic three-coat joint compound method. The first coat fills the deepest voids, typically using a setting-type compound that hardens by chemical reaction rather than evaporation. This prevents the shrinking and cracking common with DIY-grade spackle. The second coat is wider than the first to feather out the edges, and the final coat is a thin skim of lightweight topping compound. This layering process is essential for achieving a uniform surface that disappears once painted. For more complex structural issues, you can learn more about our drywall and plaster repair services to ensure your foundation is sound.
Patching Drywall vs. Stabilizing Plaster
In older Bergen County residences, plaster ceilings often suffer from key failure, where the plaster tabs holding it to the lath have snapped. We recommend using plaster washers or specialized adhesives to re-secure these sections before patching. For cracks in high-vibration areas, such as ceilings beneath a busy second floor, always use fiberglass mesh tape. This tape provides the tensile strength necessary to resist recurring movement. Setting-type compounds are non-negotiable for these heavy repairs because they provide a rock-hard base that moisture-rich NJ air won't soften.
Sanding for a Seamless Finish
Achieving a Level 5 finish, the gold standard for high-gloss or modern flat ceilings, requires obsessive attention to detail. Once the final coat is dry, perform the Light Test by holding a high-intensity lamp parallel to the ceiling. This side-lighting reveals every minor ridge and pinhole that would otherwise be invisible until the final coat of paint is applied. In dust-sensitive interiors, particularly in apartments where ventilation is limited, wet-sanding with a specialized sponge can minimize airborne particulates. This meticulous sanding phase ensures that your repair is truly invisible, providing the smooth canvas required for a premium aesthetic result. Understanding how to fix peeling paint on ceiling areas means recognizing that the finish is only as good as the sanding that precedes it.
Priming and Painting for Prevention
Successful ceiling restoration isn't just about the patch; it's about the bond. Learning how to fix peeling paint on ceiling surfaces requires a deep understanding of how to lock down the edges of the original coatings. Even after meticulous scraping and sanding, microscopic gaps remain where old paint meets the new patch. We utilize the "Peel-Stop" secret, which involves applying a high-penetration, clear binding primer that seeps under the edges of the existing paint to glue them back to the substrate. This step is the most effective way to prevent the "curling" effect that often ruins DIY repairs within weeks of completion.
In high-moisture areas like kitchens and bathrooms, a standard multi-purpose primer will eventually fail. You need a dedicated moisture-blocking barrier that prevents steam from reaching the substrate. For 2026, we recommend using a high-adhesion, low-VOC waterborne primer like Benjamin Moore Stix to ensure superior grip without compromising your indoor air safety. This type of product creates a non-porous film that resists the expansion and contraction caused by our local NJ humidity. Choosing the right foundation is just as critical as selecting the best paint finishes for NJ homes.
The Role of High-Performance Primers
Different ceiling problems require specific chemical solutions. If you are dealing with yellow water stains or tannin bleed from old plaster lath, a shellac-based primer is the gold standard for blocking stains. For general adhesion on slick, older surfaces, oil-based primers provide a traditional, rock-hard foundation that modern water-based paints can't always match. However, modern 2026 waterborne alkyd primers now offer the durability of oil with significantly lower odor and faster drying times. Ensuring 100% adhesion during this phase is the only way to guarantee your ceiling won't peel again during the next seasonal humidity spike.
Ceiling Painting Mastery
Flat or matte finishes are the undisputed kings of the ceiling. A flat sheen absorbs light rather than reflecting it, which effectively hides any minor imperfections in your drywall or plaster repair. When applying the topcoat, we use the "Wet Edge" technique. This involves working in small sections and always overlapping your roller onto the still-wet paint of the previous pass. This method eliminates visible lap marks and ensures a uniform, velvet-like appearance across the entire expanse. We always apply two thin coats rather than one thick one; this builds a more resilient film and provides better coverage for a premium result.
Modern 2026 paint formulas, such as Benjamin Moore Waterborne Ceiling Paint, are specifically engineered to resist mold and mildew. These products include antimicrobial additives that are essential for Northern NJ homes where ventilation can be a challenge during the winter months. By combining the right primer with a high-performance topcoat, you create a ceiling that isn't just beautiful, but also structurally sound and resistant to the environmental stressors of our region.
Book a professional interior painting assessment for your home
When to Call Hudson Line Painters
While understanding how to fix peeling paint on ceiling areas empowers you to handle minor cosmetic issues, certain scenarios demand a level of technical precision and safety equipment that goes beyond the standard DIY toolkit. High or vaulted ceilings represent a significant physical risk; balancing on a twelve-foot ladder while applying joint compound or maneuvering a heavy roller is a recipe for injury. We utilize professional scaffolding and specialized reach equipment to ensure that even the most soaring entryways receive a flawless finish without compromising safety. If you find yourself staring up at an expanse that requires more than a step-stool, it's time to prioritize your well-being and call in a disciplined team.
Extensive plaster failure is another clear signal for professional intervention. If you can feel the ceiling "give" when you press on it, or if large sections of the key have snapped away from the lath, a simple patch won't suffice. In the historic homes of Bergen County, preserving the architectural integrity of these surfaces is a craft that requires specialized knowledge. We specialize in stabilizing these delicate substrates before they become a structural hazard. Likewise, if you've already attempted the repair twice only to see the same bubbles return, there's likely a persistent moisture or chemical incompatibility issue that requires our commercial-grade diagnostic tools to resolve.
The Professional Advantage
Choosing a professional contractor provides access to high-end equipment that's often cost-prohibitive for a single project. We utilize commercial-grade HEPA dust extraction systems that maintain your indoor air quality far better than a standard shop-vac, which is essential in tight Hudson County floorplans. Our craftsmen are also experts in precision color matching. Ceilings often require a subtle shift in tone to account for how light hits the horizontal surface, and we ensure a seamless transition from your walls to the overhead finish. Most importantly, our work comes with the peace of mind of a professional warranty, ensuring your investment is protected against future failure.
Get Your Professional NJ Ceiling Assessment
Hudson Line Painters takes the guesswork out of home maintenance by applying a systematic procedural framework to every project. Before we open a single can of paint, we perform a thorough assessment of your home's humidity and moisture levels to ensure the root cause of the peeling is fully addressed. We are proud to serve our local communities, providing meticulous interior painting and repair services from the brownstones of Hoboken to the historic residences of Hackensack. Our systematic approach ensures your project is completed with minimal disruption to your daily life and a result that adds genuine value to your property.
Contact us for a professional ceiling repair quote
Restore Your Home's Flawless Finish
Your ceiling is a critical part of your home's aesthetic and structural health. While learning how to fix peeling paint on ceiling surfaces involves technical steps like forensic moisture testing and precision feathering, the ultimate goal is long-term durability. By following a disciplined preparation and priming sequence, you move beyond temporary patches to create a lasting transformation. A successful repair ensures that unsightly flakes and the fear of underlying damage are things of the past.
Since 2018, Hudson Line Painters has specialized in the delicate restoration of historic NJ plaster and drywall. We understand the specific challenges of Hudson, Bergen, and Union County homes; our team prioritizes meticulous dust containment and site protection to keep your environment pristine. You don't have to settle for falling flakes or the stress of failed DIY attempts. Our craftsman-led approach treats every project as a unique opportunity to add genuine value and comfort to your space.
Take the first step toward a smoother, safer home today. We are ready to provide the technical precision and peace of mind your property deserves.
Frequently Asked Questions
Can I just paint over peeling paint on my ceiling?
You cannot simply paint over a peeling surface because the new layer won't restore the bond of the failing coat underneath. Adding more weight to a loose substrate actually accelerates the flaking process. To learn how to fix peeling paint on ceiling areas effectively, you must scrape away all loose material and sand the edges to a smooth finish first. This preparation ensures your new finish has a stable foundation to adhere to.
How much does it cost to fix a peeling ceiling in NJ?
The cost for a professional ceiling repair in Northern NJ depends on the extent of the damage and the height of your ceilings. Minor cosmetic scraping and painting are significantly less expensive than repairing crumbly plaster or fixing water-damaged drywall. We recommend a professional assessment to evaluate the specific needs of your Hudson or Bergen County home. This ensures you receive an accurate estimate based on the unique substrate challenges of your property.
Is peeling paint on the ceiling a sign of a structural problem?
It is often a sign of environmental stress rather than a structural failure, but it can indicate deeper issues. In many historic Hoboken and Jersey City homes, peeling is caused by high humidity or a slow plumbing leak from above. However, if the underlying plaster feels soft or moves when pressed, the structural keys holding it to the lath may have failed. This requires stabilizing the substrate before any aesthetic painting can take place.
What is the best primer for a ceiling that has peeled before?
A high-adhesion binding primer is the most effective choice for surfaces that have previously failed. These specialized products are designed to penetrate the edges of old paint and lock them down to the substrate. For bathroom ceilings in high-humidity NJ environments, we also recommend a dedicated moisture-blocking primer. This creates a resilient barrier that prevents steam from reaching the drywall, ensuring your repair remains intact despite the daily environmental friction of steam and heat.
How do I know if the peeling paint on my ceiling contains lead?
If your home in Bergen or Hudson County was built before 1978, there is a high probability that the underlying layers contain lead. You should use an EPA-recognized lead test kit before disturbing any peeling paint. While Hudson Line Painters specializes in restoration and drywall repair, we do not perform lead paint abatement. If lead is detected, you should consult with a certified abatement specialist to ensure the safety of your living environment.
How long does a professional ceiling repair take?
A typical professional ceiling repair takes between two and three days to complete properly. This timeline allows for the necessary drying cycles between the multiple coats of joint compound and the application of specialized primers. In Northern NJ, seasonal humidity can impact these drying times, so we use commercial-grade drying equipment when necessary. Our systematic process ensures that each layer is fully cured before the next is applied, guaranteeing a seamless and durable result.
Will fixing a leak stop the paint from peeling immediately?
Fixing the leak stops the source of the problem, but it won't reverse the damage already done to the paint film. Once the bond is broken by water, the paint will continue to flake even after the area is dry. You must allow the substrate to dry completely, often using fans or dehumidifiers, before beginning the repair process. Learning how to fix peeling paint on ceiling surfaces involves ensuring the area is moisture-free before applying new materials.
Should I use a roller or a sprayer for ceiling repairs?
We generally recommend using a high-quality roller for most residential ceiling repairs in areas like Teaneck or Englewood. Rollers allow for better control and make it easier to match the existing texture of your surrounding ceiling. While sprayers are efficient for large, empty spaces, they require extensive site protection to manage overspray. For a seamless, high-end finish in a furnished NJ home, a meticulously applied roller finish usually provides the most consistent and professional aesthetic result.


