

What if the most expensive mistake you make during your home renovation isn't the paint color you choose, but the surface you ignore? Many homeowners in Bergen and Hudson County discover that stripping away decades of wallpaper often reveals a nightmare of torn drywall, gouged plaster, and chemical adhesive that refuses to budge. You likely expected a fresh start, yet you're left with a surface that looks more like a construction site than a canvas for high-end paint.
It's completely normal to feel overwhelmed by the sight of damaged walls, especially when you realize that painting over these imperfections will only make them more obvious. This guide will show you why skim coating walls after wallpaper removal is the secret weapon used by professionals to achieve a glass-smooth, Level 5 finish. We'll walk through the technical necessity of neutralizing glue residues and the long-term value of investing in proper surface restoration. You'll gain the confidence to move forward with your project, knowing exactly how to transform your New Jersey home's interior into a durable and aesthetically perfect space.
Key Takeaways
- Understand why skim coating walls after wallpaper removal is necessary to repair common damage like gouges and torn drywall paper that paint cannot hide.
- Learn how to properly neutralize residual glue with professional-grade sealers to prevent new paint from bubbling or peeling later.
- Recognize the signs of common application errors, such as "spider-web" cracking caused by applying joint compound layers that are too thick.
- Evaluate the significant time savings of hiring a professional crew, who can often achieve a flawless Level 5 finish in less than half the time of a DIY project.
- Gain peace of mind by following a proven, step-by-step restoration framework designed for the specific needs of Northern NJ's historic and high-end properties.
Why Skim Coating is Essential After Removing Wallpaper
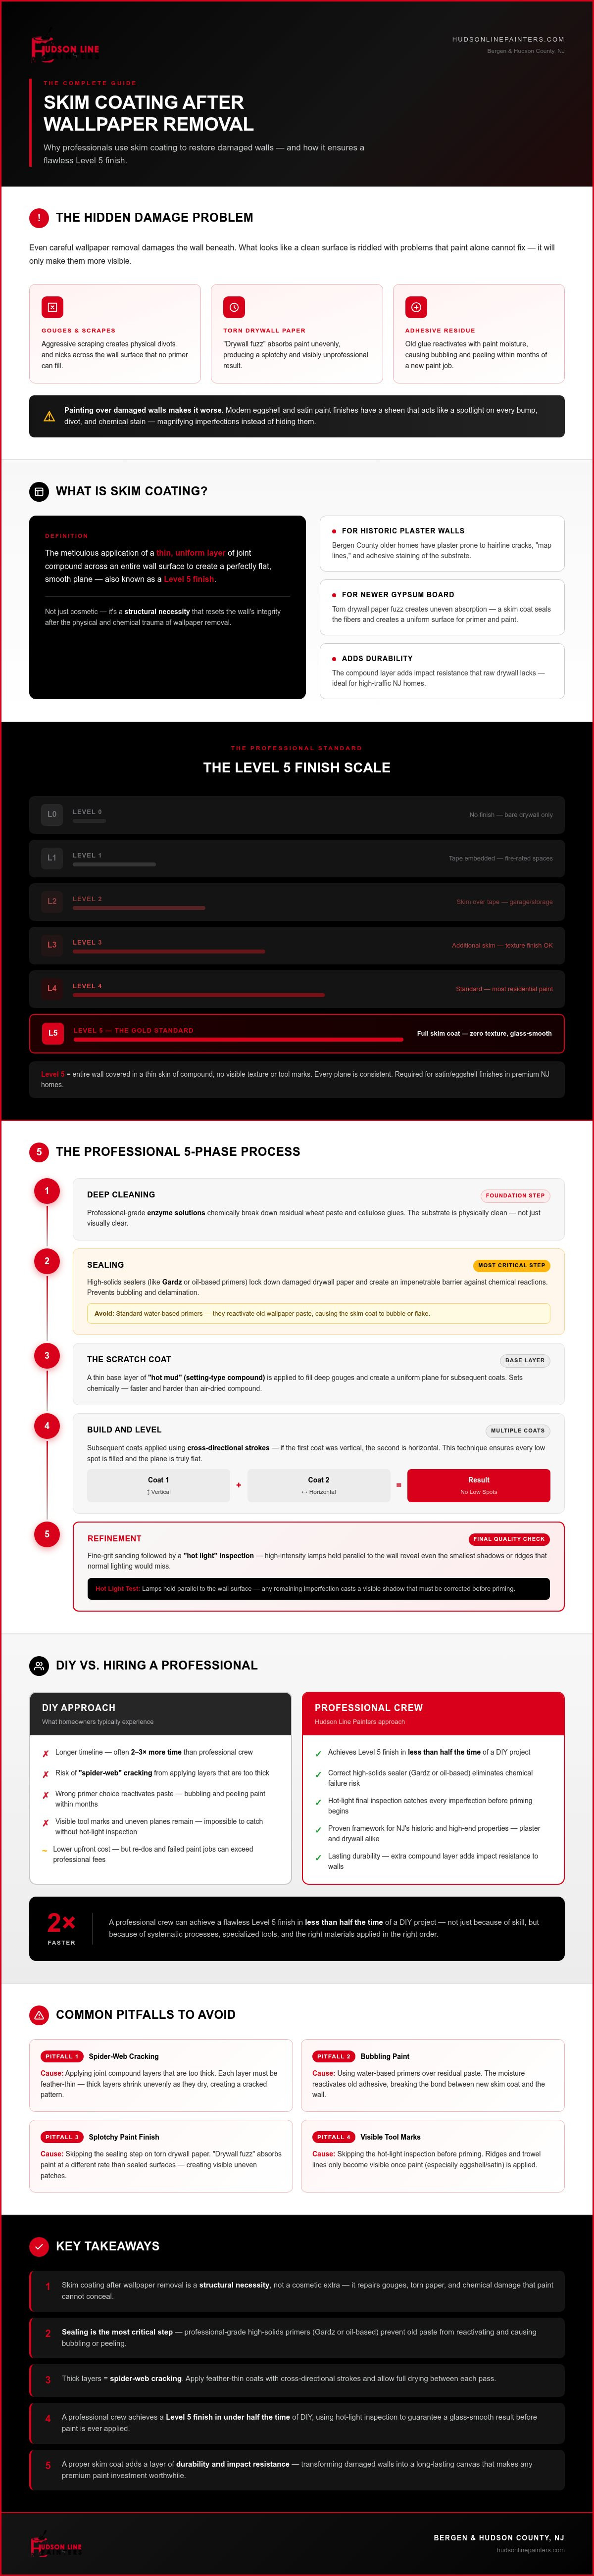
Skim coating is the meticulous application of a thin, uniform layer of joint compound across a wall to create a perfectly flat surface. It isn't just a cosmetic touch-up. It's a structural necessity. When you remove wallpaper, you aren't just taking off paper; you're often stripping away the integrity of the wall itself. Meticulous skim coating walls after wallpaper removal serves as a reset button for your home's interior, neutralizing the damage caused by years of adhesive and the aggressive scraping required to remove it.
The "hidden damage" factor is a reality every homeowner must face. Even the most careful professional removal results in small scrapes, gouges, and torn drywall paper. If you skip the skim coat and go straight to paint, these imperfections will haunt you. Modern paint finishes like eggshell or satin have a slight sheen that acts like a spotlight for every bump and divot. Additionally, leftover paste is a chemical nightmare. If any residue remains, it can reactivate when hit with the moisture of new paint, causing unsightly bubbling or peeling within months. A proper skim coat creates a physical barrier that ensures your interior painting project lasts for years.
Diagnosing Your Wall Condition
Before you start, you must understand what you're looking at. In many historic Bergen County homes, you'll find old plaster walls that are prone to hairline cracks and "map lines" where old adhesive has stained the substrate. In newer NJ constructions, you're likely dealing with gypsum board. If the top layer of paper is torn, you'll see "drywall fuzz." This fuzzy texture will absorb paint differently than the rest of the wall, creating a splotchy, unprofessional look. A professional skim coat seals these fibers down and provides a uniform absorption rate for your primer and paint.
The Level 5 Finish Explained
In the professional trade, a "Level 5" finish is the gold standard. It means the entire wall has been covered in a thin skin of compound, leaving no visible texture or tool marks. While simple patching might fix a specific hole, skim coating walls after wallpaper removal ensures the entire plane is consistent. This is particularly beneficial for high-traffic NJ homes. The extra layer of compound adds a degree of durability and impact resistance that raw drywall lacks. It transforms a damaged, dated surface into a pristine canvas that makes your investment in premium paint truly shine.
The Step-by-Step Professional Skim Coating Process
Achieving a mirror-smooth wall is a systematic journey that begins long before a trowel touches the surface. Professional skim coating walls after wallpaper removal follows a rigorous five-phase lifecycle designed to eliminate the variables that cause paint failure. We treat every wall as a unique restoration project, moving from deep decontamination to the final high-intensity light inspection.
- Phase 1: Deep Cleaning. We use professional-grade enzyme solutions to chemically break down residual wheat paste and cellulose glues. This ensures the substrate is physically clean, not just visually clear.
- Phase 2: Sealing. This is the most critical safeguard. We apply a high-solids sealer to lock down damaged drywall paper and prevent chemical reactions.
- Phase 3: The Scratch Coat. A thin base layer of joint compound is applied to fill deep gouges and create a uniform plane.
- Phase 4: Build and Level. Subsequent coats are applied using cross-directional strokes. If the first coat was vertical, the second is horizontal to ensure every low spot is filled.
- Phase 5: Refinement. We perform fine-grit sanding followed by a "hot light" inspection, where high-intensity lamps are held parallel to the wall to reveal even the smallest shadows or ridges.
Sealing the Surface: The Most Overlooked Step
Many homeowners make the mistake of using standard water-based primers, which can reactivate old wallpaper paste and cause the new skim coat to bubble or flake off. We utilize specialized primers like Gardz or high-quality oil-based sealers to create an impenetrable barrier. These high-solids formulas are designed to soak into "drywall fuzz" and harden the surface. Adhesion-promoting primers serve as the permanent, non-reactive foundation that allows your skim coat to bond securely to the wall without the risk of delamination.
Mixing and Applying Mud Like a Pro
Success in skim coating walls after wallpaper removal depends heavily on the "mud" consistency. We often use "hot mud" (setting-type compound) for base layers because it hardens through a chemical reaction rather than evaporation, which minimizes shrinking. For the final coats, all-purpose compound is thinned to the consistency of thick Greek yogurt. This allows the material to glide onto the wall effortlessly. Using a 10-inch knife for the initial pass and a 12-inch knife for the final skim helps us minimize ridges and create the broad, flat planes characteristic of a Level 5 finish. If the technical complexity of this multi-stage process feels overwhelming, our team at Hudson Line Painters is here to manage the restoration for you, ensuring a guaranteed result for your NJ home.
DIY vs. Hiring a Professional Painter in NJ
Deciding whether to tackle skim coating walls after wallpaper removal yourself or bring in a crew is often a matter of valuing your time versus the steep learning curve. Skim coating is widely considered one of the most difficult finishing skills to master. While a weekend warrior might feel confident after watching a few online tutorials, the physical reality of manipulating joint compound over large vertical surfaces is both exhausting and technically demanding. It requires a level of muscle memory and "feel" for the material that only comes with years of daily practice.
The time investment is the first major hurdle for most NJ homeowners. A single bedroom can easily stretch into a four or five-day ordeal for a DIYer. You have to account for extended drying times, which fluctuate based on New Jersey's high summer humidity, and the multiple rounds of corrective sanding required to fix application mistakes. A professional team typically completes the same space in two days with far superior results. When you factor in the cost of professional-grade knives, mixing drills, and high-intensity lighting rigs, the financial gap between DIY and hiring narrows significantly. You aren't just paying for labor; you're paying for the specialized equipment that ensures a flawless result.
Then there's the cleanup factor. Sanding joint compound creates a microscopic white powder that migrates into every corner of an occupied home if not managed correctly. Professionals utilize advanced dust-extraction systems and meticulous plastic shielding to keep your living space breathable. Without these industrial tools, you'll likely be cleaning drywall dust out of your HVAC filters and furniture for months after the project is "finished."
When to Attempt DIY (and When to Stop)
If you're dealing with a small hallway or a single accent wall, a DIY approach might be manageable. However, if your project involves an entire floor or rooms with high ceilings, the scale quickly becomes overwhelming. You should stop immediately if you encounter massive plaster cracks or "blown" drywall where the brown inner core is exposed across large areas. For these complex scenarios, you need Expert Drywall and Plaster Repair to stabilize the substrate before any finishing can begin.
The Long-Term Value of Professional Craftsmanship
In the competitive Northern NJ real estate market, the quality of your interior finish directly impacts your property value. Buyers in Bergen and Hudson County expect pristine, gallery-like walls. A "DIY-look" characterized by visible seams, sanding marks, or telegraphing glue lines can actually detract from your home's appeal. The Hudson Line Painters difference lies in our commitment to site protection and operational discipline. We treat your home as a craft studio, ensuring that the transition from wallpaper removal to a Level 5 finish is seamless, clean, and adds genuine lasting value to your investment.
Common Pitfalls and How to Avoid Them
Even with a solid plan, the transition from stripped walls to a gallery-quality finish is filled with hidden traps. Most failures in skim coating walls after wallpaper removal don't happen because of a lack of effort, but because of a misunderstanding of how materials react to one another. Avoiding these common mistakes will save you from the frustration of seeing your new paint peel or crack just weeks after the project is finished.
- Skimming over active glue. This is the most frequent cause of bubbling. If you don't chemically neutralize or physically remove every trace of adhesive, the moisture in your joint compound will reactivate the glue. This creates a pocket of gas that pushes the mud away from the wall.
- Applying coats that are too thick. It's tempting to fill a deep gouge in one pass. However, thick layers of mud shrink as they dry, leading to "spider-web" cracking. It's always better to apply three paper-thin coats than one heavy one.
- Inadequate sanding between coats. If you don't sand down the high ridges before applying your next layer, you'll create "holidays"—small missed spots or recessed areas that become glaringly obvious once the final paint is applied.
- Skipping the final prime coat. Joint compound is incredibly porous. If you paint directly over it without a dedicated primer, the wall will soak up the paint unevenly, resulting in a blotchy, flat finish known as "flashing."
Managing NJ Humidity and Drying Times
New Jersey's climate plays a significant role in the success of your project. High humidity in Bergen and Hudson County can double the expected drying time for joint compound. If you re-coat a wall before the previous layer is fully cured, you trap moisture behind the new mud, which eventually leads to delamination. We recommend using industrial dehumidifiers and high-velocity fans to move air across the surface. This ensures the compound dries from the inside out, providing a stable base for the next phase of the restoration.
Troubleshooting Torn Drywall Paper
When wallpaper removal goes wrong, it often takes the top layer of drywall paper with it, exposing the brown gypsum core. This brown paper is highly absorbent and will blister if it comes into contact with water-based joint compound. You must seal these areas first to create a waterproof shield. Shellac-based primers are the gold standard for sealing torn gypsum cores. Once the core is hardened and sealed, you can safely proceed with your skim coat without fearing the dreaded "blistering" effect.
Transforming Your NJ Home with Hudson Line Painters
Every home tells a story through its architecture, from the historic character of Hoboken brownstones to the sprawling elegance of Bergen County estates. We believe that your walls should reflect that same level of distinction. At Hudson Line Painters, we've developed a specialized approach to skim coating walls after wallpaper removal that treats your home as a sanctuary rather than a construction site. We don't just offer a service; we provide a complete restoration lifecycle that bridge the gap between dated interiors and modern, high-end design.
The true value of working with a professional crew lies in our integrated service model. Many contractors only handle one piece of the puzzle, leaving you to coordinate between a removal specialist and a finisher. We manage the entire transition, from the initial chemical neutralization of adhesives to the final, precision application of interior painting. This holistic approach ensures that the structural integrity of your drywall or plaster is maintained throughout every phase, resulting in a Level 5 finish that is as durable as it is beautiful.
A Meticulous Process for Meticulous Homes
We understand that the biggest concern for NJ families during a renovation is the impact on their daily lives. Our team utilizes advanced dust-mitigation strategies, including HEPA-filtered extraction and surgical-grade plastic shielding, to protect your furniture and air quality. We prioritize your health by using premium, low-VOC materials that deliver professional results without harsh chemical odors. For a deeper look at our preparatory phase, you can explore The Comprehensive Guide to Wallpaper Removal. Our goal is to leave your home cleaner than we found it, with nothing left behind but flawless surfaces.
Ready for a Flawless Finish?
Timing is a critical factor in home restoration, especially if you're planning to host guests for the upcoming holidays. Scheduling your skim coating walls after wallpaper removal well in advance allows for the proper curing times required by New Jersey's climate. We stand behind our craftsmanship with a guarantee that your walls will be perfectly smooth to the eye and the touch. When you're ready to move beyond the frustration of damaged drywall and residual glue, we're here to provide the technical expertise and local reliability you deserve. We invite you to contact us today for a professional wall assessment and take the first step toward a total interior transformation.
Achieve the Flawless Interior Your NJ Home Deserves
Transforming your walls from a damaged, glue-stained mess into a pristine canvas requires more than just a fresh coat of paint. You've learned that neutralizing chemical residues and sealing torn drywall are the non-negotiable foundations of a lasting finish. By investing in the professional process of skim coating walls after wallpaper removal, you aren't just fixing a surface; you're elevating your entire home's aesthetic and long-term value.
As specialists in historic NJ home restoration across Hudson, Union, and Bergen Counties, we prioritize your peace of mind. We utilize advanced dust-controlled sanding technology to keep your air clean and your furniture protected. Our fully insured team is dedicated to providing the technical precision that busy professionals expect. We take pride in delivering a Level 5 finish that stands up to the closest inspection.
Schedule Your Professional Wall Assessment in NJ
Don't let the stress of wallpaper damage hold back your renovation goals. Your journey toward perfectly smooth, gallery-quality walls starts with a single expert consultation. We look forward to helping you create a space you're proud to call home.
Frequently Asked Questions
Is it absolutely necessary to skim coat after removing wallpaper?
Yes, skim coating is almost always necessary to achieve a professional result. Removing wallpaper often leaves behind "drywall fuzz," deep gouges from scraping, and microscopic glue residue. If you skip this step, your new paint will highlight every imperfection rather than hiding it. A proper skim coat creates a fresh, non-reactive surface that ensures your paint bonds correctly and looks perfectly smooth under any lighting.
How many coats of skim coat are typically needed for a smooth finish?
We typically apply two to three thin layers of joint compound to achieve a Level 5 finish. The first coat fills deep damage and gouges, while subsequent coats level the entire surface plane. Using multiple thin layers prevents the "spider-web" cracking that occurs when mud is applied too heavily in a single pass. It's a systematic approach that results in a durable, glass-like surface that significantly improves your home's interior aesthetic.
Can I just use a high-build primer instead of skim coating?
High-build primers are excellent for minor texture, but they aren't a substitute for skim coating walls after wallpaper removal. Primers can't fill physical gouges or flatten out the "telegraphing" lines left by old adhesive. A skim coat provides the structural flatness that no paint product can replicate. It's the only way to ensure that high-sheen finishes like eggshell or satin don't reveal ugly bumps and ridges.
How long does it take for a skim coat to dry before I can paint?
Drying times vary between 12 and 24 hours per coat depending on the specific compound used and the local environment. New Jersey's high summer humidity can significantly extend these windows, so it's important to never rush the process. We use high-velocity fans and industrial dehumidifiers to ensure each layer is fully cured. This prevents moisture from being trapped behind the paint, which could lead to peeling or bubbling later.
Will skim coating make a huge mess in my house?
Professional skim coating doesn't have to be a messy ordeal for your family. While the process involves sanding, we utilize advanced dust-controlled extraction systems that capture particles at the source. We also use meticulous plastic shielding and heavy-duty floor protection to ensure your living space remains clean and breathable. Our crew prioritizes site etiquette, ensuring that your home is left in pristine condition once the restoration is complete.
What happens if I paint directly over old wallpaper glue?
It's a recipe for a renovation disaster to paint directly over residual glue. The moisture in the new paint reactivates the adhesive, causing the paint film to bubble, crack, and eventually flake off the wall. This chemical reaction ruins the finish and often requires a complete strip-and-repair job to fix properly. Skim coating provides a necessary barrier that neutralizes these chemicals and provides a stable surface for the paint.
How much does professional skim coating cost in New Jersey?
It's difficult to provide a flat rate because the cost for professional wall restoration in New Jersey, specifically in Bergen, Hudson, and Union Counties, depends on the room's square footage and the extent of the underlying damage. Factors like ceiling height and the presence of historic plaster also influence the final investment. We provide detailed, transparent estimates after a physical assessment to ensure you understand the value of the restoration.
Can you skim coat over plaster walls as well as drywall?
Yes, skim coating walls after wallpaper removal is an ideal solution for restoring historic NJ plaster walls. It fills the hairline cracks and "map lines" common in older Hudson County brownstones and Bergen County estates. This technique provides a uniform, modern surface while preserving the structural integrity of the original plaster substrate underneath. It's a much more cost-effective and less invasive alternative to tearing out old plaster and installing new drywall.


