

The calendar can’t tell you whether a pressure-treated pine deck is ready for stain. That’s why staining a pressure treated pine deck can feel confusing: advice ranges from waiting a few weeks to several months, and the right timing depends on the wood’s condition, not just its age. A water-drop test offers a useful clue: if water beads instead of soaking in, the boards may need more time to dry.
If you’re unsure when to begin or how to avoid a blotchy finish, this guide can help. Learn how to assess readiness, prepare the boards, choose a stain that suits the deck, and apply it carefully. You’ll also find practical ways to plan around New Jersey weather and maintain the finish. Hudson Line Painters’ deck-staining process follows the same sequence: clean the surface, prepare it for even absorption, and apply stain with the wood’s condition in mind.
Key Takeaways
- For staining a pressure treated pine deck, assess the boards and site conditions before deciding they’re ready for a finish.
- Follow a careful prep sequence: inspect, clear, clean, address surface flaws, and let the wood dry without aggressively washing the pine.
- Choose a transparent, semi-transparent, or solid finish based on how much grain you want to show, then compare oil-based and water-based options for your project.
- Apply stain in manageable sections, following the product label for suitable conditions, tools, coverage, and coat count.
- Watch for worn or uneven areas as you care for the deck, and reassess the finish when it no longer protects or looks consistent.
Why pressure-treated pine needs a readiness check before staining
Pressure-treated pine is lumber infused with preservatives under pressure to help protect it from decay and wood-damaging organisms. That treatment doesn’t automatically mean the boards are dry enough to stain. Preservatives and moisture are separate concerns: some treated lumber retains water from processing, while other boards are kiln-dried after treatment. The Wood preservation overview explains why wood is treated; readiness for a finish still depends on the boards and the stain you choose.
Moisture affects whether stain can penetrate and dry as intended. Treatment method, board thickness, sun exposure, airflow, and recent weather all influence drying. A sunny, open deck may dry differently from boards beneath a roof or beside dense planting, where shade and limited airflow can keep surfaces damp. A calendar estimate is only a starting point.
Stain readiness depends on wood condition and stain instructions, not age alone. When staining a pressure treated pine deck, use practical checks alongside the moisture and preparation requirements on the stain label. Applying stain too soon can interfere with absorption or drying, so assess the boards before opening the can.
How to check whether treated pine is ready
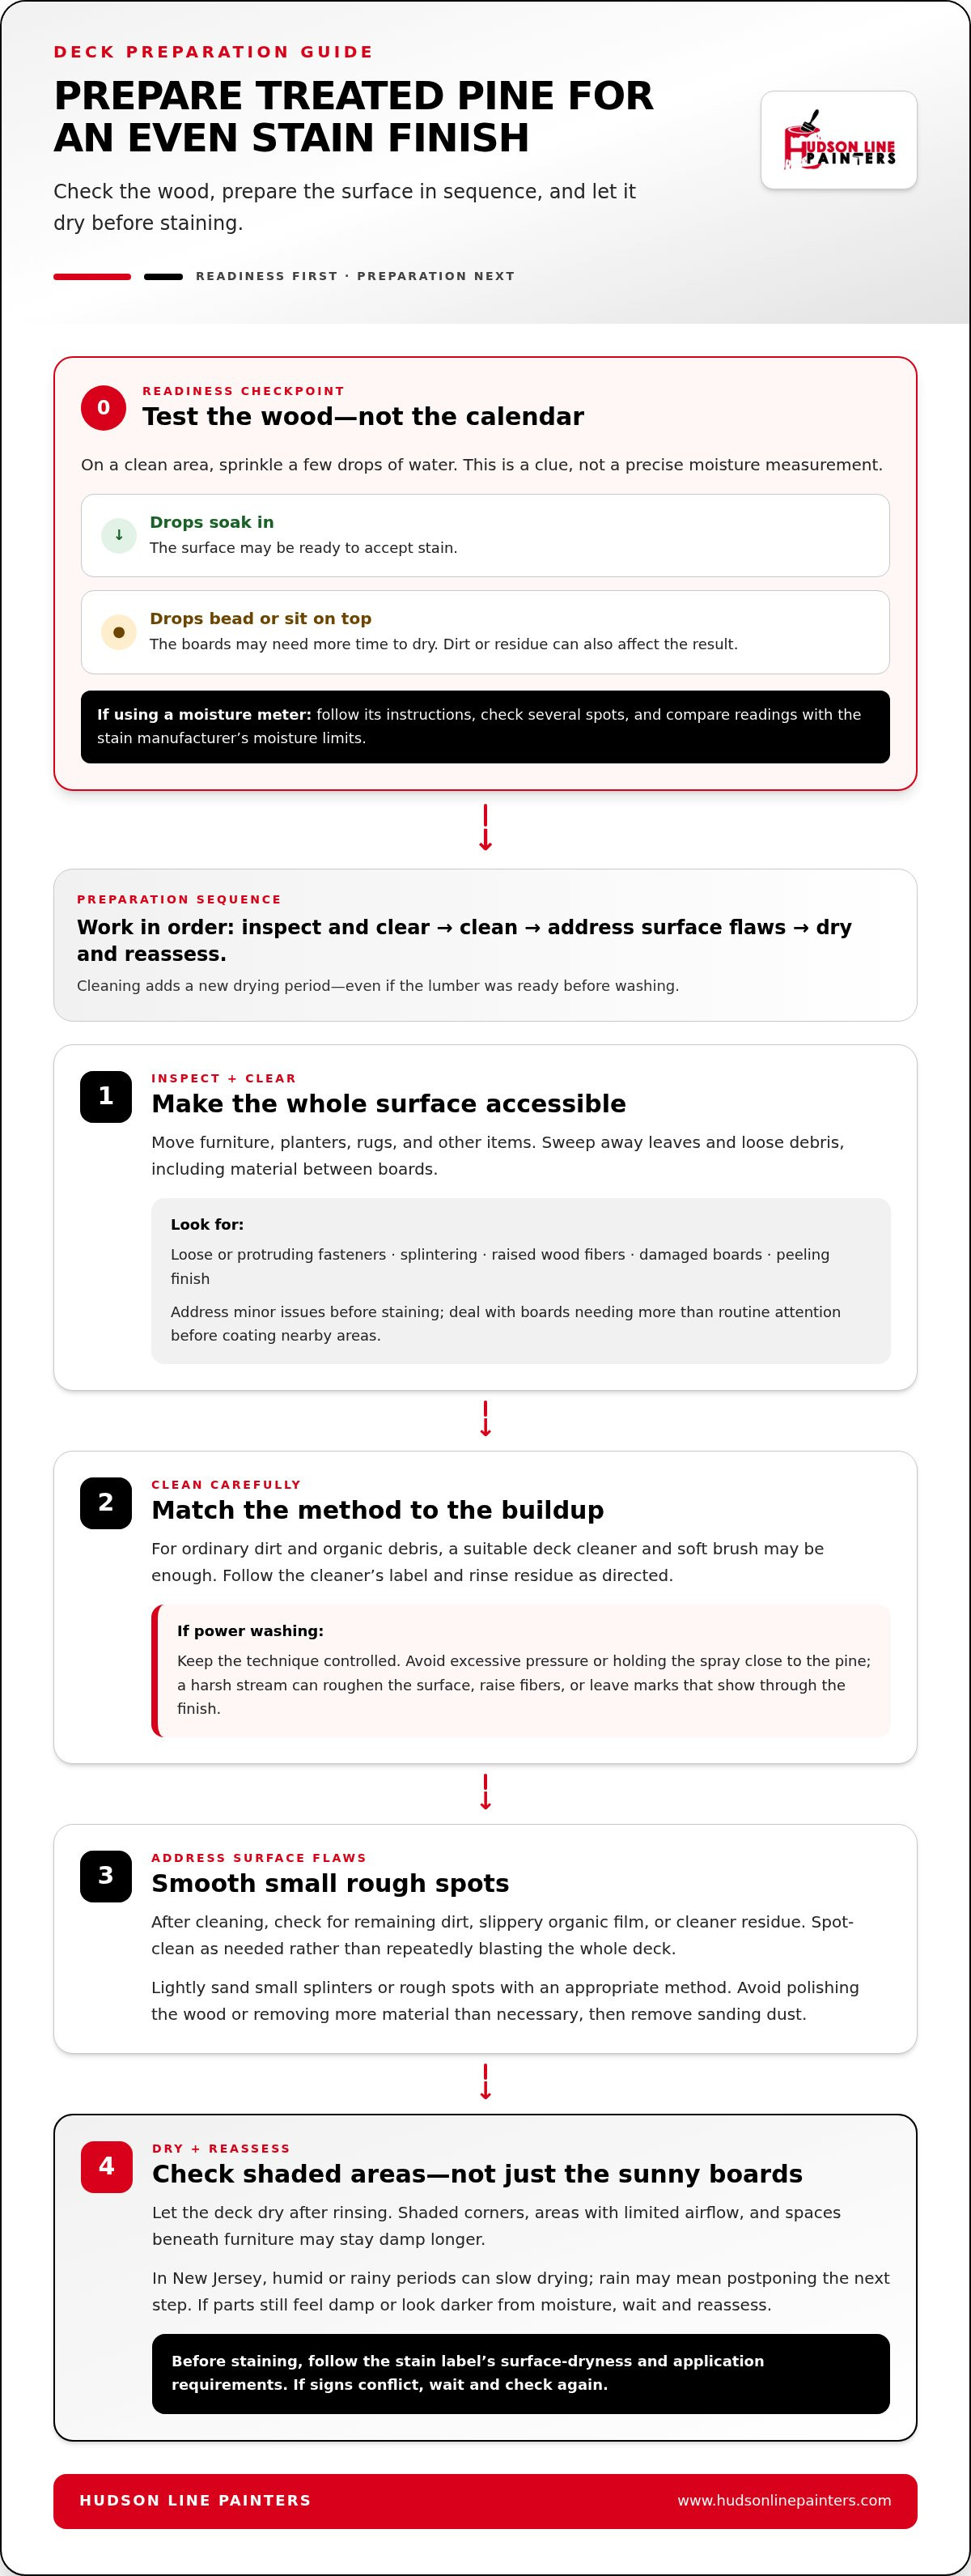
Try a basic water-drop test on a clean area. Sprinkle a few drops on the wood. If they soak in, the surface may be ready to accept stain; if they bead or sit on top, the boards may need more time to dry. This is an indicator, not a precise moisture measurement. Dirt or residue on the surface can also affect the result.
A moisture meter can provide additional information, but readings depend on the meter, its settings, and where and how you measure. Follow the tool’s instructions, take readings at several spots, and compare them with the stain manufacturer’s stated moisture limits. Meet the label’s requirements for moisture and surface preparation rather than relying on a single test.
Why a fixed wait time can mislead
Waiting recommendations range from weeks to months because decks don’t dry under identical conditions. A thick board in a shaded, damp area can hold moisture longer than a thinner board exposed to sun and moving air. Rain, limited ventilation beneath the deck, and the lumber’s treatment and drying process can also affect the timeline.
Use a suggested waiting period as an estimate, not a signal to stain automatically on a particular date. Recheck the wood after wet weather and assess several areas, including shaded boards. The most exposed plank may not represent the slowest-drying spot. If the signs conflict, wait and retest, then confirm the stain label’s requirements before proceeding.
How to prepare a pressure-treated pine deck for stain
A clean, sound surface gives stain a better chance to absorb evenly. Prepare in order: inspect the boards, clear the deck, clean away grime, address minor surface issues, and let the wood dry. This drying period after cleaning is separate from the initial readiness assessment. Even if the lumber was ready before washing, the surface must dry again before stain goes on.
Pressure-treated wood is made for outdoor use, but its condition still matters before you work on it. The U.S. Forest Service’s Guidelines for selection and use of pressure-treated wood provide background on treated lumber and its use. For staining, focus on the deck’s cleanliness and surface condition, along with the stain manufacturer’s directions.
Inspect and clean the deck without damaging the boards
Move furniture, planters, rugs, and other items off the deck. Sweep away leaves and loose debris, including material caught between boards. Then inspect the surface for loose or protruding fasteners, splintering, raised wood fibers, damaged boards, and peeling finish. Address minor issues before staining. Deal with boards that need more than routine attention before coating the surrounding area.
Match the cleaning method to the amount of buildup. For ordinary dirt and organic debris, a suitable deck cleaner and soft brush may be enough. Follow the cleaner’s label and rinse away residue as directed. If you use power washing, keep the technique controlled. Avoid excessive pressure or holding the spray close to the pine, since a harsh stream can roughen the surface, raise fibers, or leave marks that show through the finish. Professional power washing can help with deck cleaning as part of careful preparation.
After cleaning, look for remaining dirt, slippery organic film, or cleaner residue. Spot-clean as needed rather than repeatedly blasting the whole deck. Once the surface is clean, lightly sand small splinters or rough spots with an appropriate method. Take care not to polish the wood or remove more material than necessary, and remove sanding dust before moving on.
Let the prepared surface dry before moving on
Give the deck time to dry after rinsing. Shaded corners, spaces with limited airflow, and areas beneath furniture may stay damp after exposed boards appear dry. In New Jersey, plan around humid or rainy periods. Damp weather can slow drying after cleaning, and rain may mean postponing the next step. Don’t judge readiness by the sunniest boards alone.
Check the stain label for surface-dryness and application requirements. If the instructions call for a moisture check, use the method they specify. If parts of the deck still feel damp or look darker from moisture, wait and reassess. A disciplined preparation process is central to staining a pressure treated pine deck evenly. Hudson Line Painters offers deck and fence staining services, including preparation and staining for homeowners who prefer professional help.
Which deck stain suits pressure-treated pine?
The right stain depends on the appearance you want, the deck’s condition, and whether the product is compatible with the wood and any existing coating. Opacity describes how much grain shows through; oil-based and water-based describe different stain categories. Consider these choices separately, then use the product label to narrow your options. The Southern Pine Council’s Finishing Southern Pine Decks guidance offers additional context on deck finishes and application.
Choose opacity based on the look you want
Transparent finishes show the most grain and natural variation, so differences between boards remain visible. Semi-transparent stains add more color while allowing much of the grain to show. Solid finishes create a more opaque appearance, with less grain visible. None guarantees a uniform color or conceals every mark, so consider the boards’ existing color and condition before choosing.
| Finish | Appearance and visible grain | Key selection consideration |
|---|---|---|
| Transparent | Subtle color; most grain shows | Works with the wood’s natural variation rather than covering it. |
| Semi-transparent | More noticeable color; grain remains visible | Balances added color with the pine’s texture. |
| Solid | More opaque color; little grain shows | Changes the look substantially; check how it suits the surface and existing finish. |
Use the comparison as a visual guide, not a promise of a particular result. On a deck with boards of different ages or exposure, the same stain may look different from plank to plank. A small test area shows how the selected color and opacity interact with the actual wood.
Check stain compatibility before buying
Oil-based and water-based stains are broad categories, not a ranking from best to worst. Application directions and compatibility depend on the specific product. Read the label for suitability on pressure-treated pine, surface preparation, application conditions, and restrictions involving previous coatings. Don’t assume a new stain will adhere well over an old one simply because both are made for decks.
Existing coatings can change how the surface absorbs stain or affect adhesion. If the deck has a peeling, worn, or unknown finish, the label may call for removing it or completing additional preparation first. Follow those instructions rather than applying another layer over a surface that isn’t ready.
Before staining the whole deck, apply the product to a small, inconspicuous area prepared in the same way as the rest. Let it dry as directed, then assess the color, absorption, and appearance. This test helps set realistic expectations and gives you a chance to reconsider the finish before committing. For staining a pressure treated pine deck, compatibility and a test patch matter as much as the color shown on the container.
How to Apply Stain to Pressure-Treated Pine Step by Step
Once the deck is clean, dry, and compatible with your chosen stain, follow a consistent application sequence. Product directions take priority over general advice because tools, coverage, conditions, and coat requirements vary by formula. Careful pacing helps reduce missed spots and uneven overlap.
- Check the conditions. Read the label’s application temperature and weather requirements, then review the forecast for rain and overnight dew. Make sure the prepared boards meet the product’s dryness requirements and that conditions suit the full application and drying window.
- Stir the stain thoroughly. Mix it as directed before starting and periodically during the job if the label recommends it. Avoid shaking unless instructed, since the product directions determine how it should be mixed.
- Choose the right application tool. Check the label for suitable brushes, pads, or other applicators, and follow its guidance on coverage. Keep a clean cloth handy for accidental drips, using it only as appropriate for the product.
- Start in a manageable area. Work along the length of the boards rather than coating a large patch at once. Keep the wet edge workable as you move forward, so the next pass blends into the previous one before it dries.
- Apply the directed amount. Spread stain evenly and avoid leaving puddles or heavy buildup between boards. If the label and application method call for back-brushing, lightly brush the wet stain along the grain to even it out. Don’t add this step automatically if the product directions don’t call for it.
- Continue across the deck. Keep sections small enough to maintain a steady pace and consistent appearance. Check board ends, edges, and less visible areas as you go, while avoiding accidental overlap that can make the finish look darker.
- Inspect and follow the recoat directions. Look for missed areas or pooling while the stain is still workable. Allow the finish to dry as instructed before deciding whether another coat is required.
Apply an even coat without lap marks
A wet edge helps prevent a visible line where one section stops and the next begins. Work board by board, maintaining a consistent direction and pace. If you need to pause, finish at a natural break rather than leaving a wet edge mid-board. Back-brush only when appropriate for the product and tool, and follow the label’s coat count instead of applying extra stain by habit.
Follow the label’s drying and recoat instructions instead of adding coats by habit. More stain isn’t automatically better. Depending on the product, excess material may leave an uneven surface or interfere with drying.
Plan around New Jersey weather
Check for rain and overnight dew before beginning. Humid air, shade, and changing conditions can affect drying, while direct sun may change how quickly stain behaves on exposed boards. Use the product’s stated temperature and weather window, and postpone the work if the forecast doesn’t allow you to follow the label’s directions.
For staining a pressure treated pine deck, a measured application and close attention to product instructions help keep the process controlled from the first board to the final inspection.
Protect the finished deck and decide when professional staining helps
Good aftercare starts with simple habits. Keep leaves, dirt, and other debris from collecting on the boards, especially in corners and between planks where damp material can linger. Clean the surface with a method suited to the finish, and follow any care directions provided for the stain. Avoid harsh cleaning that could roughen the pine or wear the coating prematurely.
Check the deck periodically rather than assuming the finish will wear evenly. Sun exposure, shade, foot traffic, and areas that collect water can all affect how the surface looks and performs. A sunny stair tread may fade sooner than a sheltered board, while a shaded corner may stay damp longer. Use these differences as a reason to inspect the whole deck, not just the most visible section.
Recognize when the finish needs attention
Look for uneven fading, exposed wood, peeling, or patches that appear dull and worn compared with the surrounding finish. You can also sprinkle a little water on a clean area. If it no longer beads in a spot where it once did, reassess that area. Beading is only one sign, so consider it alongside the finish’s appearance and the stain maker’s care guidance.
There’s no single recoating interval that fits every deck. Reassess after seasons of heavy sun, rain, or frequent use, and pay particular attention to steps, entrances, and other high-traffic areas. If wear is localized, don’t assume the entire deck needs the same treatment. Before adding stain, confirm that the existing coating and surface condition suit the product and preparation method you plan to use.
When a professional process can make the project easier
Some decks are straightforward to maintain; others take more planning. A large surface, multiple levels, tight spaces, persistent grime, or uneven wear can make cleaning, preparation, and application time-consuming to coordinate. A professional process brings those tasks into sequence, helping homeowners manage surface preparation and staining without guessing at each transition.
Hudson Line Painters provides deck and fence staining as part of its residential home improvement work in Hudson County, Union County, and Bergen County, including Hoboken, Edgewater, Fort Lee, Teaneck, Hackensack, Englewood, Cliffside Park, Leonia, Palisades Park, and Ridgefield. The process brings together surface preparation and finish application, with attention to the deck’s condition and the stain’s directions. If you’re weighing DIY work against help with a demanding project, consider the time required for preparation, drying, and careful application. A New Jersey deck and fence staining guide can also help you plan around local conditions and the work your deck needs.
Whether you’re addressing worn areas or planning a full refresh, regular inspection helps you make the next decision based on the deck’s condition, not a fixed calendar. That practical approach supports better decisions about staining a pressure treated pine deck and caring for its finish over time.
Give your deck a thoughtful next step
A well-cared-for deck doesn’t need a rushed refresh. Let the boards’ condition guide your timing, then choose an approach that fits the work ahead. If staining a pressure treated pine deck feels like more than you want to manage alone, professional help can make preparation and finishing easier to coordinate.
Hudson Line Painters provides deck and fence staining and power washing for homeowners in Hudson County, Union County, and Bergen County, including Hoboken, Edgewater, Fort Lee, Teaneck, Hackensack, Englewood, Cliffside Park, Leonia, Palisades Park, and Ridgefield. With a clear plan for the surface and finish, you can move forward with confidence and prepare your outdoor space for everyday use.
Take the next step at a pace that feels right. Your deck can be ready for another season of everyday use.
Frequently Asked Questions
Does staining prevent pressure-treated pine from cracking or splintering?
No. Stain helps protect exposed wood from weathering, but it can’t prevent every crack, check, or splinter. Pressure-treated pine still responds to changes in moisture and temperature, so inspect boards as the deck ages. Address rough spots safely before they worsen, and follow the stain manufacturer’s maintenance guidance. Stain is a protective finish, not a repair for decking that’s structurally damaged or deteriorated.
Should you stain the underside of pressure-treated deck boards?
Usually, the underside of an existing deck is difficult to reach, and coating it won’t replace adequate drainage or ventilation. For new construction, follow both the lumber and stain manufacturers’ guidance before coating surfaces that will be concealed. Avoid trapping moisture where the deck design needs airflow. Prioritize the exposed walking surface and accessible components, and keep drainage paths and gaps clear rather than treating stain as a solution to dampness.
What is the difference between kiln-dried-after-treatment lumber and air-dried pressure-treated pine?
Kiln-dried-after-treatment, or KDAT, lumber is dried in a kiln after preservative treatment. Air-dried pressure-treated pine dries under ambient conditions. Supplier information or lumber markings may help identify which type you have, but the label alone doesn’t prove it’s ready for a finish. For staining a pressure treated pine deck, assess the actual boards and follow the stain maker’s readiness requirements before starting.
Can you stain just one section of a pressure-treated pine deck?
Yes, but a partial application may look different from the surrounding deck, especially if nearby boards have faded or have an older coating. Test the stain on a discreet spot first, then choose a natural stopping point, such as a board end or a clear change in surface. Keep your tool, application method, and pace consistent across the section to limit visible differences in color or sheen.
Why does pressure-treated pine sometimes have green or brown discoloration?
Green or brown tones can result from treatment, storage, weather exposure, or natural variation between boards. Color alone doesn’t show whether the wood is dry enough or predict the final stain color. Clean the surface according to the product directions, then test the chosen stain on an inconspicuous area. If the test looks uneven, reassess the surface and preparation before coating the full deck.
Can pressure-treated pine be used for a covered porch as well as an open deck?
Pressure-treated pine is used in different outdoor structures, but confirm the lumber is intended for the planned use by checking its markings or supplier information. A covered porch may dry differently from an open deck because it gets less direct exposure to sun and rain, and airflow can vary. In humid New Jersey conditions, assess the actual surface and follow the finish instructions rather than assuming a covered space is ready sooner.


