

What if the raised spot that keeps showing through your paint isn’t a paint problem at all? When fixing nail pops in drywall, covering the bump with compound alone can leave a loose fastener in place, making the blemish more likely to return. It’s natural to wonder whether the nail or the drywall is moving, and whether a quick patch will simply crack again.
A lasting repair addresses both the cause and the finish. This guide explains how to recognize nail pops, why framing movement can push fasteners outward, and how to choose an appropriate repair approach. You’ll also learn when recurring or widespread pops call for professional attention.
From securing loose drywall to sanding, priming, and painting, each step contributes to a clean, paint-ready result. Hudson Line Painters provides drywall and plaster repair alongside interior painting for homes and businesses in Northern New Jersey, helping restore a consistent finish when a repair involves more than a dab of spackle.
Key Takeaways
- Recognize the small bump, cracked paint, or shallow ring that can signal a drywall nail pop.
- Understand how fastener movement and framing conditions can cause pops to recur.
- Follow the repair steps for fixing nail pops in drywall, and learn why simply hammering a fastener flush may not be enough.
- Decide whether a pop is a manageable DIY repair or part of a recurring or widespread issue that needs professional attention.
- See how drywall repair and interior painting can work together to restore a neat, consistent finish in Northern New Jersey homes.
What a drywall nail pop looks like, and what the bump can tell you
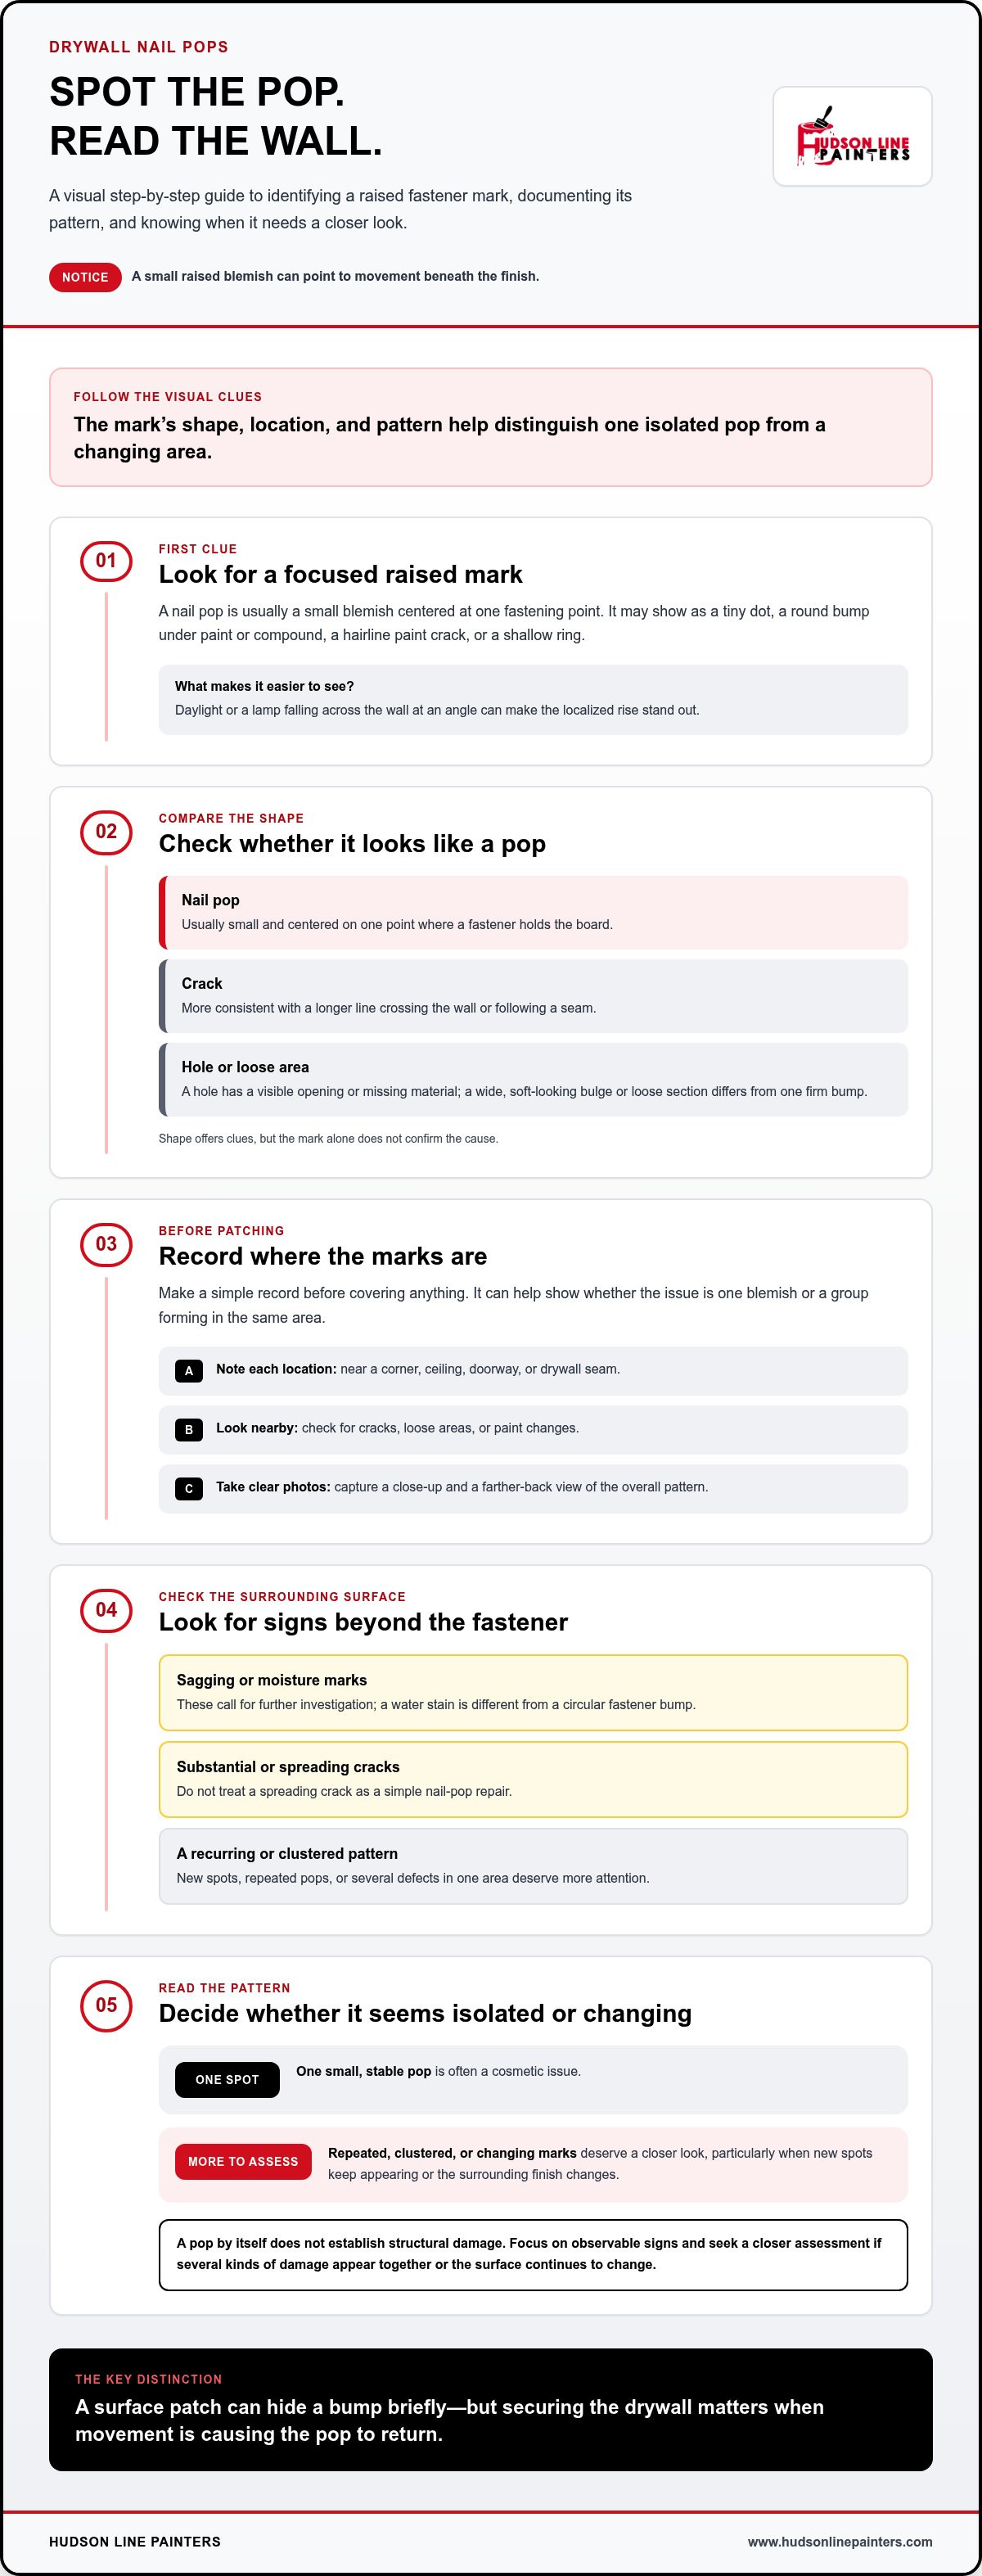
A drywall nail pop is a small raised blemish where a fastener has shifted or pushed against the finished surface. The fastener may appear as a tiny dot, or it may remain hidden beneath a round bump in the paint or joint compound. Either way, the localized rise can make a smooth wall look uneven, especially in side lighting. Identifying the mark is a useful first step in fixing nail pops in drywall without mistaking a different problem for a loose fastener.
Look for a small circular bump, a hairline crack in the paint, or a shallow ring around the fastener. The mark may stand out when daylight or a lamp falls across the wall at an angle. Drywall panels are attached to framing and finished with joint compound, as described in this overview of drywall construction. A pop usually appears at a particular fastening point rather than as a broad change across the surface.
How to tell a nail pop from a drywall crack or hole
Shape and location offer useful clues. A nail pop is usually small and centered on one point where a fastener holds the board. A longer line that crosses the wall or follows a seam is more consistent with a crack, while a hole leaves a visible opening or missing material. A wide, soft-looking bulge or a section that seems loose is different from a single, firm bump.
These clues help describe the damage, but they don’t confirm its cause. Before deciding the issue is isolated, make a simple record of what you find:
- Note each spot’s location, such as near a corner, ceiling, doorway, or drywall seam.
- Look for nearby cracks, loose areas, or changes in the paint.
- Take clear photos close up and from farther back to show the overall pattern.
That record can help you tell whether there’s one blemish or a group of defects appearing in the same area.
When a wall or ceiling needs a closer look
One small, stable pop is often a cosmetic issue. Repeated or clustered pops deserve more attention, particularly if new spots keep appearing or the surrounding finish is changing. Document the pattern before patching, since covering the marks can make it harder to track whether the affected area is growing.
Look beyond the fastener itself. Sagging, moisture marks, or substantial cracking alongside nail pops are reasons to investigate further. A water stain, for example, is different from a circular fastener bump, and a spreading crack should not be treated as a simple nail-pop repair. A pop alone doesn’t establish that there’s structural damage. Focus on observable signs and seek a closer assessment if several kinds of damage appear together or the surface continues to change.
Why drywall nail pops return: fasteners, framing, and indoor conditions
A nail pop can return when the fastener and drywall keep moving in relation to each other. The fastener may loosen, shift, or stop holding the board firmly against the framing. As the drywall moves outward around that point, it can disturb the joint compound and paint. The visible blemish is a clue at the finish level, but movement behind it is what matters for the repair.
Covering a nail pop without securing the drywall may hide the bump briefly, but it doesn’t correct the movement that can make the blemish reappear. Fixing nail pops in drywall therefore takes more than smoothing compound over the raised spot. The repair needs to account for how the board is held in place.
How a loose nail or screw creates a raised spot
Drywall can be attached with nails or screws, though homeowners often call either type of raised fastener mark a “nail pop.” If a fastener doesn’t hold securely in the framing, or the board shifts around it, even slight movement can press against the finished surface. Joint compound may crack or lift, and paint can develop a small ridge or blemish above the fastening point.
The cause isn’t always obvious from the mark alone. A fastener may have been poorly seated, may not have caught the framing securely, or may have shifted as the materials moved. Different causes can create similar-looking spots, so appearance alone can’t confirm exactly what happened behind the wall.
Can seasonal conditions affect drywall in New Jersey homes?
They may play a part. Wood framing can shrink or move as it dries, and changes in indoor temperature and humidity can contribute to movement in building materials. Indoor conditions in Northern New Jersey homes can vary with the seasons, but a recurring pop shouldn’t automatically be attributed to weather. Seasonal movement is one possibility, not a diagnosis.
Installation issues may also be involved, including a fastener that didn’t hold securely in the framing. If a pop appears alongside moisture marks, the concern may be different from ordinary movement. A stain or damp-looking area calls for attention to the moisture source, not just a surface patch. Consider what else is happening around the spot, whether the blemish is returning, and whether nearby areas are changing.
For recurring or widespread pops, a careful repair can secure the loose area and prepare the surface for a neat finish. Hudson Line Painters provides drywall and plaster repair for residential and commercial properties in Northern New Jersey, with interior painting to help bring the repaired area and surrounding wall together.
DIY repair or professional drywall repair: how to choose
The right repair route depends on more than how noticeable a pop looks. Consider how many spots there are, whether they keep returning, how easy they are to reach, and how closely the finish needs to match the surrounding wall. One small, stable blemish may be manageable as a DIY project. Several defects, especially if they recur or spread across a room, call for a closer look before you begin patching.
When a homeowner may handle one isolated nail pop
A DIY repair may suit one small, accessible spot with no nearby moisture marks, sagging, or broader damage. Be realistic about the finish: patching and sanding may take more than one stage, and matching the existing paint can be challenging. If the fastener or board is still moving, surface work alone may not address the cause. Choose DIY only if you’re comfortable assessing the spot and preparing a smooth surface.
When to bring in a drywall repair professional
Repeated pops, multiple damaged areas, or defects scattered across a wall make professional repair a practical choice, particularly when the finish is paint-sensitive or needs to blend closely. A professional can repair the damaged area and prepare it for finishing. Ceiling sag, water marks, or expanding cracks alongside the pops call for broader assessment rather than treatment as routine cosmetic defects. For a wider overview of repair considerations, see this drywall and plaster repair guide.
Use this comparison to weigh the work involved before deciding:
Scope | DIY: One isolated, stable spot. Professional repair: Multiple, recurring, or widely separated defects.
Preparation | DIY: You’re comfortable protecting the area and working carefully. Professional repair: The damaged surface needs more extensive preparation or assessment.
Finish matching | DIY: A minor variation in texture or paint is acceptable. Professional repair: A consistent, paint-ready appearance matters across a visible area.
Recurrence | DIY: The blemish appears isolated and isn’t changing. Professional repair: Pops return, spread, or appear with other signs of damage.
When fixing nail pops in drywall, confidence with the tools is only part of the decision. Consider access, too: a ceiling repair or a spot near a difficult corner can be harder to finish evenly than an accessible wall blemish. Think about how the repaired area will look in the room’s normal light. A smooth patch can still stand out if its texture or paint differs from the surrounding surface.
If you’re unsure whether the damage is isolated, pause before covering it. Note where the spots appear and whether nearby surfaces show other changes. Hudson Line Painters provides drywall and plaster repair and interior painting for homes and businesses in Northern New Jersey, bringing surface repair and finishing together when a project calls for both.
How to fix a nail pop in drywall, step by step
A lasting repair starts by stabilizing the drywall, then rebuilding the surface in stages. Simply hammering a protruding fastener flush may flatten the bump temporarily, but it can leave the board unsecured and the underlying movement unaddressed. For a small, accessible repair, use the sequence below. Wear appropriate eye protection, keep the work area clear, and follow the instructions on any compound, primer, or paint you use.
- Prepare the area. Move nearby items, protect the floor, and make sure the surface is dry and free of loose paint or compound. Inspect the surrounding wall before starting. If you see moisture, substantial cracking, sagging, or a larger area of loose drywall, stop and seek a closer assessment instead of treating it as a routine patch.
- Secure the drywall. Hold the board firmly against the framing before filling the damaged spot. If the fastener is a protruding nail, set it carefully just below the surface without crushing the drywall or tearing its paper. Add drywall screws above and below the original fastener into the framing, taking care not to drive them so far that they break the paper. Stop if you’re unsure where the framing or wiring is, or if the board is badly damaged.
- Patch the spot. Apply suitable joint compound over the fastener marks and any disturbed surface, spreading it in a controlled, thin layer. Follow the product label and allow the compound to dry as directed. If the repair needs another coat to level it, apply it after the first layer has dried rather than trying to fill the area all at once.
- Sand carefully. Once the compound is completely dry, sand lightly until the patch feels even with the surrounding wall. Avoid sanding through the drywall paper or scuffing a wide area around the repair. Use eye protection and follow the compound’s instructions for sanding and cleanup.
- Prime the repair. Apply primer to the patched area after sanding and removing dust. Primer helps prepare the compound for paint; skipping this step can leave the repair looking different from the surrounding surface.
- Paint and check the blend. Paint only after the repair is secure, smooth, clean, and primed. Match the existing color and sheen as closely as possible, then view the area under normal room lighting. A patch may need additional paint or a wider blend to look consistent.
Each stage matters. Fixing nail pops in drywall isn’t just about hiding the fastener; it’s about securing the board and preparing the surface so the finish has a sound base. If the pop returns, the damaged area spreads, or the repair needs to blend across a visible wall or ceiling, professional drywall repair can address the surface and prepare it for interior painting.
When Hudson Line Painters can help with nail-pop repair in Northern New Jersey
A few isolated nail pops may be manageable as a home repair. If the spots keep returning, appear across several walls, or sit in a finish-sensitive area, professional drywall repair can address the damaged surface and prepare it for painting. Hudson Line Painters provides drywall and plaster repair for residential and commercial properties in Northern New Jersey, including Hudson County, Bergen County, and Union County.
What a coordinated repair and paint finish can address
Repair and paint are connected parts of the finished result. First, the affected area needs to be secured and patched, then smoothed and prepared so paint can be applied to a sound surface. Painting over an unstable or uneven patch won’t correct the surface issue, while a well-prepared repair gives the finish a better foundation.
The surrounding wall matters, too. Differences in texture, paint color, or sheen can make a patched spot noticeable, particularly in a prominent area or under strong room lighting. Hudson Line Painters coordinates drywall and plaster repair with interior painting services when both surface preparation and the painted finish are part of the project. The work depends on the condition and size of the affected area; no surface repair can promise that future movement won’t occur.
A practical next step for local homeowners
Before describing the repair, note how many spots you’ve found and where they appear. Mention whether they’re on a wall or ceiling, whether they’ve returned after patching, and whether you see nearby cracks, sagging, or moisture marks. Photos can show the size and distribution of the affected areas. These details provide a useful starting point for discussing the work without assuming every bump has the same cause.
For recurring, widespread, or paint-sensitive repairs, professional drywall and plaster repair can address the surface and prepare it for finishing. Hudson Line Painters serves homeowners and businesses in Hudson County, Union County, and Bergen County, including Hoboken, Edgewater, Fort Lee, Teaneck, Hackensack, Englewood, Cliffside Park, Leonia, Palisades Park, and Ridgefield.
If you’re considering fixing nail pops in drywall, share how many affected spots you’ve found, where they are, and whether they have returned after patching. That information helps define the repair and the finish you want.
Discuss your drywall repair
Plan your next step toward a smoother wall
A raised spot can be a small distraction, but a repair is also a chance to consider the finish you want in the room. Decide whether you’re addressing one blemish or whether the surrounding painted surface needs attention as well. That helps define a practical scope, from correcting the damaged area to coordinating the repair with interior painting.
If the spot returns or you’re uncertain about the condition behind the finish, avoid relying on another quick cover-up. Hudson Line Painters provides drywall and plaster repair and serves communities across Hudson, Bergen, and Union counties. For help with fixing nail pops in drywall, describe what you’ve noticed and how you’d like the wall to look afterward.
A thoughtful repair plan can help restore a smoother, more finished-looking space.
Frequently Asked Questions
Can a drywall nail pop mean there is structural damage?
A nail pop by itself doesn’t prove there’s structural damage. One isolated spot is commonly cosmetic, but a sudden cluster accompanied by signs such as large cracks, doors that stick, or uneven floors deserves a broader assessment. Keep track of when new marks appear and whether other changes develop. That context is more useful than trying to diagnose the home’s structure from one raised fastener mark.
Can seasonal temperature or humidity changes cause nail pops?
They can contribute to movement in framing and drywall, though they aren’t the only possible cause. Indoor conditions can change as homes are heated, cooled, or ventilated through the year. For homeowners in Hoboken, Edgewater, Fort Lee, Teaneck, Hackensack, Englewood, Cliffside Park, Leonia, Palisades Park, Ridgefield, and across Hudson, Bergen, and Union counties, note whether marks change seasonally, but don’t assume that timing rules out installation issues or moisture.
Will a drywall nail pop come back after I repair it?
It can, particularly if the repair only covers the visible mark and the drywall remains loose against the framing. Before repainting, check whether the repaired area feels secure and whether nearby fasteners or marks are changing. If the spot returns, avoid repeating the same surface-only patch. Fixing nail pops in drywall means addressing the fastening and finish, while recurring defects may need a closer look at the surrounding area.
Can I paint over a drywall nail pop without patching it?
Paint alone won’t flatten a raised spot or hold a loose fastener in place. It may make the blemish less noticeable briefly, but the uneven surface can remain visible through the new coat, especially under angled light. For a neater result, repair and smooth the damaged area before priming and painting. If the spot is changing or the paint is cracked, first determine whether the drywall needs to be secured.
Are nail pops common in newly built homes?
They can appear in newer homes as framing lumber dries and the building settles. A small number of pops doesn’t automatically signal a major problem, but note whether new marks keep appearing or occur with other changes, such as spreading cracks. If you’re documenting issues in a recently built home, dated photos can help show whether the pattern is stable or developing and support a more informed assessment.
Can nail pops appear in drywall ceilings as well as walls?
Yes, a fastener-related bump can show up in a ceiling as well as on a wall. Ceiling defects can be harder to inspect and repair because they’re overhead, so look for changes in the surrounding surface, not only the raised point. A sagging area or moisture discoloration calls for more attention than a small, stable blemish. Don’t work overhead from an unstable position or ignore a ceiling that appears to be changing.
Does homeowners insurance cover drywall nail-pop repairs?
Coverage depends on your policy and what caused the damage. A nail pop associated with ordinary settling or gradual material movement may be treated differently from drywall damage tied to a sudden covered event. Review your policy’s exclusions, deductible, and claim requirements, and document the affected areas before making changes. If there’s a leak or another suspected cause, focus on identifying and addressing that issue rather than assuming the surface repair is covered.


