

You've finally decided to update that guest room in your historic North Jersey home, but the first pull of the scraper reveals a frustrating surprise: three more patterns hiding underneath the surface. It's a common nightmare when removing multiple layers of wallpaper, where a simple refresh turns into a battle against decades of stubborn adhesive and brittle paper. You're likely facing the dreaded confetti effect, where the paper tears into tiny, quarter-sized pieces while your tools accidentally gouge the underlying drywall or historic plaster.
We understand that this process can feel overwhelming and technically demanding. This guide promises to help you master a systematic, professional-grade removal process that protects your home's integrity. You'll learn how to strip away layers of history without causing structural damage or uncovering a multi-week DIY disaster. We will preview the essential tools that actually work, the moisture-first strategy used by seasoned contractors, and the necessary restoration steps like skim coating to ensure your walls are perfectly smooth and ready for a fresh coat of paint.
Key Takeaways
- Identify why older homes in Bergen and Union Counties often hide a "wallpaper sandwich" and how it changes your restoration approach.
- Discover why professional-grade steamers are the most effective tool for removing multiple layers of wallpaper without gouging your drywall.
- Compare the "Soak and Sit" method against high-heat steaming to determine which strategy will save you the most time and effort.
- Follow a disciplined preparation sequence to safeguard your NJ hardwood floors and trim from the moisture required for heavy-duty stripping.
- Understand why skim coating is a non-negotiable step for achieving a high-end paint finish after the final layer of paper is gone.
Understanding the "Wallpaper Sandwich": Why Multiple Layers Happen
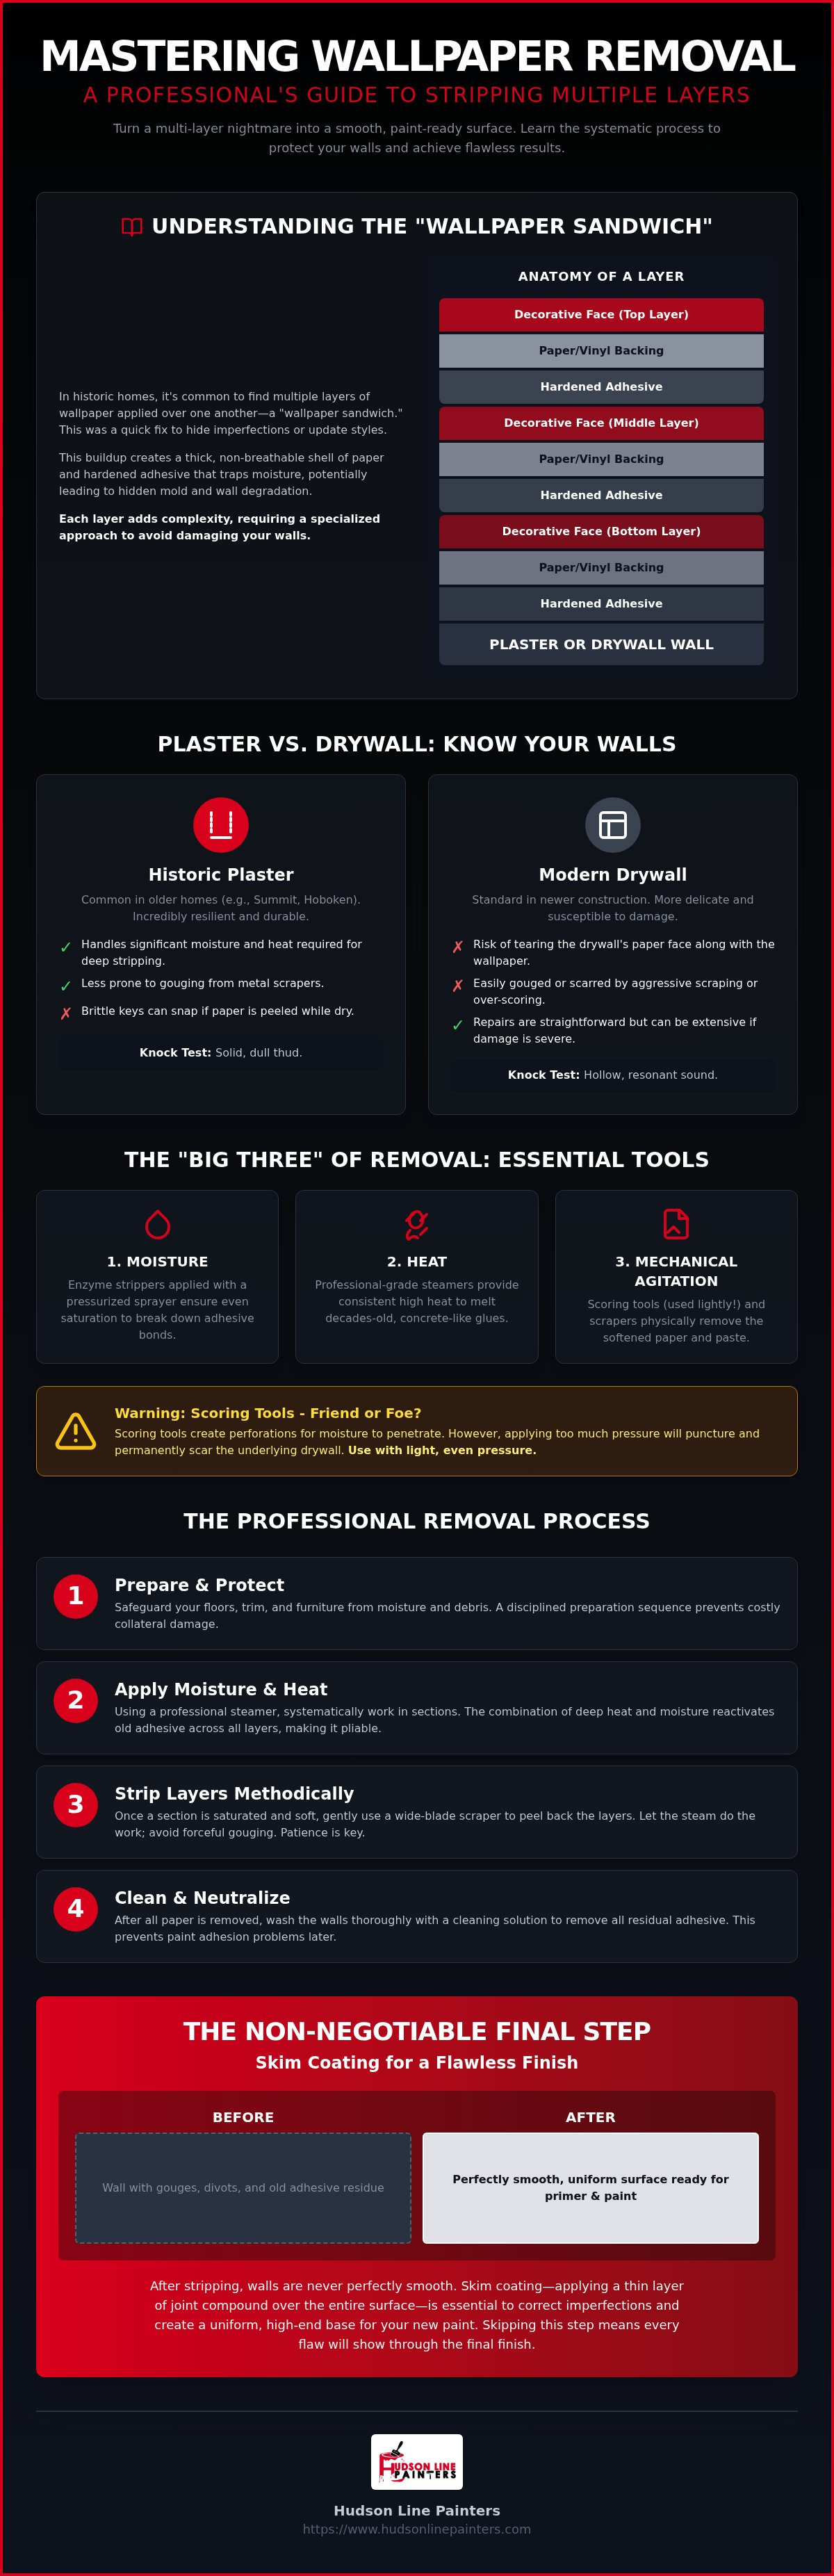
In the historic neighborhoods of Summit and throughout Bergen and Union Counties, homeowners often discover what we call the "wallpaper sandwich." Layered wallpaper is the result of a common past practice where new patterns were applied directly over old ones to quickly hide surface imperfections or outdated styles. While this saved time for previous owners, removing multiple layers of wallpaper today reveals a complex structure that requires a specialized approach to avoid damaging the underlying walls. This accumulation of paper and paste creates a thick, stubborn shell that resists standard removal techniques.
A typical "sandwich" consists of three distinct components per layer: the decorative top face, the fibrous vinyl or paper backing, and the original adhesive that has likely hardened over decades. When these are stacked, they create a dense, non-breathable barrier. This buildup acts as a ticking time bomb for wall health because it traps moisture against the substrate, often leading to hidden mold growth or the slow degradation of the wall material itself.
Plaster vs. Drywall: How Your Wall Material Changes the Strategy
The age of your home dictates how we handle the removal process. Historic plaster walls, frequently found in older Hoboken or Summit residences, are incredibly resilient. They can handle the significant moisture and heat required for deep stripping without losing structural integrity. Conversely, modern drywall is much more delicate. The risk here is that the wallpaper adhesive may have bonded too strongly to the "paper-face" of the drywall itself. If you aren't careful, the removal process can peel away the structural paper of the wall, leading to costly interior painting prep work or extensive repairs. You can identify your wall type by performing a simple "knock test." A solid, dull thud usually indicates historic plaster, while a hollow, resonant sound signals modern drywall.
The Hidden Dangers of Layered Wallpaper in Historic NJ Homes
Beyond the physical labor, there are environmental and structural factors to consider. Non-breathable vinyl layers often trap humidity, creating a breeding ground for mold that remains invisible until the first layer is peeled back. Additionally, homes built before 1978 may contain lead-based pigments in older floral or geometric patterns, which require careful handling. We emphasize that "dry peeling" is the primary cause of permanent surface damage in these older homes. Tearing at dry paper creates tension that can snap brittle plaster keys or rip drywall cores. A disciplined, moisture-first approach is the only way to ensure a clean transition to a fresh, paint-ready surface.
Essential Tools for Stripping Stubborn Wallpaper Layers
Successfully removing multiple layers of wallpaper requires a coordinated approach using what we call the "Big Three": moisture, heat, and mechanical agitation. Standard retail spray bottles often fail because the liquid only saturates the top decorative layer, leaving the underlying "sandwich" bone dry. To reach the deepest adhesive, you need tools that force moisture through every strata of paper and paste. Professional-grade steamers are the cornerstone of our process. Unlike small handheld retail models that lose pressure quickly, industrial steamers provide a consistent, high-temperature output. This deep heat reactivation is essential for melting older, wheat-based glues that have essentially turned into concrete over the decades.
For newer synthetic adhesives, we supplement the steam with chemical enzyme strippers. These solutions specifically target the molecular bonds of the paste, breaking them down without the need for excessive, damaging force. It's a delicate balance. Too much chemical can soak into the drywall core, while too little leaves you scraping at dry paper. We've found that applying these enzymes with a pressurized garden sprayer ensures the most even application across wide wall surfaces. Using the right tool for the specific wall material is critical; metal scrapers are a necessity for stubborn residue on historic plaster, but they represent a significant danger to modern drywall where they can easily cause deep gouges.
Scoring Tools: Friend or Foe?
Scoring tools are often misunderstood by DIY enthusiasts. A scoring wheel creates thousands of tiny perforations, allowing stripping solutions to penetrate the surface. However, if you apply too much pressure, you'll puncture the underlying drywall paper, leading to permanent scarring that shows through your final paint job. Scoring is only effective if the solution actually reaches the bottom layer of adhesive. For thicker vinyl layers that resist wheels, we often use a "cross-hatch" method with a putty knife. This involves making light, diagonal incisions that create a path for the steam to travel behind the paper without endangering the wall substrate.
The Professional NJ Toolkit: What We Use
Our team utilizes a specific set of high-performance tools to ensure every project meets our interior painting services preparation standards. We favor broad-blade knives over narrow scrapers because they distribute pressure more evenly across the wall surface. This equipment, combined with our industrial-strength steamers, allows for deep heat penetration through three or more layers of material. This technical precision is why many Summit homeowners choose to partner with us for their restoration needs. If you're feeling overwhelmed by a wall that won't budge, our expert removal team can step in to handle the heavy lifting and protect your home's value.
Comparing Removal Methods: Which One Wins for Multiple Layers?
When you're facing a wall with decades of history, choosing the right strategy is the difference between a successful restoration and a month-long ordeal. We generally categorize removal into three primary methods, though only one truly excels at removing multiple layers of wallpaper without causing structural fatigue. The "Soak and Sit" approach relies on enzyme-based solutions to chemically digest the paste. This is often effective for single layers, but it can become messy and unpredictable when liquid has to fight through three or four different patterns. The "Steam Power" approach remains our preferred professional standard for layered jobs. It uses high-temperature vapor to reactivate adhesive instantly, even through thick vinyl faces.
The "Dry Strip" method is the fastest, but it's almost never an option for older homes in Summit where paper was often applied directly to unprimed plaster or drywall. Steaming is the gold standard when removing multiple layers of wallpaper because it addresses the adhesive at its core. For a standard 12x12 NJ bedroom, the cost-to-time ratio heavily favors steaming. While a soak-and-scrape approach can easily consume 8 to 12 hours of heavy labor, professional steaming usually completes the removal in half that time. This efficiency doesn't just save hours; it ensures the wall substrate isn't over-saturated, which is the primary cause of drywall damage.
Why DIY Concoctions Like Fabric Softener Can Fail
Fabric softener is a common internet suggestion that we strongly advise against. While vinegar is a mild acid that can help break down some glues, it's often too aggressive for historic plaster and can leave a lingering scent. Fabric softener's biggest flaw is the waxy residue it leaves behind. This invisible film is a disaster for residential painting projects. It prevents high-end primers from bonding correctly, which eventually leads to peeling paint. Professional enzyme strippers are a much safer bet. They are engineered to be bio-degradable and targeted, breaking down specific adhesive proteins without contaminating the wall surface for future finishes.
The Power of Steam for Heat-Activated Adhesives
Steam is fundamentally more efficient because vapor molecules are smaller than liquid droplets. This allows the heat to penetrate the "wallpaper sandwich" much faster than any surface-applied spray. However, using high-heat equipment requires technical discipline and site etiquette. In the tight confines of a bathroom or hallway, steam can quickly lead to heavy condensation on ceilings and trim. We always prioritize the protection of your home by covering NJ hardwood floors with absorbent drop cloths and managing local humidity. Safety is paramount when handling industrial steamers, especially near electrical outlets and sensitive wood moldings that are common in historic Northern NJ architecture.
Step-by-Step: How to Remove Multiple Wallpaper Layers Without Damaging Walls
Approaching a wall with decades of accumulated paper requires a disciplined, multi-phase strategy. We begin with comprehensive room preparation, which is essential for protecting your home's value. We cover NJ hardwood floors with leak-proof plastic and layers of canvas drop cloths to manage the inevitable runoff. All electrical faceplates are removed, and the outlets are sealed with tape to ensure a safe workspace. Once the environment is secure, we move to Phase 2: stripping the decorative face layer. This top layer is often vinyl and can be peeled away dry, exposing the porous backing underneath.
Removing multiple layers of wallpaper truly begins in Phase 3 with our double-soak technique. We apply a professional enzyme solution to the backing and allow it to penetrate for several minutes before a second application. This ensures the moisture reaches the original adhesive against the wall. In Phase 4, we use systematic scraping, strictly following the 45-degree angle rule. Holding the blade at this specific angle provides enough leverage to lift the paper without digging into the substrate. Finally, Phase 5 involves a critical wash using clean water and sponges to remove the residual "paste slime" that can ruin future paint adhesion.
The Scoring and Soaking Phase
Patience is your most valuable tool during the soaking stage. You'll know your solution has reached the original wall glue when the paper starts to blister and feel spongy to the touch. We strictly follow the 15-minute rule; if you try to scrape too early, you'll end up fighting the paper rather than letting the chemistry do the work. To keep the wall wet without flooding your baseboards, we apply the solution in manageable three-foot sections, working from the top down to let gravity assist the saturation process.
The Systematic Peeling Technique
When it's time to lift the paper, we've found that peeling from the bottom up is significantly more efficient. This method, often recommended by restoration enthusiasts like Sarah at Ugly Duckling House, allows the weight of the saturated paper to help pull the layers away from the wall. You'll occasionally encounter stubborn "fused" spots where the adhesive has bonded permanently to the wall. In these areas, we re-apply steam rather than using force. It's vital to recognize your "stop point." If you see the brown paper of the drywall start to tear or fuzz, stop immediately, as this indicates the substrate is compromised and needs professional intervention.
Transitioning from Stripped Walls to a Flawless Paint Finish
Once the final scrap of paper is in the bin, many homeowners expect a smooth surface ready for a roller. The reality is far more complex. Over 90% of walls require some level of structural restoration after removing multiple layers of wallpaper. Decades of adhesive and moisture often leave the substrate pitted, scarred, or chemically contaminated. One of the most common frustrations is the appearance of "glue ghosts." These are patches of invisible adhesive residue that reactivate when they hit water-based paint, causing the new finish to bubble or crack. The physical act of removing multiple layers of wallpaper is only the first half of a successful renovation.
To prevent these failures, we utilize a specific sealing protocol. A high-quality oil-based primer is essential to lock in old adhesive residue and prevent it from bleeding through your topcoat. This step is non-negotiable for a professional result. Following this, targeted drywall and plaster repair ensures that any gouges or "fuzzing" from the removal process are neutralized before the first drop of paint is applied. This meticulous preparation saves you money on future repairs by ensuring the paint bonds correctly the first time.
Skim Coating: The Secret to "New" Walls
For many NJ renovations, skim coating walls after wallpaper removal is the industry standard. This process involves applying thin layers of joint compound over the entire wall surface to create a perfectly flat plane. It's the only way to truly hide the imperfections caused by decades of layering and stripping. While a DIY patch job might fix a hole, a professional Level-5 finish provides a glass-smooth surface that reflects light evenly. This level of technical precision is what separates a basic room refresh from a high-end interior transformation.
When to Call the Professionals at Hudson Line Painters
There's a point in every project where the cost of a DIY mistake outweighs the price of professional service. If you encounter crumbling plaster behind the paper, pervasive mold growth, or more than four layers of material, it's time to stop. These conditions require technical intervention and specialized equipment to prevent structural damage. We offer a seamless professional hand-off. Our team handles the difficult, messy labor of stripping and restoration, allowing you to enjoy the final aesthetic result without the multi-week stress. You can contact Hudson Line Painters for a local NJ estimate and ensure your walls receive the craftsmanship they deserve.
Restoring Your Walls to Their Original Glory
Successful restoration starts with acknowledging that layered wallpaper is a structural challenge rather than a simple cosmetic fix. We've explored how a moisture-first strategy protects your home's substrate and why professional-grade equipment is essential for removing multiple layers of wallpaper without causing permanent damage. It's vital to remember that the process doesn't end when the last piece of paper hits the floor. Proper sealing with oil-based primers and expert skim coating are the final steps to ensuring your new paint finish looks flawless and lasts for years.
Since 2018, our team has helped homeowners across Hudson, Bergen, and Union Counties navigate these complex projects. We specialize in historic plaster restoration and offer a full-service approach that covers everything from the initial strip to the final coat of premium paint. You don't have to face the frustration of stubborn adhesive or crumbling walls alone. By partnering with a disciplined team, you can transform your space with total peace of mind and technical precision.
We look forward to helping you reveal the true potential of your historic Northern New Jersey home with a finish that stands the test of time.
Frequently Asked Questions
Can I just paint over multiple layers of wallpaper?
You should avoid painting over multiple layers because it traps moisture and creates a surface prone to peeling. The texture of the seams and any underlying bubbles will remain visible regardless of how many coats of paint you apply. This shortcut also makes eventual removal much more difficult and labor intensive. It's always better to strip the walls down to the substrate to ensure a smooth, professional finish that lasts.
How much does professional wallpaper removal cost per room in NJ?
Professional costs in New Jersey are determined by the room's square footage and the difficulty of removing multiple layers of wallpaper. Projects involving several patterns or painted-over surfaces require more labor hours and specialized equipment than a single-layer job. We provide detailed, in-person assessments to evaluate the wall's condition before starting. This ensures you receive a transparent estimate that covers the full scope of removal, washing, and necessary substrate repairs.
Is it better to use a steamer or a chemical stripper for old wallpaper?
For most layered projects, a professional steamer is superior because the high-temperature vapor penetrates deeper than liquid solutions. Chemical strippers are effective for breaking down specific synthetic adhesives, but they often struggle to reach the bottom layer of a wallpaper sandwich. We typically use a combination of both, starting with steam to reactivate the old glue and using enzyme-based strippers for any stubborn residue left behind on the walls.
What happens if the wallpaper removal damages my drywall?
If the removal process gouges your drywall, it's not a disaster, but it does require professional repair. Minor surface tears or fuzzing of the drywall paper are common when dealing with stubborn adhesives. We address these issues by sealing the damaged areas with an oil-based primer and then applying a skim coat. This restoration process smooths out the imperfections and creates a level-5 finish that is indistinguishable from a brand-new wall surface.
How do I get the sticky glue residue off the walls after the paper is gone?
Removing the sticky residue requires a thorough final wash with warm water and a specialized adhesive solvent or enzyme solution. You must scrub the walls until the slime is completely gone, as any remaining paste will cause new paint to crack or peel. We use professional-grade sponges and change the water frequently to ensure the surface is chemically clean. Once dry, we always apply a primer to seal the substrate.
Is it safe to remove wallpaper myself if my NJ home was built before 1978?
It's safer to hire a professional if your home was built before 1978 due to potential lead-based pigments in older wallpaper patterns. New Jersey has specific notice requirements for lead hazards in older residences, and the dust from scraping can create environmental risks. Our team follows disciplined safety protocols to manage debris and protect your living space. A professional assessment ensures the removal process complies with local safety standards and avoids contaminating your home.
How long does it typically take to remove three layers of wallpaper from one room?
Removing three layers of wallpaper from a standard room typically takes a professional team one to two full days. This timeframe covers the essential preparation, the multi-stage steaming process, and the final adhesive scrubbing. DIY attempts can often stretch into a multi-week ordeal if the paper is particularly stubborn or bonded to unprimed drywall. Our systematic approach ensures the project stays on schedule while protecting the integrity of your home's historic plaster or modern drywall.
Does fabric softener really work for removing multiple layers of wallpaper?
While fabric softener is a popular internet tip, we don't recommend it for removing multiple layers of wallpaper. The chemicals in fabric softener leave a waxy residue on the wall that interferes with paint adhesion and primer bonding. This often leads to peeling paint several months after the project is finished. It's much more effective to use professional enzyme strippers that are specifically designed to break down paste without contaminating the underlying wall surface.


