

You peel back a loose corner of that dated floral print in your Bergen County colonial, only to find three more layers of mystery paper and an unsettling crunching sound coming from the wall itself. It is a moment of pure hesitation that every owner of a historic North Jersey home knows well. You want a modern look, but the fear of crumbling lath or permanent structural damage often keeps those old patterns on the wall for decades. Removing wallpaper from plaster walls is a delicate restoration project that requires a much softer touch than working with modern drywall.
We understand that your home's original plaster is a high-value asset that deserves meticulous protection. If you are tired of staring at stubborn adhesive residue or layers of paper that seem fused to the substrate, you are in the right place. This guide provides the professional-grade techniques needed to strip away the past without compromising your home's structural integrity. We will walk you through the essential tools, the step-by-step removal process, and the critical role of professional skim coating in achieving that perfectly smooth, gallery-quality finish you deserve.
Key Takeaways
- Understand the unique fragility of lath and plaster construction found in historic North Jersey homes to prevent crumbling.
- Identify the specific tools needed to protect your property and score paper without puncturing the underlying wall surface.
- Compare the risks and rewards of steaming versus chemical strippers when removing wallpaper from plaster walls.
- Learn a disciplined removal process designed to strip stubborn, multiple layers in manageable, damage-free sections.
- Discover why professional skim coating is the essential finishing touch for restoring walls to a smooth, paint-ready condition.
Understanding the Fragility of Plaster Walls vs. Modern Drywall
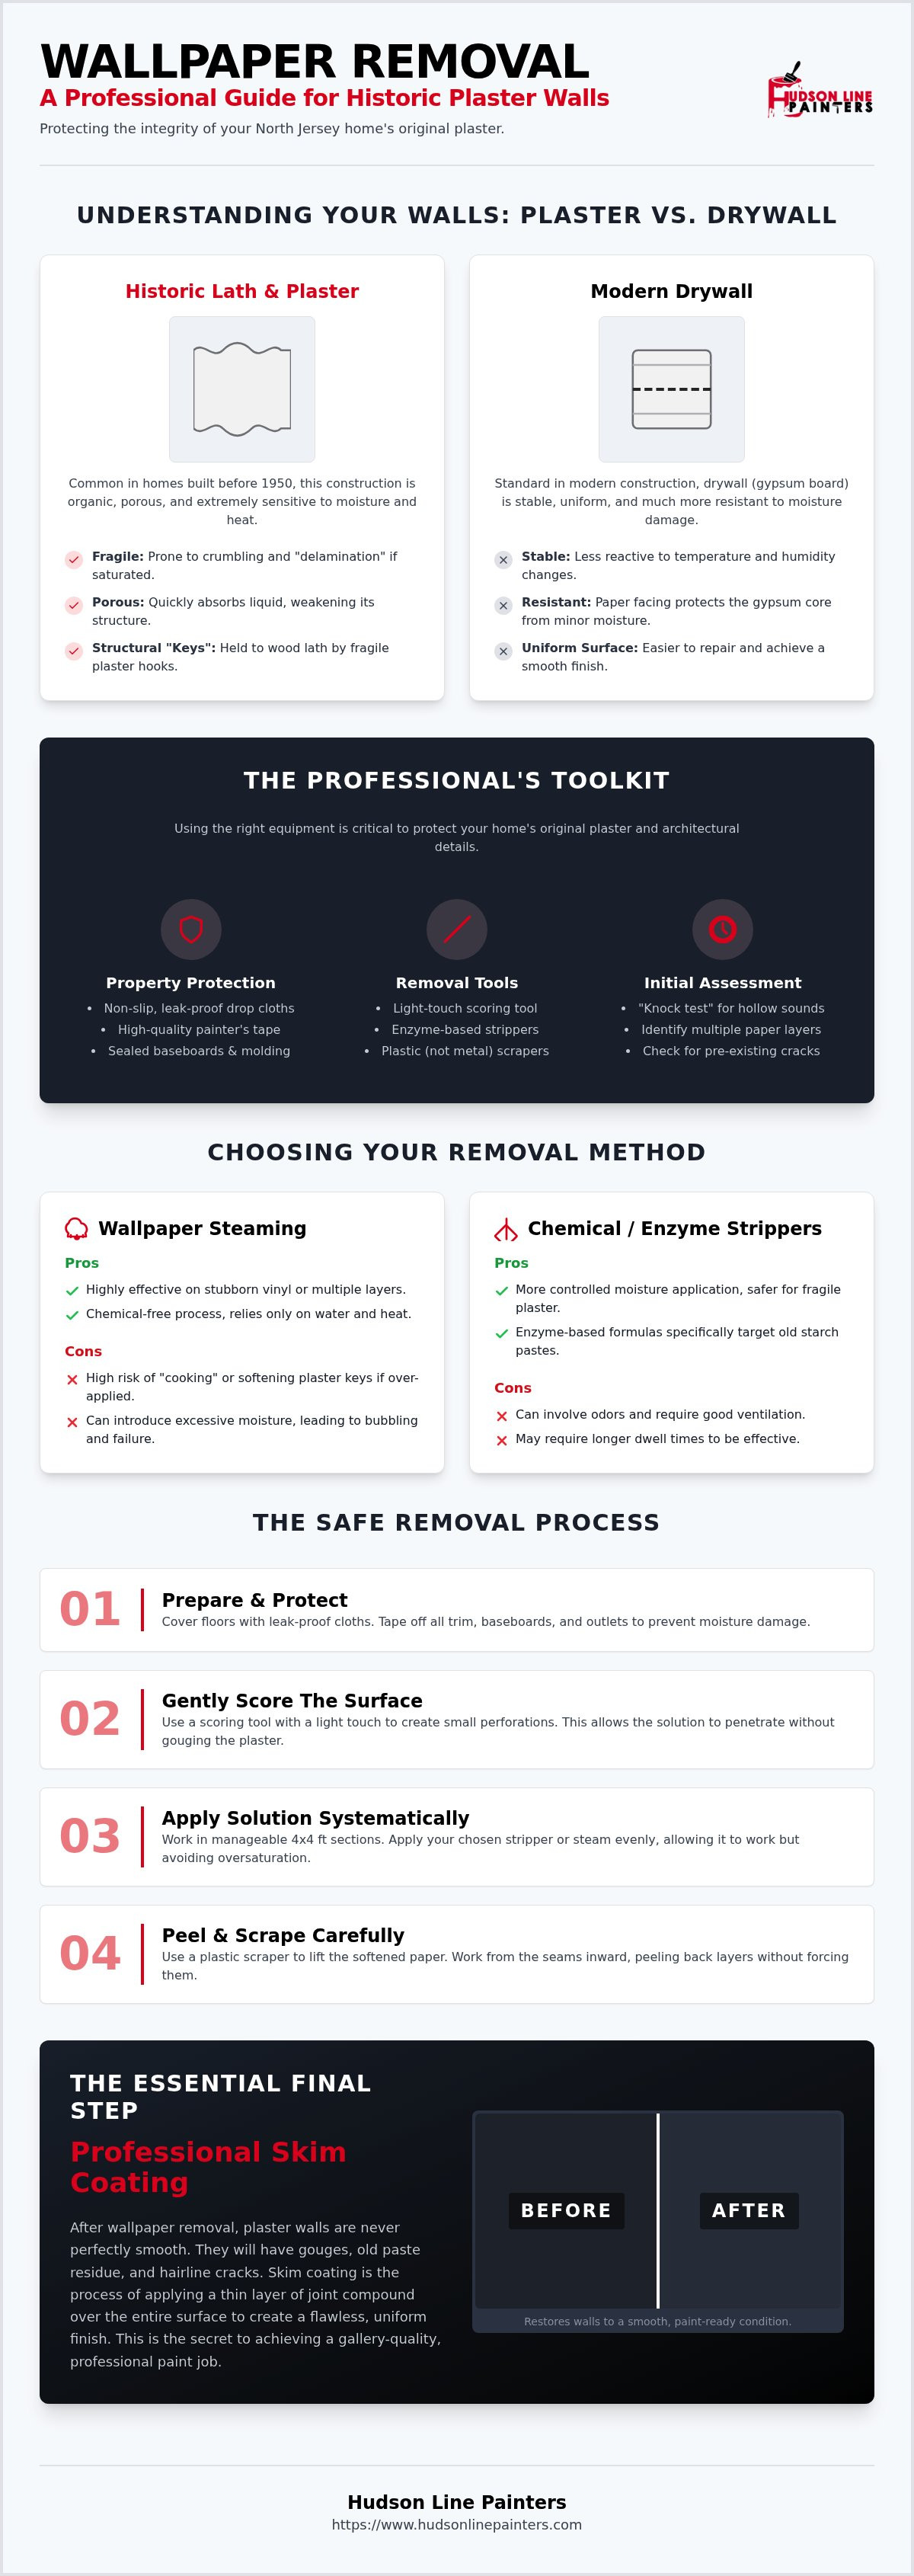
In many North Jersey homes built before 1950, your walls aren't made of the standardized gypsum board found in modern suburban developments. Instead, they feature a craftsman-intensive method known as lath and plaster. This involves horizontal wood strips, called lath, nailed to studs and covered by several layers of wet plaster. Unlike modern drywall, which is relatively uniform and stable, plaster is an organic, mineral-based material that remains porous throughout its life. This inherent fragility of plaster walls means they react with extreme sensitivity to the liquids and heat used during a renovation. When removing wallpaper from plaster walls, you must account for this porosity to avoid "delamination," a condition where the plaster bond fails and pulls away from the wood lath entirely.
Plaster keys are the small curls of plaster that were squeezed through the gaps between wood lath strips during installation, hardening into structural hooks that are the only thing keeping the wall surface attached to the home's frame.
Why Plaster is Vulnerable to Moisture
Excessive water is the primary threat to historic plaster. Traditional mixtures often contain lime or gypsum, which can soften and lose their crystalline strength if they remain saturated for too long. When homeowners apply too much liquid stripper or leave a steamer in one place for several minutes, the moisture seeps through the paper and attacks the chemical bond of the plaster. This often results in bubbling or crumbling that ruins the substrate. Before you begin, perform a "knock test" by gently tapping the wall with your knuckles in various spots. If you hear a hollow, drum-like sound, the plaster has already detached from the lath, and you should proceed with extreme caution.
The Layering Effect in Historic NJ Homes
If you own a home in Hoboken, Jersey City, or Bergen County, you aren't just dealing with one layer of paper. You are likely peeling back a timeline of design history. It's common to find three to five layers of paper, often including a thick, fibrous "liner paper" used by previous generations to bridge cracks in the plaster. Removing these layers requires a disciplined, sequential approach. In some instances, the old adhesive and multiple layers of paper are actually providing the surface tension that keeps a failing wall together. Identifying these "mystery" layers early ensures your interior painting project starts on a solid, stable foundation rather than a crumbling one.
Essential Tools and NJ Home Prep for Wallpaper Stripping
Preparing a historic North Jersey interior for renovation requires more than just a bucket of water. When you're working in a Jersey City brownstone or a Bergen County Victorian, protecting the original architectural details is your first priority. You must use non-slip, leak-proof drop cloths rather than thin plastic sheets. These provide a stable footing on polished hardwood floors and prevent the "sludge" of old adhesive from seeping into the wood grain. Since liquid runoff is inevitable, you'll also need to seal your baseboards and crown molding with high-quality painter's tape to prevent moisture from warping the wood or causing the paint to peel.
A professional scoring tool is the next essential item. Its job is to create tiny perforations in the paper's surface, allowing your stripping solution to reach the glue. However, you must use a light touch. If you press too hard, you'll gouge the soft plaster underneath, creating extra work for yourself later. For the stripping solution, we recommend enzyme-based strippers over traditional vinegar. These enzymes are designed to break down specific types of starch-based pastes common in older homes without the harsh odor or acidity that can affect the pH of your plaster walls.
Professional Grade Equipment vs. DIY Substitutes
Choosing the right method for removing wallpaper from plaster walls often comes down to the condition of the substrate. A professional-grade steamer is highly effective for stubborn vinyl layers, but you must keep it moving to avoid "cooking" the plaster keys mentioned in the previous section. If the plaster feels soft or hollow, a chemical gel stripper is a safer alternative because it provides more controlled moisture application. Always opt for plastic scrapers instead of metal ones. Metal blades easily nick 100-year-old plaster, while plastic edges are firm enough to lift the paper but flexible enough to glide over imperfections. A stiff-bladed multi-tool is also vital for surgically removing paper from tight corners and intricate trim work where a wider scraper won't fit. If the complexity of these layers feels overwhelming, our team at Hudson Line Painters can provide a professional assessment to ensure your walls stay intact.
Room Preparation for a Mess-Free Project
Safety is paramount when using liquids near electrical systems. You must turn off the power to the room at the breaker and cover every electrical outlet and light switch with plastic and tape. This prevents the stripping solution from entering the junction boxes. As the paper comes off, it creates a sticky, heavy mess. We recommend having a dedicated heavy-duty trash bin in the room to dispose of the wet paper immediately, preventing it from bonding to your drop cloths. Finally, ensure you have adequate ventilation. Even low-VOC chemical strippers can create a concentrated scent in small Hoboken apartments, so keeping windows open or using floor fans helps maintain a comfortable and safe working environment.
The Pros and Cons of Steaming vs. Chemical Strippers on Plaster
Deciding between a steamer and a chemical stripper is the most critical technical choice you'll make when removing wallpaper from plaster walls. While steam offers raw power for high-volume removal, chemical gels provide the precision necessary for fragile substrates. You must weigh the speed of the project against the long-term health of your walls. The best method for multi-layered Victorian-era wallpaper usually involves a hybrid approach, starting with dry-stripping the top decorative layers and using a targeted enzyme gel to dissolve the deepest historical adhesive bonds.
You must consider the "Heat Factor" when dealing with historic homes. Plaster is held together by structural keys that are sensitive to temperature extremes. Introducing concentrated, high-temperature steam can actually soften the lime or gypsum in the plaster, causing it to separate from the lath. For modern families in New Jersey, choosing non-toxic, enzyme-based removers is often the priority. These formulas are generally biodegradable and safe for use around children and pets, avoiding the harsh fumes associated with older solvent-based strippers common in the past.
When to Use a Wallpaper Steamer
A steamer is your best ally when facing thick, non-porous vinyl or five layers of paper that refuse to budge. The heat effectively penetrates the vinyl coating that liquid strippers often slide right off. However, you must keep the steam plate moving constantly. Leaving it in one spot for more than a few seconds can trap moisture behind the plaster, leading to deep structural cracks. You should also have a second person dedicated to wiping up condensation. This prevents hot water from dripping onto your historic Jersey City brownstone's hardwood floors or pooling behind your baseboards.
The Case for Gel and Enzyme Removers
Gel and enzyme removers are the gold standard for preserving delicate plaster surfaces. Unlike watery solutions that run down the wall and saturate the floor, "no-drip" formulas stay exactly where you apply them. This is especially beneficial for the high 10-foot ceilings common in Bergen County's historic districts. Enzymes work by breaking down the organic wheat-based pastes used in the early 20th century. By dissolving the adhesive at a molecular level, they allow the paper to slide off with minimal scraping pressure. This reduces the risk of gouging the plaster, ensuring the surface remains as smooth as possible for your upcoming interior painting project.
A Step-by-Step Guide to Safely Removing Wallpaper from Plaster
Removing wallpaper from plaster walls is a process that rewards patience over brute force. Unlike drywall, where the paper face is part of the board's structural integrity, plaster is a separate, rock-like substrate. This means you can't just tear the paper away; you must chemically or thermally release the bond. Our professional framework follows a disciplined five-step sequence designed to protect your home's historical character while ensuring a clean surface for your next design phase. By working in manageable 3x3 foot sections, you maintain control over moisture levels and prevent the stripping solution from drying out before you can scrape it away.
Scoring and Soaking: The Secret to Efficiency
The first step involves using a scoring tool to create tiny perforations in the paper. You must use a remarkably light touch here. If you press too hard, the tool's teeth will puncture the plaster or snag on the wood lath underneath, creating small holes that will require patching later. Once the surface is scored, apply your enzyme-based solution. While a sponge allows for heavy saturation, a pressurized spray bottle provides better control for vertical surfaces and prevents excessive runoff onto your baseboards. Always test a small, inconspicuous area first to determine the paper's "release point." This is the moment when the adhesive has fully softened, allowing the paper to glide off without resistance.
Scraping Without Scarring the Surface
The most critical phase is the 15-minute dwell time. Most DIY failures happen because the homeowner starts scraping too early. Waiting the full 15 minutes allows the enzymes to eat through the starch-based paste, turning it into a soft jelly. When you begin scraping, hold your plastic putty knife at a shallow 15-to-30-degree angle. This prevents the corners of the blade from digging into the plaster. You'll often find that the decorative top layer comes off first, leaving behind a stubborn backing paper. Don't rush; re-soak this backing layer and wait another few minutes rather than trying to scrape it dry. If you encounter "mystery" patches of old plaster repair or different types of adhesive from previous decades, treat those areas with extra solution rather than extra pressure.
Once the paper is gone, the final step is neutralizing the wall. Use a mixture of warm water and a small amount of trisodium phosphate (TSP) substitute to wash away every trace of glue residue. If you leave even a thin film of old paste on the wall, your new paint will eventually crack or peel. A clean, smooth plaster wall is the only acceptable foundation for a high-end finish.
Request a professional wallpaper removal estimate today
Restoring Your Plaster Walls: Why Skim Coating is the Final Step
Once the exhausting task of removing wallpaper from plaster walls is complete, the surface revealed is rarely ready for immediate decoration. You are likely staring at a landscape of hairline cracks, small gouges from the scraping process, and perhaps areas where the plaster has become soft or chalky over the decades. Generic guides often suggest a quick coat of primer, but a high-end result requires a more disciplined restoration. This is where skim coating becomes an essential phase of the project. It involves applying a thin, consistent layer of joint compound over the entire surface to hide imperfections and create a uniform texture that looks like new construction.
In historical districts, the underlying structure has often shifted, leading to structural stress that the wallpaper was previously hiding. Because of this, professional plaster wall repair in Bergen County is frequently a necessary step before any aesthetic work begins. Addressing these foundational issues now ensures that your new finish won't crack six months after the project is finished. We view this stage as a vital investment in your home's longevity rather than just a cosmetic fix.
Repairing Cracks and Gouges
Structural cracks require more than just a smear of spackle. You must bridge these gaps with self-adhesive mesh tape and a setting-type joint compound, which hardens through a chemical reaction rather than just evaporation. This provides the tensile strength needed to prevent the crack from reappearing. When applying the compound, use a wide taping knife to "feather" the edges. This technique involves gradually thinning the layer of mud as you move away from the repair, making the patch virtually invisible once sanded. If the plaster feels chalky or dusty, it won't bond well with new paint. You'll need to use a specialized masonry conditioner or a high-solids primer to stabilize the surface before proceeding.
The Final Polish: Priming and Painting
The final stage of your restoration is the transition to interior painting. Even after thorough cleaning, microscopic traces of old wallpaper adhesive can linger in the pores of the plaster. An oil-based or high-quality synthetic primer is non-negotiable here; it seals in that residue so it doesn't reactivate and cause your new paint to bubble. Once the primer is dry and lightly sanded, you finally have the clean, smooth canvas required for a premium finish coat. This meticulous preparation is what separates a DIY attempt from a professional-grade transformation that adds genuine value and comfort to your space.
Ready for a professional transformation? Contact Hudson Line Painters for a free estimate.
Transforming Your Historic NJ Home with Confidence
Success when removing wallpaper from plaster walls depends on a deep respect for your home's original craftsmanship. You've learned that protecting the delicate lath and plaster bond is paramount, requiring a disciplined approach to moisture and heat. Whether you employ enzyme-based gels or careful steaming, the process must prioritize the structural integrity of your walls. A professional finish is only possible after thorough neutralizing and expert skim coating to erase the scars of the past.
Hudson Line Painters specializes in plaster repair and restoration for homeowners throughout Hudson, Union, and Bergen Counties. We bring technical precision to every project, ensuring meticulous site protection and a spotless cleanup. Our team treats your property with the same care we would our own, providing peace of mind through every stage of the renovation.
Get a Professional Wallpaper Removal Estimate in NJ
You don't have to settle for dated decor or the stress of a failing DIY project. By following these professional techniques, you can restore your walls to their original glory and create a beautiful foundation for your next design chapter. We look forward to helping you achieve the smooth, lasting results your home deserves.
Frequently Asked Questions
Can I remove wallpaper from plaster walls without damaging them?
Yes, you can achieve damage-free results by using a patient, chemical-based approach. Removing wallpaper from plaster walls requires you to soften the adhesive without saturating the brittle lime substrate. By using a plastic putty knife and allowing the stripping solution to dwell for at least 15 minutes, you can lift the paper without gouging the wall. This meticulous method protects the structural keys that hold your plaster to the wood lath.
Is it better to steam or use chemicals on old plaster walls?
Chemical enzyme strippers are usually the superior choice for historic plaster. While steam is effective for thick vinyl, the high heat can damage 100-year-old plaster keys and cause the surface to buckle. Enzyme gels offer a no-drip application that stays in place, breaking down old wheat pastes without soaking the wall. This controlled method minimizes the risk of structural failure in the older homes found throughout Bergen and Hudson Counties.
What happens if the plaster starts crumbling during wallpaper removal?
If you notice crumbling, stop the removal process immediately to prevent further structural damage. This usually means the plaster has separated from the wood lath behind it. You'll need to stabilize the area with a bonding agent or setting-type compound before continuing. In many historic NJ homes, this is a sign that professional plaster repair is required to ensure the wall remains safe and secure for your future design plans.
How do I remove the sticky glue residue left on the plaster?
You must wash the wall with a solution of warm water and a TSP substitute to neutralize the adhesive. Removing wallpaper from plaster walls often leaves behind a thick film of starch-based glue that can ruin a new paint job. Scrub the surface in small sections and rinse with a clean sponge. Ensuring every trace of residue is gone is the only way to prevent your new finish from peeling or cracking later.
Do I need to skim coat my walls after removing the wallpaper?
Skim coating is a necessary final step for almost every plaster restoration project. Even with careful removal, the underlying wall will likely have hairline cracks, small gouges, or an uneven texture from decades of wear. Applying a thin, professional layer of joint compound smooths out these imperfections. This creates a uniform, gallery-quality surface that is essential for a high-end interior painting result in your Hoboken or Jersey City home.
Can I just paint over old wallpaper on plaster walls?
We never recommend painting over wallpaper on plaster. The water in the paint can soak through the paper and reactivate the old glue, leading to unsightly bubbles and peeling. The seams of the paper will also remain visible, regardless of how many coats you apply. Removing the paper and properly preparing the plaster substrate is the only professional way to ensure a durable, beautiful finish that adds value to your property.
How much does professional wallpaper removal cost in NJ?
Professional removal costs in New Jersey depend on the number of layers and the complexity of the project. A single room with modern paper is less intensive than a historic room with multiple layers of painted-over Victorian paper. While rates vary across the industry, the investment reflects the skill required to preserve fragile plaster. We provide detailed assessments to help you understand the specific requirements for your home's restoration and long-term value.
What tools do I need specifically for plaster wall wallpaper removal?
You need a scoring tool, a pressurized sprayer, and plastic scrapers to protect the soft plaster surface. Metal scrapers are too aggressive and often cause deep nicks that require extra repair work. You should also use leak-proof drop cloths to protect historic hardwood floors from the wet "sludge" created during removal. Finally, a TSP substitute and a high-quality sponge are essential for neutralizing the wall and removing the final traces of stubborn glue residue.


